Models > 2477A

2477A - Overview

Models starting with 2477A

Keep searches simple, eg. "belt" or "pump".
Light Bulb - 40W – Part Number: 8009
Light Bulb - 40W
★★★★★
★★★★★
(66)
PartSelect #: PS884734
Manufacturer #: 8009
This an authentic OEM 40-Watt replacement light bulb, used in a number of household appliances. It is specially designed to withstand extreme temperatures, which is why these replacement bulbs are mos...
$11.73
  In Stock
Order within the next 49 mins and your part ships today!
Flat Style Oven Igniter – Part Number: 5303935066
Flat Style Oven Igniter
★★★★★
★★★★★
(49)
PartSelect #: PS470129
Manufacturer #: 5303935066
This is a flat style oven igniter used to light the oven burner in a gas range. When the element in this igniter glows white hot, the gas is released from the safety valves, which lights the oven burn...
$35.86
  In Stock
Order within the next 49 mins and your part ships today!
Condenser Fan Motor Kit – Part Number: 833697
Condenser Fan Motor Kit
★★★★★
★★★★★
(34)
PartSelect #: PS395284
Manufacturer #: 833697
This condenser fan motor kit is designed for use with refrigerators. This fan draws air through the condenser coils and over the compressor. It does this with the goal of cooling the warm refrigerant ...
$63.18
  In Stock
Order within the next 49 mins and your part ships today!
Screw – Part Number: WP400021-1
Screw
★★★★★
★★★★★
(1)
PartSelect #: PS11742240
Manufacturer #: WP400021-1
Sold individually.
$13.25
  In Stock
Order within the next 49 mins and your part ships today!
Light Bulb – Part Number: 316538904
Light Bulb
★★★★★
★★★★★
(11)
PartSelect #: PS12751166
Manufacturer #: 316538904
This OEM 40 watt appliance light bulb is used for some ranges, refrigerators, freezers, and microwaves. Simply locate the existing bulb, unscrew it from its socket, and replace with new light bulb. If...
$19.73
  In Stock
Order within the next 49 mins and your part ships today!
Screw – Part Number: W11233072
Screw
★★★★★
★★★★★
(6)
PartSelect #: PS12349731
Manufacturer #: W11233072
This is a multi-use and multi-appliance screw. It can be used on a microwave, refrigerator, range/oven, air conditioner, dehumidifier, washer, or dryer. The measurements of this screw are 8 x 1/2 inch...
$20.79
  In Stock
Order within the next 49 mins and your part ships today!
Run Capacitor – Part Number: WP65889-4
Run Capacitor
★★★★★
★★★★★
(5)
PartSelect #: PS11743364
Manufacturer #: WP65889-4
This part helps the compressor kick on and off while maintaining a constant temperature to keep things frozen in your freezer. If you are noticing temperature issues with your refrigerator or freezer,...
$66.72
  In Stock
Order within the next 49 mins and your part ships today!
Hose Clamp – Part Number: WP596669
Hose Clamp
★★★★★
★★★★★
(1)
PartSelect #: PS11743008
Manufacturer #: WP596669
This hose clamp is used in a wide variety of household appliances. Most often it is found in washers, dishwashers, refrigerators, freezers, dehumidifiers, garbage disposals, or air conditioners. This ...
$11.80
  In Stock
Order within the next 49 mins and your part ships today!
Oven Rack – Part Number: 316067902
Oven Rack
★★★★★
★★★★★
(4)
PartSelect #: PS437923
Manufacturer #: 316067902
Oven racks can become rusted or damaged from constant use, and need to be properly maintained and cleaned to keep them working properly. If you notice that your oven rack has been damaged or rusted, t...
$81.35
  In Stock
Order within the next 49 mins and your part ships today!
Single Outlet Water Valve Kit – Part Number: 4318047
Single Outlet Water Valve Kit
★★★★★
★★★★★
(13)
PartSelect #: PS358631
Manufacturer #: 4318047
This part is a solenoid-operated switch located at the bottom of the refrigerator. When the water inlet valve is turned on, water is released from the supply line through the water valve and into the ...
$36.58
  In Stock
Order within the next 49 mins and your part ships today!
Screw – Part Number: WP488729
Screw
★★★★★
★★★★★
(1)
PartSelect #: PS11742721
Manufacturer #: WP488729
Metallic screw that is less than an inch long. Does not include the plastic washer.
$7.91
  In Stock
Order within the next 49 mins and your part ships today!
Ice Cube Tray – Part Number: WP61002140
Ice Cube Tray
PartSelect #: PS11743133
Manufacturer #: WP61002140
This ice cube tray is located inside your refrigerator and is eleven inches long, with 48 molds. It comes in white and is made entirely from plastic. If your tray is broken, cracked, or damaged, repla...
$26.45
  In Stock
Order within the next 49 mins and your part ships today!

Common Symptoms of models starting with 2477A

[Viewing 19 of 19]
Gas igniter glows, but will not light
Fixed by
these parts
Fixing Fixing Fixing
Show All
Will Not Start
Fixed by
these parts
Fixing Fixing Fixing
Show All
Little to no heat when baking
Fixed by
these parts
Fixing Fixing
Show All
Fridge too warm
Fixed by
these parts
Fixing Fixing Fixing
Show All
Leaking
Fixed by
these parts
Fixing Fixing Fixing
Show All
Freezer section too warm
Fixed by
these parts
Fixing Fixing Fixing
Show All
Noisy
Fixed by
these parts
Fixing Fixing
Show All
Ice maker not making ice
Fixed by
these parts
Fixing Fixing
Show All
Fridge and Freezer are too warm
Fixed by
these parts
Fixing Fixing
Show All
Fridge runs too long
Fixed by
these parts
Fixing Fixing
Show All
Element will not heat
Fixed by
these parts
Fixing
Show All
Gas smell
Fixed by
these parts
Fixing
Show All
Clicking sound
Fixed by
these parts
Fixing
Show All
Oven not heating evenly
Fixed by
these parts
Fixing
Show All
Too warm
Fixed by
these parts
Fixing Fixing
Show All
Freezer not defrosting
Fixed by
these parts
Fixing
Show All
Light not working
Fixed by
these parts
Fixing
Show All
Little to no heat when broiling
Fixed by
these parts
Fixing
Show All
Ice maker won’t dispense ice
Fixed by
these parts
Fixing
Show All
Keep searches simple. Use keywords, e.g. "leaking", "pump", "broken" or "fit".
Oven quit heating.
After reading up on the problem of the gas oven not lighting I decided I needed to install a new igniter. I had read where some people just pulled a panel off the back and installed a new one.. yeah, no such luck with this model so I had to crawl into the broiler drawer space [which I had to clean out first]. Note, if you wear trifocal glasses you might as well close your eyes and replace it by feel because there is no way to tilt your head back enough to see what you are doing and still get both arms and your chest in a broiler. Also be sure to remove all cats and dogs from the area before starting. They seem to think they can help or it's a game of hide and seek and they want to hide with you.. they were no help at all.
Other than that, it was quite easy.
Parts Used:
Flat Style Oven Igniter
  • John from Darlington, SC
  • Difficulty Level:
    Easy
  • Total Repair Time:
    15 - 30 mins
  • Tools:
    Nutdriver
566 of 619 people found this instruction helpful.
Was this instruction helpful to you?
Thank you for voting!
Oven was difficult to light, then stopped lighting altogether
1. Turned off circuit breaker to stove
2. Removed the two screws holding down the floor of the oven (screws are at back.), and then lifted it out.
3. Removed the nut holding down the flame guard, and lifted it off.
4. Opened the bottom drawer.
5. Removed the protective cover in the back left of the oven at the bottom, first removing the one screw at the bottom that holds it. This reveals a white plug, presumably going to a fuse.
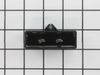
6. Disconnected the white plastic connector, lifting its front tab to release it.
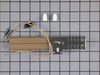
7. The igniter wires go to two lugs that attach at the floor of the oven at the back (one goes via the now free white connector). Slide back the plastic lug covers and use pliers to pull off the lugs. Note that the wider one (on the right) goes to the top of the igniter, while the narrower one (on the left) goes to the bottom of the igniter via the white plastic connector.
8. Removed the two bolts holding the igniter.
9. At this point, the igniter comes out. Nice, since it means you can work on the wires in comfort.
10. Slide the flame retardant sleeves away from the igniter. I found in-line connections about 1.5 inches from the igniter, and cut the wires next to these (on the side away from the igniter, of course.), and stripped the final 3/8 inch. Shorten the wires on the replacement igniter so that they are 3 or 4 inches long, slide on the flame retardant sleeves, then strip the final 3/8ths inch. Use the provided caps to connect the wires. Bottom wire goes to the plastic connector, top wire goes to the wide lug.
11. Install the new igniter by connecting the lugs, sliding on their protective plastic sleeves, reconnecting the white plastic connector, screwing in the two igniter mounting screws, and reinstalling the corner cover. Put back the flame shield and floor of the oven. Turn on the circuit breaker, and it works!
Parts Used:
Flat Style Oven Igniter
  • Ritchie from Ithaca, NY
  • Difficulty Level:
    A Bit Difficult
  • Total Repair Time:
    15 - 30 mins
  • Tools:
    Nutdriver, Pliers, Screw drivers
279 of 364 people found this instruction helpful.
Was this instruction helpful to you?
Thank you for voting!
Sometimes the condenser fan would start causing the refrigerator to overheat.
Unplug the appliance.
Removed the screws holding the back panel.
Removed the fan blade.
removed 3 screws holding the condenser fan.
Remove the 3 metal brackets attached to the fan.
(First note which studs the brackets are attached to. Attach the 3 metal brackets to the new fan. (New screws were supplied)
Cut and strip the wire about two inches from the fan.
Cut and strip the new wire. I cut the new wire in half (about 6 inches.) Connect the two wires, twist and used 2 wire nuts. Tie wrap the wire to the wire harness. Mount the new fan (three screws)
Screw the back panel back on.
Mount the new
Parts Used:
Condenser Fan Motor Kit
  • Tom from Franklin, WI
  • Difficulty Level:
    A Bit Difficult
  • Total Repair Time:
    15 - 30 mins
  • Tools:
    Nutdriver, Pliers
180 of 204 people found this instruction helpful.
Was this instruction helpful to you?
Thank you for voting!