Models > 1105904251

1105904251 Kenmore Washer - Overview

Sections of the 1105904251

[Viewing 4 of 4]
Keep searches simple, eg. "belt" or "pump".
Screw, 8/18 x 3/8 – Part Number: WP90767
Screw, 8/18 x 3/8
★★★★★
★★★★★
(2)
PartSelect #: PS11746840
Manufacturer #: WP90767
This screw is sold individually.
$5.42
  In Stock
Hose Clamp – Part Number: WP285655
Hose Clamp
★★★★★
★★★★★
(2)
PartSelect #: PS11740613
Manufacturer #: WP285655
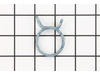
The hose clamp is used to hold the water hose in place which will prevent the hose from leaking water. Sometimes the clamp may lose its ability to latch on, causing a leaking washer. For the installat...
$11.10
  In Stock
Lid Hinge Mounting Screw – Part Number: WPW10119828
Lid Hinge Mounting Screw
★★★★★
★★★★★
(2)
PartSelect #: PS11748588
Manufacturer #: WPW10119828
Sold individually. NOTE: The color on the screw may not be the same as the image, but will still function the same.
$11.80
  In Stock
Front Top Lock – Part Number: WP18776
Front Top Lock
★★★★★
★★★★★
(1)
PartSelect #: PS11738705
Manufacturer #: WP18776
This part is used to secure the top panel to the cabinet. Sold individually.
$13.19
  In Stock
Support Roller Clip – Part Number: WP90296
Support Roller Clip
★★★★★
★★★★★
(1)
PartSelect #: PS11746832
Manufacturer #: WP90296
Sold Individually.
$5.36
  In Stock
Lid Hinge Bearing – Part Number: WP21258
Lid Hinge Bearing
PartSelect #: PS11738874
Manufacturer #: WP21258
This is the bearing for the lid hinge. Sold individually.
$11.10
  In Stock
Spanner Nut – Part Number: WP21366
Spanner Nut
PartSelect #: PS11738884
Manufacturer #: WP21366
Right hand threaded nut holds the tub in place in direct drive, top loading washing machines. To remove the spanner nut you will need a spanner wrench.
$10.83
  In Stock
Screw – Part Number: WP98165
Screw
★★★★★
★★★★★
(2)
PartSelect #: PS11747542
Manufacturer #: WP98165
This screw is a little under an inch long and is made of metal. It is used with a refrigerator's ice maker assembly. Sold individually.
$7.76
  In Stock
Washer Transmission Stem Seal – Part Number: WP8577376
Washer Transmission Stem Seal
PartSelect #: PS11746747
Manufacturer #: WP8577376
Sold individually.
$11.10
  In Stock
Screw – Part Number: WP681414
Screw
★★★★★
★★★★★
(1)
PartSelect #: PS11743744
Manufacturer #: WP681414
This screw is sold individually.
$7.76
  In Stock
Hose Clamp – Part Number: WP356138
Hose Clamp
★★★★★
★★★★★
(1)
PartSelect #: PS11741854
Manufacturer #: WP356138
This clamp helps to prevent leaking by holding the end of water hose in place.
$10.83
  In Stock
Lid Hinge Pad – Part Number: WP21097
Lid Hinge Pad
PartSelect #: PS11738862
Manufacturer #: WP21097
Sold individually.
$10.83
  In Stock

Questions And Answers for 1105904251

Be the first to ask our experts a question about this model!

Common Symptoms of the 1105904251

[Viewing 5 of 5]
Leaking
Fixed by
these parts
Fixing Fixing Fixing
Show All
Noisy
Fixed by
these parts
Fixing
Show All
Will not agitate
Fixed by
these parts
Fixing Fixing
Show All
Will not drain
Fixed by
these parts
Fixing
Show All
Lid or door won’t close
Fixed by
these parts
Fixing
Show All
Keep searches simple. Use keywords, e.g. "leaking", "pump", "broken" or "fit".
broken clip on top panel hold down
pressed clip into hole on top of front panel. first remove two philip screws that hold filter so you can lift top up.
Parts Used:
Front Top Lock
  • Mark from Huntington Station, NY
  • Difficulty Level:
    Easy
  • Total Repair Time:
    Less than 15 mins
  • Tools:
    Screw drivers
15 of 26 people found this instruction helpful.
Was this instruction helpful to you?
Thank you for voting!
Dryer Top Panel is Loose
1) Unplug power cable from dryer.
2) Remove the 2 screws that secure the chute for lint filter screen with
Phillips head screwdriver.
3) Remove the lint filter screen.
4) Depress plastic locking clip on each side with putty knife to release
tension and lift up top panel to clear the locking clips. Each locking
clip is located 2-1/2 inches from the front edge of side panel.
5) Lift the top panel and lean against the wall for support. If dryer top
panel cannot be raised all the way due to cabinet(s) above, tape
the dryer top panel to cabinet above or have somebody hold the
top panel for temporary support.
6) Install the new metal locking clips. Ensure that the elongated tab
of the metal locking clip is towards the front of dryer. Compress
locking clip lightly with pliers and push down into the hole.
7) Lower the dryer top panel and press it down in place over the metal
locking clips for a tight fit.
8) Reinstall the 2 screws to secure the lint filter chute.
9) Reinstall lint filter screen.
10) Reconnect power cable for dryer.
11) Turn on dryer and inspect that all dryer panels (top, sides and
front) are tight and secured.
Repair Duration: 5 minutes
Parts Used:
Front Top Lock
  • MONTE from CHESAPEAKE, VA
  • Difficulty Level:
    Very Easy
  • Total Repair Time:
    Less than 15 mins
  • Tools:
    Pliers, Screw drivers
5 of 5 people found this instruction helpful.
Was this instruction helpful to you?
Thank you for voting!
machine wouldn't turn on when lid closed
replaced missing screw and pad and now machine works perfectly
Parts Used:
Lid Hinge Mounting Screw Lid Hinge Pad
  • Ellen from NYACK, NY
  • Difficulty Level:
    Easy
  • Total Repair Time:
    Less than 15 mins
  • Tools:
    Screw drivers
2 of 3 people found this instruction helpful.
Was this instruction helpful to you?
Thank you for voting!