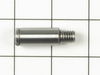
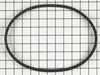
This genuine OEM washer has a 3/4 inch outside diameter. This thrust washer can be used on most makes and models of dryers. A complete list of compatible dryers is available below. The washer is found...
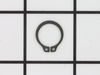
The metal retaining ring, which is under an inch long, holds the rear wheels on the axels of the dryer. The main reason why it would need to replaced is if the retaining ring has sprung out of place o...
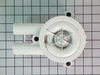
This pump is attached to the motor and helps expel water from the washing machine. It is activated after the spin speed is maintained for a specific period of time.
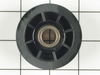
This v-shaped spin belt helps transfer power from the motor to the transmission to help pump the water in and out of the washer. It also helps runs the spin cycle in the washer.
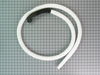
This hose clamp is used in a wide variety of household appliances. Most often it is found in washers, dishwashers, refrigerators, freezers, dehumidifiers, garbage disposals, or air conditioners. This ...
If your washer shakes or vibrates loudly when it reaches its max speed, make sure the 4 levelling legs are even. Adjust the legs so that the machine is level, and tighten the locking nuts on the legs ...
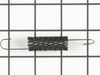
This spring retaining clip is just under 1 inch long. The clip is made entirely of metal and is attached to the back wall of the washer, under the console. If your washer is vibrating and louder than ...
The hose clamp is used to hold the water hose in place which will prevent the hose from leaking water. Sometimes the clamp may lose its ability to latch on, causing a leaking washer. For the installat...
Had to remove pump-not easy. Nothing wrong with pump, but had to trash it to get it off the motor shaft, so I had to replace it, too.
Pop up top of cabinet and remove front panel. (I leaned unit back against a wall to facilitate internal access once panel was removed.)
Remove motor assy - 4 screws & connector
... Read more.
Remove 3 pump screws (torx) and 2 hoses. Pry pump off motor shaft (not easy). I used a heat gun to help expand the plastic fitting on the motor shaft.
Remove old belt, put on new belt. (Do not use automotive belt-this belt is designed to slip because it also spins the tub. The tub will not spin when it's full of water, and the pump will not pump the water if the tub is bogging down the pump. Plus, you will probably overheat the motor.)
Press new pump back on motor shaft (advise not to re-use old pump as seals were probably damaged by removal process.)
Caution: Pressing pump onto motor shaft may cause pump rotor to bind in housing. Try to press it on a little too far so you back off slightly.
Replace pump screws.
Replace motor, giving attention to belt alignment.
Replace motor screws and connector.
Re-attach hoses on pump.
Button up cabinet.
Done.
The hardest part was removing the pump. If not for that, it would have been a 15-min, $20 repair.
Because I felt it wise to replace the pump also, it was a $70 repair.
It took some trial and error but overall not a difficult project. 1. Take the front covers off. 2. Undo the pully spring to loosen belt 3. Remove belt off idler pulley wheel and free up belt from the large wheel. 4. Disconect the wiring harness and the hoses. 5. Undo the motor mounting bolts (4) 6. Take motor out of washer an
... Read mored remove the 3 screws holding the pump to the motor. 7. The pump had melted to the shaft and required I chisel the pump off of the shaft. 8. Attach new pump paying attention to where the belt is positioned. 9. Reattach the motor bolts, hoses, and wiring harnes. 10. Attach the belt and test the pump. 11. Put the front back on.
Water was leaking on the floor during the wash cycle and especially during draining of the washer. I removed the front panel at ground level and watched while draining after a rinse.
I t was obvious that water was spraying from a hole in the rubber end of the hose (the hose is a fused assembly of a plastic section and a rubber
... Read more section).
So, I finished draining, removed the hose (required pliers to squeeze off a hose clamp).
Upon inspecting the hose, it was also apparent that the hole was caused by rubbing against a support bracket for the motor. This should not happen, but it did because the plastic standoff supposed to keep the hose away from the bracket was installed 180 degrees backwards.
So, I simply replaced the hose and turned the bracket around to the correct orientation.
Everything worked as planned and my repair cost was much less than if I had called someone out.


.gif "MISCELLAEOUS INFORMATION Diagram and Parts List for PALW680RAW Amana Washer")