If your gas oven is not heating at all, or not heating properly the most commonly problem is a faulty igniter. The bake igniter is used in gas overs and ranges, the element in the igniter gets hot eno...
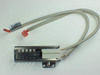
This OEM control panel switch, also known as a limit switch or limit sensor, is mounted within the control panel housing on ranges. It is a small component that is responsible for transferring power t...
We're sorry, but our Q&A experts are temporarily unavailable.
Please check back later if you still haven't found the answer you need.
2 questions answered by our experts.
Sort by:
< Prev
1
Next >
Search filter:
Clear Filter
Your search term must have 3 or more characters.
Keep searches simple. Use keywords, e.g. "leaking", "pump", "broken" or "fit".
Sorry, we couldn't find any existing answers that matched.Try using some different or simpler keywords, or submit your new question by using the "Ask a Question" button above!
Eeica
February 1, 2020
I just installed the unit and two of the six burners will not ignite.. the two far left thanks in advance for any help
For model number PRG366GH
Hello Eeica, Thank you for your inquiry. Check the gas supply tubes to those two burners to make sure they are free from debris, and connected properly. We would also recommend checking the burner valve, and the burner switch. Hope this helps.
1) Two left burners do not light up - no gas, 4 other burners have gas
2) Three burners do not ignite. Need to use lighter to use.
For model number PRG366GH
Hello Suresh, thank you for your question. According to our research, you may need to check the following parts: the left rear burner tube, part number PS8733668, the left front burner tube, part number PS8733669, the valve, part number PS8729315, and the surface burner tube, part number PS8728076. Moreover, you may need to replace the burner surface igniter, part number PS8728077. We hope this information helps!
The sole review for this part by Andrew was most helpful and accurate with one exception: he said that there were two nuts Which needed to be removed in order to pull off the front knob panel. There were actually two on each end for a total of four, which confused me, as I wondered if I had the right ones. Another thing that would be help
... Read moreful for somebody considering doing this repair is to know that it takes a deep quarter inch socket With two 6 inch extensions to reach these nuts through holes in the interior side panels. Also, take a look at the replacement potentiometers, and you’ll see that there’s a slot that can be lined up so that they can be pulled off the side of the shaft rather than off the front of the shaft. This repair took me about six hours. I’m mechanically inclined and work methodically, but since I’ve never done this repair before it was quite time-consuming.