This lid lock, also known as a door lock, is a genuine OEM replacement part for your washing machine. The lid lock keeps your washer lid closed during the washing cycle. If this part is broken, your w...
$83.87
In Stock
Order within the next 8 hrs and your part ships today!
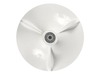
This drain pump assembly is for washers. Drain pump assembly removes water from the washer during the drain portion of the cycle. The assembly may include multiple parts; refer to your parts diagram f...
$48.21
In Stock
Order within the next 8 hrs and your part ships today!
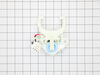
This lid lock striker is sourced directly from the manufacturer for use in top-load washing machines. It is a white, plastic component located on the underside of the washing machine lid. When the lid...
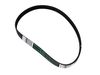
This is a drive belt for various models of dryer. This belt is responsible for allowing the drive motor to rotate the dryer drum. Over time and with use, this belt will wear out and if it becomes dama...
$11.48
In Stock
Order within the next 8 hrs and your part ships today!
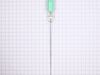
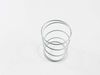
This rod and spring assembly is designed to fit with washing machines and is made by the original manufacturer of your washer. It is a part of the washer suspension system that helps to stabilize and ...
$12.69
In Stock
Order within the next 8 hrs and your part ships today!
This is a manufacturer-made suspension rod and spring assembly for your washing machine. This suspension rod is one of four suspension rods that make up the entirety of the inner suspension of your wa...
$13.43
In Stock
Order within the next 8 hrs and your part ships today!
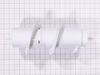
This auger is an authentic OEM replacement part specially designed for washing machines. It is a white, spiral-shaped agitator located in the center of the wash basket. During the wash cycle the auger...
$39.76
In Stock
Order within the next 8 hrs and your part ships today!
This lid lock bezel, also known as a trim piece, is a genuine OEM part designed for washing machines. It is approximately 3.5 inches long. The bezel is a white, plastic frame that fits around the peri...
$8.54
In Stock
Order within the next 8 hrs and your part ships today!
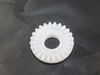
This is a clutch for your washing machine. The clutch is made of a white plastic material and is used within washing machines to engage and disengage the transmission during the wash and spin cycles, ...
$8.54
In Stock
Order within the next 8 hrs and your part ships today!
This is a mode shifter or shift actuator for models of washing machine. Mode shifters are designed to change the function of the washing machine motor, between spinning cycles and agitation, and is us...
$39.40
In Stock
Order within the next 8 hrs and your part ships today!
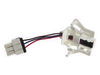
This is a speed sensor for a variety of washing machine models. Speed sensors are used to monitor the speed of the washer drum and communicate it to the electronic control board to slow or quicken it....
$11.71
In Stock
Order within the next 8 hrs and your part ships today!
Questions And Answers for GTW460ASJ9WW
Ask our experts a question about this model and we'll get back to you as soon as possible!
19 questions answered by our experts.
Sort by:
< Prev
1
2
3
Next >
Search filter:
Clear Filter
Your search term must have 3 or more characters.
Keep searches simple. Use keywords, e.g. "leaking", "pump", "broken" or "fit".
Sorry, we couldn't find any existing answers that matched.Try using some different or simpler keywords, or submit your new question by using the "Ask a Question" button above!
Terry
November 11, 2021
Doesn't use enough cold water even on highest water level. The clothes don't all get wet unless I stand and spin the tub while it is filling. Then the clothes all get bunched up on one side of the tub, which of course, throws it out of balance. Nigh to impossible to spread the clothes out so it balances the load and the machine doesn't go crazy banging and shaking. Twists clothes together and some items wind up inside other items.
For model number GTW460ASJ9WW
Hello Terry, Thank you for the question. We suggest checking to make sure the Cold Water Tap is on all the way. If the water Flow is still slow, you may need to replace the Water Inlet Valve, PartSelect Number: PS12726769. If you need help placing an order, customer service is open 7 days a week. Please feel free to give us a call. We look forward to hearing from you!
the washer wont fill, i checked the water inlets and both clear, i change the lid lock switch im reaching the point of total frustration
For model number GTW460ASJ9WW
Hi Todd, thank you for getting in touch. Based on our understanding of the issue, we would recommend checking the selector switch assembly, part number PS12754096, as it is most likely faulty and may need to be replaced. We hope this sorts out your problem!
STARTS BEEPING WHEN ITS NOT RUNNING. SOUNDS LIKE MOORIS CODE.
For model number GTW460ASJ9WW
Hi Craig, thank you for contacting us. Based on our research, the beeping occurs if the interface control board is shorting out. It comes along with the control panel assembly, part number PS12703270. You may need to replace it to fix the issue. We hope this information helps!
Washer intermittently will fill and agitate but won't drain and spin. Beeper for it being finished will sound but still full of water. Will normally correct itself eventually after using the drain and spin cycles multiple times or other times will just finish on its while we are away
For model number GTW460ASJ9WW
Hi Bill, thank you for contacting us. Based on our understanding of the issue, the problem is most likely related to the main control board, part number PS16743401. We hope this solves your problem!
Hello Kimberly, Thank you for the question. if the Appliance has no power, we suggest checking the outlet it is plugged into first. Make sure it is operating and sending power to the appliance. Check the Power Code to make sure there is no damage and all wire connectors in the terminal block are secure. You can also test the Start Capacitor with a multi meter to check for continuity. If everything checks out good, you may have a defective User Interface Control Board. We hope this helps!
Drain all the water out of the tub with a shop vac Remove rear drain hose and drained rest of water into a bucket Remove small rear panel (bottom left hand corner) where the drain hose connects Tipped washer up about 45 degrees to get underneath it - Supported it with a few paint cans Remove internal drain hose/clamps
... Read morefrom pump - w/ pliers Remove belt cover (gray plastic) with socket - 3 bolts Remove wire assembly plug from socket Remove old drain pump with socket - 3 bolts Install new drain pump - 3 bolts - plug wire assembly into socket Reinstall belt cover - 3 bolts Reinstall hose to drain pump (note panel will be inside washer) Feed drain hose panel through hole and reinstall - 1 nut Re attached drain hose to exterior drain plug You are done !
Very simple to repair. Be sure to drain the tub outside or into the sump pump then lay the washer on its side. The pump is right there on the bottom of the basket with 3 bolts. You will also need to remove the belt cover to get to the plug. So simple and saves you hundreds off repair man prices.
Turn off hot and cold water supply valves feeding washer. Disconnect both water hoses from washing machine. Remove two screws (one on each side) from upper silver colored metal plate on back of washer to allow access to (blue) water inlet valve. Slightly lift the bottom portion of metal plate and slide to release hooks for
... Read moreeasy removal. Pull back and tilt forward plastic control panel to get it out of your way. Disconnect two electrical connections (one on each side) of water inlet valve. One of these came off easily but the other one was stubborn and I had to force it off with a screw driver. If there is an easier way I don't know what it is. Remove two screws from water inlet valve. (one on each side) Gently pull up on stainless steel water temperature sensor located in the middle of the water inlet control valve. It has a black wire connected to it so be careful. Once you have disconnect the sensor you can remove the water inlet valve. If you look closely you will see a small blue O-ring in the hole where you removed the water temp sensor from the water inlet valve. The new valve DOES NOT come with a replacement O-ring so you will have to re-use the old one. I used a small jeweler's screwdriver to get the old out of the hole. Don't forget to install the O-ring or your washer WILL leak! Put everything back together in reverse order. Check hose connections for leaks. Hope this helps somebody. Wish I had known about the O-ring. It would have saved me a headache.