Part Location Diagram of 530069247 Poulan Fuel Line
See part A-24 in the diagram
( Grid squares measure 1x1 inch )
Customer Service Representative

Get in touch, we're here to help!

Daily 8am - 9pm EST

customerservice@partselect.com

Fuel Line 530069247

 Fits your 137E!
★★★★★
★★★★★
4 Reviews

Rated by 8 customers 

Easy 

1- 2 hours 

Ratings submitted by customers like you who bought this part.

$ 6.62
  In Stock
Get FREE EconoShip on orders over $100! T&C apply

Get this part fast! Average delivery time for in-stock parts via standard shipping: 1.8 days.

 Fits your 137E!
PartSelect Number PS9472280
Manufacturer Part Number 530069247
Manufactured by Poulan
Product Description

Fuel Line Specifications

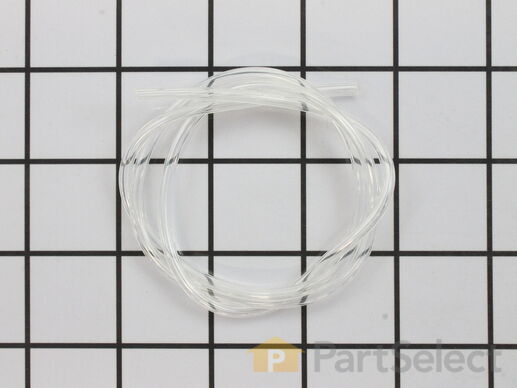
This is the replacement fuel line 25 Inch for several OPE products that use small engines. The fuel line carries fuel from the tank to the carburetor. Over time, the fuel line can become badly clogged, and it can become brittle as well. When the fuel line is badly clogged or cracked, fuel can leak out and it can make it difficult to start or run the engine. To replace the fuel line, carefully disconnect the old line from the carburetor and from the fuel grommet, then replace it with the new line. This fuel line is 25 inches in length and is made of clear plastic. The fuel line is sold individually and is an OEM part sourced directly from the manufacturer.
How Buying OEM Parts Can Save You Time and Money

How Buying OEM Parts Can Save You Time and Money

Troubleshooting
This part fixes the following symptoms:
Will Not Start | Engine stops after a few seconds or minutes
This part works with the following products:
Chainsaw, Trimmer, Leaf Blower / Vacuum, Hedge Trimmer.
This part works with the following products:
Poulan, Weed Eater, Husqvarna, Paramount.
Back to Top
Customer Reviews
Average Rating:
★★★★★
★★★★★
4 Reviews
3.8
Filter By Rating:
  • 5 Stars
    2
  • 4 Stars
    1
  • 3 Stars
    0
  • 2 Stars
    0
  • 1 Star
    1
Sort by:
  • 1
Sorry, we couldn't find any existing reviews that matched. Try using some different or simpler keywords.
  • 1
Customer Repair Stories
 Average Repair Rating: 3.2 / 5.0, 8 reviews. What's this?
Sort by:
  • 1
Sorry, we couldn't find any existing installation instruction that matched.
Fuel line deterioration and carb overhaul
The machine was offered for free on FB marketplace. The person tried a rebuild of the carb, but could not figure out how to connect the fuel line, which feeds from the tank above the carb. I couldn’t either, so I went to a local parts dealer, who could not find a diameter the same size (it’s tiny). I assumed there may have been a fitting in the tank, but if so, it was absent. The only parts that were found in the tank: a large filter in a 3/4”piece of larger tubing and this tiny fuel line was inserted into the other end. The resulting arrangement was long enough to reach the hole in the tank.Since the machine looked spectacularly clean, I used these parts to make it run.

1. Using diagonal cutters, I cut a very sharply angled end on the small line.

2. I generously lubricated the new line and the hole in the tank. I then took angled end of the new line and inserted it into the hole. Using a screwing type motion , I slowly worked it into the tank, using generous amounts of lubricant, until the line was far enough into the tank to grab from the fill hole with needle nose pliers. I then pulled and twisted until the line came out of the top of the tank.

3. I cut the angled end square at this point. I then inserted the filter into the larger tubing the cut about an inch longer than the filter Barb.I then lubed the larger line and the smaller line and pulled the line back into the tank from the bottom until the filter laid flat on the bottom of the tank.

4. At this point, I cut the end of the small line so that about an inch protruded from the bottom of the tank. I then re-lubed that line and inserted into a well lubricated length of larger line of sufficient length to reach the inlet on the carb.

About the carb: the donor of the machine had apparently attempted a rebuild. While it was very clean, he assembled it incorrectly. The metering diaphragm was pinched and he left off two of the four screws which held it together. I disassembled it, and using the correct parts assembled in the correct order, (there are parts for multiple applications included in the kit), mounted it back to the machine, and after about six or eight pulls, it roared to life. I did not get into the jets etc, because they seemed to work. This Walbro carb only has one inlet and no purge bulb, and after adjusting the carb it starts on the third pull every time using the choke as it was designed to.
Other Parts Used:
Kit - Gasket/Diaphragm Fuel Line
  • Edward from FREDERICKSBRG, VA
  • Difficulty Level:
    A Bit Difficult
  • Total Repair Time:
    30 - 60 mins
  • Tools:
    Pliers, Screw drivers
5 of 5 people found this instruction helpful.
Was this instruction helpful to you?
Thank you for voting!
Broken piston ring and tune up
Straight forward, trick for the piston ring was to cut a soda can to make a sleeve that could be wrapped around the piston ring. A bit of duct tape with a tab held it shut until the piston was in position then it was easily removed as the piston was slid in.
Other Parts Used:
Ring - Piston Fuel Line Tank Purge Line Foam-Air Filter
  • Wade from HENDERSONVLLE, NC
  • Difficulty Level:
    Easy
  • Total Repair Time:
    30 - 60 mins
  • Tools:
    Socket set
3 of 3 people found this instruction helpful.
Was this instruction helpful to you?
Thank you for voting!
Fuel line size - Important
Be sure the fuel line is the exact same size (id and od) as the one you are replacing. I had purchased a Fuel line from my local dealer - and after a few hours I figured out that it was the wrong size! He simply cut some line from a spool he had. Didn't bother to look it up! The line from this site was perfect! The id is important because the line has to Compress to go through the hole.
Other Parts Used:
Fuel Line Tank Purge Line Fuel Line Fitting
  • Lawrence from ORION, MI
  • Difficulty Level:
    Really Easy
  • Total Repair Time:
    30 - 60 mins
9 of 13 people found this instruction helpful.
Was this instruction helpful to you?
Thank you for voting!
Both the Fuel line and the Engine fuel line, where dry rotted.
1) While still attached to the fuel tank, I first sized up the old fuel lines with the newer fuel lines.
2) With a pair of needle nose players, I then removed the old dry rotted fuel ?? lines, from the fuel tank.
3) I cleaned the fuel tank and around the carburetor area, to insure that there was no debris, that could possibly fall into the path of the new fuel lines installation.
4) I then installed the smaller one of the fuel lines, so that it would be out of the way, of the larger fuel line. I Pulled the fuel line through the smaller hole in the fuel tank, with needle nose players. I pulled the smaller fuel line out through the fuel tank filler hole, attached the fuel filter to the smaller fuel line. I Made sure that the fuel filter was extended to the furthest end of the fuel tank bottom. Six inches in all. I then attached the smaller fuel line to the carburetor.
5) I Installed the larger fuel line, followed the same procedures as the smaller fuel line.
6) Both fuel lines where cut on an angle for easy installation. No lubricant was necessary.
7) I filled up the fuel tank with fresh fuel and oil, new air filter and spark plug. It started on the first pull. Amazing.
Other Parts Used:
Fuel Line Tank Purge Line Engine Fuel Filter
  • Victor from SCOTTSVILLE, KY
  • Difficulty Level:
    Very Easy
  • Total Repair Time:
    15 - 30 mins
  • Tools:
    Pliers, Socket set
29 of 37 people found this instruction helpful.
Was this instruction helpful to you?
Thank you for voting!
Fuel and Purge lines had disintegrated
Disassembled it and cleaned fuel tank. Cut and ran new fuel lines, installed filter and reassembled. Parts fit perfectly and got running after not running for over 20 years.
Other Parts Used:
Fuel Line Tank Purge Line Engine Fuel Filter
  • Casper from ERATH, LA
  • Difficulty Level:
    Really Easy
  • Total Repair Time:
    30 - 60 mins
  • Tools:
    Nutdriver, Pliers, Screw drivers
17 of 24 people found this instruction helpful.
Was this instruction helpful to you?
Thank you for voting!
Replace the fuel lines
Replaced all fuel lines. Followed instructions found on Partselect.com, which said to insert cut fuel line in tank and use forceps to reach back in the tank and pull the fuel line through. The problem was that I did not have forceps, or needle nosed pliers that could reach the end of the hose.

Instead of running the line into the tank, I found another suggestion online to run the line from inside the tank outward, allowing me to grab the line with any pliers and thread it. The way I did this was used about a foot length of 14 gauge copper wire. Put an inch or two into the hose (that has been cut on an angle), and use a little black tape to secure the hose on the wire. Now you should be able to route the stiff wire from inside the tank to the fuel hole in the tank. Fish the wire through, and it should be enough to get the tapered end through the tank. Pull the copper wire, mine came out, but there was enough of the hose exposed on the outside of the tank for me to grab with pliers and pull it through.
Other Parts Used:
Fuel Cap Assembly Fuel Line Tank Purge Line Filter-Air Bulb-Purge "snap-in" Fuel Line Fitting Engine Fuel Filter
  • Robert from MANVILLE, NJ
  • Difficulty Level:
    Really Easy
  • Total Repair Time:
    30 - 60 mins
13 of 16 people found this instruction helpful.
Was this instruction helpful to you?
Thank you for voting!
Deterioration of fuel line system
Removed the top cover (T25 torx), and side cover (T25 torx) with recoil starter. Drained all fuel, and removed all pieces of fuel old fuel line and the weighted filter from inside the tank by shaking out and the (long forceps). A spot headlamp makes it easier to see inside the tank for much of the procedure. Remove the foam filter to find the two 8mm nuts and remove the air filter housing and carburetor (nut driver, 8mm socket) the choke lever slides out of its slot with some wiggling and moving the carb back off the mounting studs. Leave the throttle cable attached to the filter housing and move both assemblies out of the way to access the top wall of the fuel tank. There is a cover over the carb adjust screws that wiggles out also. The fuel line and purge line both pass through the wall of the tank and need to be pulled out with some effort (long curved forceps) from inside the tank through the fuel fill port. They are a tight fit. Pay attention to the lines size and location. Large line is in the position away from the recoil starter with the little plastic fitting hanging near the top of the tank. The smaller line is closest to the recoil starter. Both new lines will need to pass through the tank wall (this is the most difficult part). To facilitate the initial entry through the wall of the tank, cut a tapered end on your new lines. Use a very slippery lube to coat the end of the line and push it into the tank as far as you can from the top (forceps or soft grip pliers) help. Look inside the tank and pull the lines through fully out of the tank fill (long curved forceps and head spot light). Don't pull all the way through the fuel fill, just enough to install the new fuel line fitting in the return purge line and the new weighted filter on the fuel line and pull the lines back inside the tank. The return line with fitting close to the top of the tank and the filter hanging so it lays at the bottom of the tank, and able to swing around so it keeps contact with fuel at all times. Remove the old purge/primer bulb two screws (Phillips). The short stem is suction, long stem is pressure. Don't mix them up and connect lines backwards, don't ask me how I know! Lol! If you have such a saw like mine, that has no fuel lines intact, it is difficult to vision the line routes. There are helpful schematics on the internet. Just remember that the purge bulb long fuel stem sends pressure back to the tank through the return line (larger line in the tank with the line fitting away from the recoil). That line can now be cut to length and pushed on the bulb long stem. The suction side of the bulb short stem, connects to the purge line on the side of the carburetor (short line). You need to cut that line to the same length as the old one. It has to curve twice to get to the suction side of the purge bulb without kinking. The only other line left is the fuel line with the filter attached hanging inside the tank. Be sure you have the filter able to lay on the floor of the tank and move around. That line connects to the carburetor opposit side from the purge bulb. Dont cut that one until the carb is installed for proper length. The fuel routes from that filtered line into the carb, then out of the carb to the purge bulb suction side, then out to the return line in the tank with the fitting end. That fitting installed into the line serves only to keep the line from pulling back out of the tank, nothing attaches to it. Make sure all lines are clear of the mounting area of the carb, and throttle function. Pass the bulb lines through the slot in the side of the case being sure the lines don't kink. Secure the bulb with the two phillips screws. Position the carb on the studs and slide the choke lever into its place in the case as you go. Place the filter housing on the studs and push the carb and housing down watching the fuel lines for any kinks, especially where the throttle cable is in close proximity to the short carb purge line. Check the throttle function for interferance, and Install the two 8mm nuts. Now route the fuel line around the throttle mechanism out of the way, hold it to the barb on the side of the carb and cut it to length and install. Put some fuel mix in the tank (dont fill it) to test. Press the primer bulb, tilting the saw with fill cap removed, and see if anything leaks, also watch fuel flow back to the tank inside as you press the bulb. You should see fuel and air bubbles from the purge line. When all air bubbles are gone the system is purged. Install the new foam filter in the housing and then the top and side cases. I did not reinstall the cover of the carb adjust needle screws so I could adjust the fuel/ air mixture to run at peak performance. Hope this helps! The kit that I got was perfect and there are some useful instructions included. Thank you! Respectfully Mark
Other Parts Used:
Primer Bulb Kit Fuel Line Tank Purge Line Foam-Air Filter Fuel Line Fitting Engine Fuel Filter
  • Mark from LYNDONVILLE, NY
  • Difficulty Level:
    A Bit Difficult
  • Total Repair Time:
    1- 2 hours
  • Tools:
    Nutdriver, Pliers, Screw drivers, Socket set
92 of 100 people found this instruction helpful.
Was this instruction helpful to you?
Thank you for voting!
Weak spark. Multiple fuel leaks/ no start.
Pull #25 torx 4mm screws until you find the ignition module. Replace it, use lock tight, gap with a paper credit card. Reassemble. Replace cap and fuel lines. Pump and pull till it blows the carb cleaner and Blaster out and starts.
Other Parts Used:
Ignition Module Fuel Line Tank Purge Line Fuel Cap (w/ retainer) Engine Fuel Filter
  • Anthony from ST GEORGE, UT
  • Difficulty Level:
    Easy
  • Total Repair Time:
    More than 2 hours
41 of 45 people found this instruction helpful.
Was this instruction helpful to you?
Thank you for voting!
  • 1
Questions and Answers

Ask our experts a question about this part and we'll get back to you as soon as possible!

3 questions answered by our experts.
Sort by:
  • 1
Sorry, we couldn't find any existing answers that matched.Try using some different or simpler keywords, or submit your new question by using the "Ask a Question" button above!
Larry
March 15, 2018
Need the fuel line that will fit through the hole in the bottom of the tank. Outside diameter measures .065 approx.
For model number GTI 19T
PartSelect logo
Hi Larry, Thank you for your question. The part number listed under your model number for the fuel line is PS9472280. I hope this helps. Thank you and have a great day!

8 people found this helpful.

Was this helpful?
Thank you for voting!
Robert
September 6, 2021
What is the id & od of fuel line?
For model number Poulan Pro 295
PartSelect logo
Hi Robert, Thank you for your question. The inner diameter is approximately 5/64th inches and the outer diameter is approximately 9/64 inches. We hope this helps! If you have any questions, please let us know.

8 people found this helpful.

Was this helpful?
Thank you for voting!
Arnold
March 30, 2023
What size is the gas line in circum..
For model number 1400
PartSelect logo
Hi Arnold, thank you for your question. The fuel line, part number PS9472280, has a 0.080-inch inner and a 0.14-inch outer diameter. So the inner circumference is approximately 0.25 inches, while the outer circumference is 0.44 inches. We hope this information helps!

3 people found this helpful.

Was this helpful?
Thank you for voting!
  • 1
You May Also Need ?
Model Cross Reference
This part works with the following models:
PartSelect Number: PS9472280
Manufacturer Part Number: 530069247
Brand
Model Number
Description
Poulan
112
Trimmer - Pro Gas Trimmer
Husqvarna
132HBV
Leaf Blower / Vacuum - Handheld Blower
Husqvarna
136
Chainsaw - Chainsaw
Husqvarna
136LE
Chainsaw - Chainsaw
Husqvarna
137
Chainsaw - Chainsaw
Husqvarna
137E
Chainsaw - Chainsaw
Weed Eater
1400
Trimmer - Trimmer
Weed Eater
1400T
Trimmer - Gas Trimmer
Husqvarna
141
Chainsaw - Chainsaw
Husqvarna
141LE
Chainsaw - Chainsaw
Husqvarna
142
Chainsaw - Chainsaw
Husqvarna
142E
Chainsaw - Chainsaw
Weed Eater
1600
Trimmer - Gas Trimmer
Weed Eater
1600T
Trimmer - Gas Trimmer
Weed Eater
1700
Trimmer - Gas Trimmer
Weed Eater
1700A
Trimmer - Gas Trimmer
Weed Eater
1720
Trimmer - Gas Trimmer
Husqvarna
18H
Hedge Trimmer - Hedge Trimmer
Weed Eater
1900
Trimmer - Gas Trimmer
Poulan
1950
Chainsaw - Gas Chainsaw
Poulan
1950LE
Chainsaw - Gas Chainsaw
Poulan
1975
Chainsaw - Gas Chainsaw
Poulan
1975LE
Chainsaw - Gas Chainsaw
Poulan
2025
Chainsaw - Gas Chainsaw
Poulan
2050
Chainsaw - Gas Chainsaw
Poulan
2050LE
Chainsaw - Gas Chainsaw
Poulan
2050WT
Chainsaw - Gas Chainsaw
Poulan
2055
Chainsaw - Gas Chainsaw
Poulan
2055LE
Chainsaw - Gas Chainsaw
Poulan
2075
Chainsaw - Gas Chainsaw
Customer Service Representative

Get in touch, we're here to help!

Daily 8am - 9pm EST

Contact Customer Service