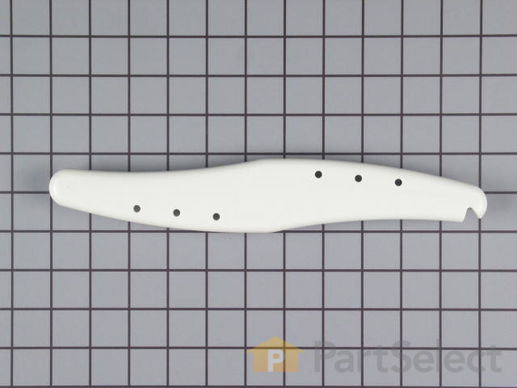
Part Location Diagram of WD28X10103 GE Third Level Spray Arm
See part 570 in the diagram
( Grid squares measure 1x1 inch )
Customer Service Representative

Get in touch, we're here to help!

Daily 8am - 9pm EST

customerservice@partselect.com

Third Level Spray Arm WD28X10103

 Fits your 40290117!
★★★★★
★★★★★
5 Reviews

Rated by 8 customers 

Easy 

30 - 60 mins 

Ratings submitted by customers like you who bought this part.

$ 86.81
  In Stock
Get FREE EconoShip on orders over $100! T&C apply

Get this part fast! Average delivery time for in-stock parts via standard shipping: 1.8 days.

 Fits your 40290117!
PartSelect Number PS755622
Manufacturer Part Number WD28X10103
Manufactured by GE
Product Description

Third Level Spray Arm Specifications

Water is forced through this spray arm by the unit's pump and motor assembly. The force of the water propels the spray arms, spraying water and detergent onto the dishes on the dishrack. This spray arm does not come with the screws.
How Buying OEM Parts Can Save You Time and Money

How Buying OEM Parts Can Save You Time and Money

Troubleshooting
This part fixes the following symptoms:
Not cleaning dishes properly | Leaking
This part works with the following products:
Dishwasher.
This part works with the following products:
General Electric, Kenmore, Hotpoint.
Part# WD28X10103 replaces these:
AP3184058, 948229, WD22X0042, WD22X0043, WD22X0051, WD22X0066, WD22X0076, WD22X0082, WD22X0092, WD22X0116, WD22X0151, WD22X116, WD22X151, WD22X42, WD22X43, WD22X51, WD22X66, WD22X76, WD22X82, WD22X92 , WD28X10043, WD28X10373, WD28X10374, WD35X0199, WD35X199 Show less
Back to Top
Customer Reviews
Average Rating:
★★★★★
★★★★★
5 Reviews
4.2
Filter By Rating:
  • 5 Stars
    4
  • 4 Stars
    0
  • 3 Stars
    0
  • 2 Stars
    0
  • 1 Star
    1
Sort by:
  • 1
Sorry, we couldn't find any existing reviews that matched. Try using some different or simpler keywords.
  • 1
Customer Repair Stories
 Average Repair Rating: 3.3 / 5.0, 8 reviews. What's this?
Sort by:
  • 1
Sorry, we couldn't find any existing installation instruction that matched.
3rd level spray arm fell off it's pivot/mounting bracket
Note: The replacement 3rd level spray arm comes coupled with a new fixed mounting bracket . The arm rotates/pivots around this fixed bracket. Procedure: Un-hitch and pull dishwasher out from under cabinet. Pull back top sound blanket. Remove two screws that attach the old mounting bracket. These screws are located on each side of the water delivery hose where the hose enters the top of the dishwasher. Open the dishwasher’s door and remove (pull down) the defective 3rd level spray bracket and its mounting bracket. Install the new mounting bracket (with attached spray arm) by aligning the bracket’s attachment holes with the two holes where the two screws were removed from, i.e. hold the spray arm assembly in one hand while looking for the alignment from above he dishwasher. Once aligned, install the two screws. Straighten out sound blanket, push dishwasher back into place, and re-attach dishwasher’s under counter attachment screws/bolts.
Other Parts Used:
Third Level Spray Arm SCREW
  • David from Duluth, GA
  • Difficulty Level:
    Very Easy
  • Total Repair Time:
    Less than 15 mins
  • Tools:
    Nutdriver, Screw drivers
4 of 4 people found this instruction helpful.
Was this instruction helpful to you?
Thank you for voting!
Leaked from the top of dishwasher
Used a nutdriver to remove the two screws attaching the third level spray arm and a pliers to release the clamp holding the power shower hose. Reversed the process on the new hose and spray arm. Dishwasher works great now!
Other Parts Used:
Third Level Spray Arm Upper Spray Arm Water Supply Hose
  • Kurtis from Morristown, MN
  • Difficulty Level:
    Easy
  • Total Repair Time:
    30 - 60 mins
  • Tools:
    Nutdriver, Pliers
0 of 4 people found this instruction helpful.
Was this instruction helpful to you?
Thank you for voting!
Replace Top Spray Arm
As suggested. Pull washer, remove screws from top and replace with new part. Very simple and easy if you follow steps furnished by this site.
  • John from Norman, OK
  • Difficulty Level:
    Really Easy
  • Total Repair Time:
    30 - 60 mins
  • Tools:
    Nutdriver, Screw drivers
4 of 7 people found this instruction helpful.
Was this instruction helpful to you?
Thank you for voting!
Dishes not clean after wash,White film all over.
Pulled unit out of cabinet took two top screws out of spinner spray arm and put back together.Old sprayer was plugged up not letting wash go through.Thanks for helping me fix and not replace unit.Saved at least 400.
  • Carl from Corpus Christi, TX
  • Difficulty Level:
    A Bit Difficult
  • Total Repair Time:
    1- 2 hours
  • Tools:
    Screw drivers, Socket set
3 of 5 people found this instruction helpful.
Was this instruction helpful to you?
Thank you for voting!
spray arm falls off
Turn off power at breaker box.
Remove lower covers and 2 screws into counter top.
Verify sufficient length on water and electrical connection to allow sliding dishwasher out approx. 2/3. I disconnected the electrical at the j box on the dishwasher. If you must disconnect the water line, shut off supply, usually located under nearby sink, and provide a rag or sponge for small amounts of water left in supply line.
Carefully pull back the insulation to expose two screws on top where water line runs into the center.
Pull the top tray part way out and reach in to hold the spray arm while removing the screws. The spray arm will easily drop out.
Hold the new spray arm in place making sure the raised screw posts push into the holes, then reinstall the two screws. Done. Pull insulation back into place, retape if necessary. Reconnect electrical and water if necessary.
Slide unit back in, checking alinement. Rescrew to counter top and reinstall lower covers. Task complete. 15 mins if prepared. 30 mins if both elect. & water are disconnected and you are somewhat hesitant.
  • JAMES from AUBURN, WA
  • Difficulty Level:
    Really Easy
  • Total Repair Time:
    Less than 15 mins
  • Tools:
    Nutdriver, Screw drivers
4 of 6 people found this instruction helpful.
Was this instruction helpful to you?
Thank you for voting!
Leaking from the hose that connects to the upper spray arm
replaced hose and upper sparay arm
Other Parts Used:
Third Level Spray Arm Upper Spray Arm Water Supply Hose
  • Steven from Oakdale, NY
  • Difficulty Level:
    A Bit Difficult
  • Total Repair Time:
    1- 2 hours
  • Tools:
    Nutdriver, Pliers, Screw drivers, Socket set
1 of 6 people found this instruction helpful.
Was this instruction helpful to you?
Thank you for voting!
upper spray would fall off
Without any specific directions with the part (which would had been nice. If it wasn't for my husband I wouldn't have known where to start.) I had to carfully pull the dishwasher out of the cabinet (it wasn't heavy) to unplug the power supply. Then we unscrewed 2 screws on the top and the upper arm connection came off. We replaced it with the new one, screwed it back on, reconnected the power supply and pushed the dishwasher back where it belonged. It worked out very well.
Also I want to say I am very happy with the length of time it took to get my part to me. (1 day) I was washing dishes it no time.

Thank You
Debbie Bradford
Hookstown, Pa.
  • Debra from Hooks Town, PA
  • Difficulty Level:
    Easy
  • Total Repair Time:
    30 - 60 mins
  • Tools:
    Screw drivers
3 of 5 people found this instruction helpful.
Was this instruction helpful to you?
Thank you for voting!
Washing poorly, leaving particles of food on top of the dishes, not draining completely, ceiling spray arm not spinning (bent up to the ceiling)
The lower spray arm unscrews. From inside the dishwahser, put a screwdriver through the tab slots and unscrew the tower from the floor. It's pretty tight for plastic.
The upper spray arm has screws on the top of the dishwasher. You must slide the dishwasher out from underneath the countertop to get to the screws. Normally that's just the two screws above the door that screw into the countertop. Pull the insulation back and unscrew the arm from the top of the dishwasher. Reverse to reinstall.
Piston and nut assembly for check valve: Inside the dishwasher at the back there are 2 screws that hold a screen down. Remove the screen. Take out the check valve and replace it. It was still functional in mine, it looked like food gunk had built up on it and impeded the check valve action.
The flapper chec is a rubber flap in the drain tube that connects to your sink drain. You have to pull the dishwasher out from under the sink to get to the end of the drain tube that connects to the dishwasher. Take the hose clamp loose and remove the drain tube from the dishwasher. Then unscrew the plastic fitting that you just took the drain tube off of. The flapper chec is there. It had turned brittle and didn't flap anymore. It is a similar setup to the rubber seal at the end of your garden hose.
Other Parts Used:
Whirlpool EveryDrop3 Refrigerator Water Filter Third Level Spray Arm Piston and Nut Assembly Lower Spray Arm with Tower Check Valve Flapper
  • Aaron from Liberty Township, OH
  • Difficulty Level:
    A Bit Difficult
  • Total Repair Time:
    30 - 60 mins
  • Tools:
    Nutdriver, Screw drivers
46 of 69 people found this instruction helpful.
Was this instruction helpful to you?
Thank you for voting!
  • 1
Questions and Answers

Ask our experts a question about this part and we'll get back to you as soon as possible!

1 question answered by our experts.
Sort by:
  • 1
Sorry, we couldn't find any existing answers that matched.Try using some different or simpler keywords, or submit your new question by using the "Ask a Question" button above!
Sandy
March 12, 2018
One of the clips on the plastic assembly holding the upper spray arm on has broken causing the spray arm to fall down. Is this a repairable problem or is it time for a new dishwasher?
For model number GSD3460G00SS
PartSelect logo
Hello Sandy, thank you for your question. The clips are a part of the spray arm itself, part number Third Level Spray Arm WD28X10103. This part clips to the Upper Spray Arm Water Supply Hose part number WD24X214. I hope this helps!

4 people found this helpful.

Was this helpful?
Thank you for voting!
  • 1
You May Also Need ?
Model Cross Reference
This part works with the following models:
PartSelect Number: PS755622
Manufacturer Part Number: WD28X10103
Brand
Model Number
Description
General Electric
1200L02
Dishwasher - DISHWASHER
General Electric
3000B10
Dishwasher - DISHWASHER
General Electric
3000W10
Dishwasher - DISHWASHER
Kenmore
3631435196
Dishwasher
Kenmore
3631435197
Dishwasher
Kenmore
3631435198
Dishwasher
Kenmore
3631435596
Dishwasher
Kenmore
3631435597
Dishwasher
Kenmore
3631435598
Dishwasher
Kenmore
36314382000
Dishwasher
Kenmore
36314387000
Dishwasher
Kenmore
36314389000
Dishwasher
Kenmore
3631441190
Dishwasher
Kenmore
3631441191
Dishwasher
Kenmore
3631441192
Dishwasher
Kenmore
3631441590
Dishwasher
Kenmore
3631441591
Dishwasher
Kenmore
3631442190
Dishwasher
Kenmore
3631442191
Dishwasher
Kenmore
3631442192
Dishwasher
Kenmore
3631442590
Dishwasher
Kenmore
3631442591
Dishwasher
Kenmore
3631442592
Dishwasher
Kenmore
3631444193
Dishwasher
Kenmore
3631444194
Dishwasher
Kenmore
3631444195
Dishwasher
Kenmore
3631444196
Dishwasher
Kenmore
3631444197
Dishwasher
Kenmore
3631444593
Dishwasher
Kenmore
3631444595
Dishwasher
Customer Service Representative

Get in touch, we're here to help!

Daily 8am - 9pm EST

Contact Customer Service