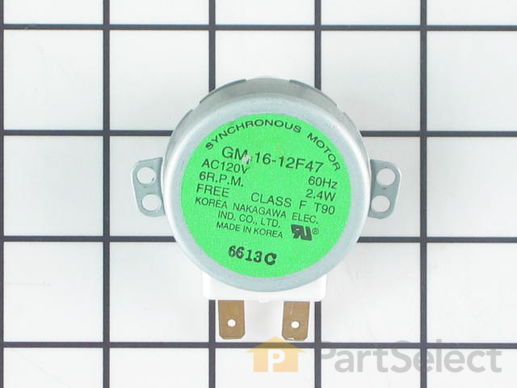
Part Location Diagram of W10642989 Whirlpool MOTOR-TURN
See part 12 in the diagram
( Grid squares measure 1x1 inch )
Customer Service Representative

Get in touch, we're here to help!

Daily 8am - 9pm EST

customerservice@partselect.com

MOTOR-TURN W10642989

★★★★★
★★★★★
2 Reviews

Rated by 4 customers 

Easy 

1- 2 hours 

Ratings submitted by customers like you who bought this part.

$ 109.24
  In Stock
Get FREE EconoShip on orders over $100! T&C apply

Get this part fast! Average delivery time for in-stock parts via standard shipping: 1.8 days.

PartSelect Number PS11729872
Manufacturer Part Number W10642989
Manufactured by Whirlpool
Product Description

MOTOR-TURN Specifications

This motor is used to rotate the cooking tray.
How Buying OEM Parts Can Save You Time and Money

How Buying OEM Parts Can Save You Time and Money

Troubleshooting
This part fixes the following symptoms:
Tray won’t turn
This part works with the following products:
Microwave, Microwave Oven Combo.
This part works with the following products:
Whirlpool, KitchenAid, Kenmore, Maytag.
Part# W10642989 replaces these:
4375347, 4393755, 8169527, 8183953, 8183954, 8184774, 8205023, 8205048
Back to Top
Customer Reviews
Average Rating:
★★★★★
★★★★★
2 Reviews
5.0
Filter By Rating:
  • 5 Stars
    2
  • 4 Stars
    0
  • 3 Stars
    0
  • 2 Stars
    0
  • 1 Star
    0
Sort by:
  • 1
Sorry, we couldn't find any existing reviews that matched. Try using some different or simpler keywords.
  • 1
Customer Repair Stories
 Average Repair Rating: 2.5 / 5.0, 4 reviews. What's this?
Sort by:
  • 1
Sorry, we couldn't find any existing installation instruction that matched.
Turntable did not work
Ordered a new motor. Removed the outside trim of the oven-microwave combo. 2 screws at the bottom of the trim. Removed the screws that held the combination micro and oven unit in place. Removed the top and bottom black plastic grill of the microwave. 3 screws each. Pulled the entire unit out about 1 inch exposing the screws at each side of the microwave that hold it in place.
Snapped off the top control panel which exposed the wiring connecting the control panel.
Unplugged a couple of wire harness units to free the control panel.
Be sure to label the units to know which goes where during reassembly.
Remove the microwave unit from the housing and place it on its side.
Remove the metal plate that houses the motor. 4 screws hold the motor in place. Disconnect the 2 wires from the old motor and you are ready to install the new motor. Be sure to TURN OFF THE POWER to the unit at the breaker box and remove the turntable from inside the microwave.
  • Eldon from ORANGE, CA
  • Difficulty Level:
    Easy
  • Total Repair Time:
    30 - 60 mins
  • Tools:
    Screw drivers
1 person found this instruction helpful.
Was this instruction helpful to you?
Thank you for voting!
I had two issues, 1). The oven blower was making a lot of noise when the oven was turned on. 2). The microwave turntable wasn't turning.
The replacement of the blower was an easy repair. Just had to remove two back panels of the oven and the blower was then very accessable. Just remove the two electrical wires and then three screws and the blower came right off. Put the new blower on with the three screws and replaced the 10 or 12 screws holding the back panels and the job was complete!. The difficult part of the job was removing the combo unit from the cabinet to access the back panels. That part took some effort. Had to build a platform to slide the oven out onto after I disconnected the electrical feed wire (#6 wire) located in a junction box in my attic. Once that was done, the actual blower replacement was simple. The turntable motor was a different story...Although replacing the turntable motor was going to be as easy as replacing the blower motor, I couldn't access the underside of the microwave without disassembling the whole combo unit cabinet! That was very disappointing to me that Whirlpool didn't make that part easier to access, so I didn't replace the turntable motor. Too bad but we are just going to live with the turntable not turning!!
Other Parts Used:
BLOWER MOTOR-TURN
  • John from E MCKEESPORT, PA
  • Difficulty Level:
    Easy
  • Total Repair Time:
    1- 2 hours
  • Tools:
    Screw drivers, Socket set
3 of 3 people found this instruction helpful.
Was this instruction helpful to you?
Thank you for voting!
Microwave Turntable Won't Rotate
I turned off the power to the oven at the breaker. I then removed the side trim pieces by removing the screws located behind the lower oven door. I removed the plastic trim pieces above and below the microwave oven and removed the control panel and slid it into the opening above the microwave. I located the two screws securing the microwave into the frame and began sliding it out. I had to disconnect a small wiring harness and two wires from the microwave that were attached inside the opening above the microwave. The microwave section was the easily slid out, turned on it's side where the turntable motor was accessed by removing the access panel. I pulled the old motor, checked resistance and it matched the new motor. I then checked the old motor by applying 120V to it and it ran FINE! I thought I had the wrong part, but decided to install the new motor anyway. I did, secured the access panel and replaced the microwave in the frame. I reconnected the wires and secured the control panel and tested the microwave...and the turntable works!
  • Steven from Sacramento, CA
  • Difficulty Level:
    A Bit Difficult
  • Total Repair Time:
    30 - 60 mins
  • Tools:
    Screw drivers
11 of 17 people found this instruction helpful.
Was this instruction helpful to you?
Thank you for voting!
Microwave turntable does not work
My unit is a wall mount/cabinet/built-in model. The repair is actually fairly simple once you determine that the actual microwave is just a component of the entire unit, and that it (the microwave) can be easily removed from the unit. I did not figure this out until after I removed the entire unit (disconnect the power supply, lift the entire bulky, heavy unit out of the cramped space in the cabinet, etc). Once I got it out I figured out how easy it is to remove the actual oven - a couple of screws, literally. The unit is a bit bulky, but not particularly heavy and is quite manageable. I did this entire process alone.

I got the oven out, rolled it on it's side and found the plate to access the motor. The plate is located on the bottom/underside of the unit. The plate is nothing more than a section of the underside of the metal housing that has been cut-out as an access point. This "cut-out" is not complete - that is, not completely cut out so as to all the plate to stay in place without the need for screws, etc, until you actually have to use it. I used a pair of dykes to cut the couple of points still connecting this plate, removed the two phillips screws to remove the motor, disconnected the two wires connected, then reversed to complete the repair. You then flip the cut-out plate over/rotate it, and some screw holes line up. Find a couple of small screws, and re-attach the plate to cover the motor.

The actual fix is really easy, again, once you figure out the simple way to remove the oven. I am an idiot, so you will probably find this much easier. I could probably do this repair now, after my experience, in less than 30 minutes (probably less than 15 minutes). I probably save a couple hundred $ by doing it myself so was well worth the time to do it. Good luck.
  • Todd from San Bernardino, CA
  • Difficulty Level:
    A Bit Difficult
  • Total Repair Time:
    More than 2 hours
  • Tools:
    Pliers, Screw drivers
31 of 38 people found this instruction helpful.
Was this instruction helpful to you?
Thank you for voting!
  • 1
Questions and Answers

Ask our experts a question about this part and we'll get back to you as soon as possible!

1 question answered by our experts.
Sort by:
  • 1
Sorry, we couldn't find any existing answers that matched.Try using some different or simpler keywords, or submit your new question by using the "Ask a Question" button above!
Julie
June 6, 2023
If I buy this part and try it and it doesn't fix the problem, can I return it?
For model number WMH31017HZ04
PartSelect logo
Hi Julie, thank you for writing in. For your peace of mind, we offer a 30-day return period. Parts must be in resaleable condition to qualify: Resaleable” means that the part must not have incurred damage, such as signs of installation, marks, or scuffing. Part must also be in its original packaging to be considered resaleable. We hope this helps.

Was this helpful?
Thank you for voting!
  • 1
Model Cross Reference
This part works with the following models:
PartSelect Number: PS11729872
Manufacturer Part Number: W10642989
Brand
Model Number
Description
Kenmore
66463783600
Microwave
Kenmore
66560601000
Microwave
Kenmore
66560609000
Microwave
Kenmore
66560612000
Microwave
Kenmore
66560617000
Microwave
Kenmore
66560619000
Microwave
Kenmore
66560622000
Microwave
Kenmore
66560629000
Microwave
Kenmore
66560632000
Microwave
Kenmore
66560639000
Microwave
Kenmore
66560652000
Microwave
Kenmore
66560654000
Microwave
Kenmore
66560657000
Microwave
Kenmore
66560659000
Microwave
Kenmore
66560682000
Microwave
Kenmore
66560689000
Microwave
Kenmore
66561601100
Microwave
Kenmore
66561609100
Microwave
Kenmore
66561612100
Microwave
Kenmore
66561612101
Microwave
Kenmore
66561614100
Microwave
Kenmore
66561614101
Microwave
Kenmore
66561617100
Microwave
Kenmore
66561617101
Microwave
Kenmore
66561619100
Microwave
Kenmore
66561619101
Microwave
Kenmore
66561622100
Microwave
Kenmore
66561624100
Microwave
Kenmore
66561627100
Microwave
Kenmore
66561629100
Microwave
Customer Service Representative

Get in touch, we're here to help!

Daily 8am - 9pm EST

Contact Customer Service