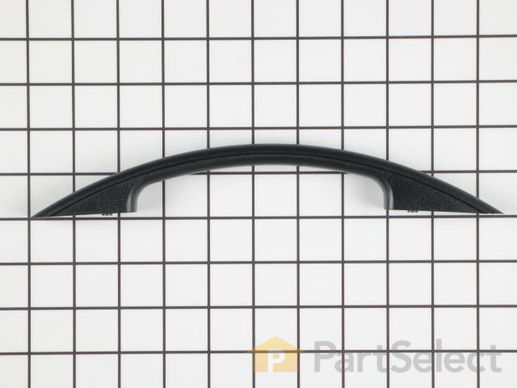
Part Location Diagram of 4393782 Whirlpool Door Handle
See part 7 in the diagram
( Grid squares measure 1x1 inch )
Customer Service Representative

Get in touch, we're here to help!

Daily 8am - 9pm EST

customerservice@partselect.com

Door Handle 4393782

 Fits your GH7145XFT0!
★★★★★
★★★★★
3 Reviews

Rated by 7 customers 

Really Easy 

15 - 30 mins 

Ratings submitted by customers like you who bought this part.

$ 88.27
  In Stock
Get FREE EconoShip on orders over $100! T&C apply

Get this part fast! Average delivery time for in-stock parts via standard shipping: 1.8 days.

 Fits your GH7145XFT0!
PartSelect Number PS373727
Manufacturer Part Number 4393782
Manufactured by Whirlpool
Product Description

Door Handle Specifications

Screws are NOT included.
How Buying OEM Parts Can Save You Time and Money

How Buying OEM Parts Can Save You Time and Money

Troubleshooting
This part works with the following products:
Microwave.
This part works with the following products:
Whirlpool, Kenmore, Estate, Roper.
Part# 4393782 replaces these:
AP3033589, 588291, 4393734, 4393782, 8185113
Back to Top
Customer Reviews
Average Rating:
★★★★★
★★★★★
3 Reviews
3.7
Filter By Rating:
  • 5 Stars
    2
  • 4 Stars
    0
  • 3 Stars
    0
  • 2 Stars
    0
  • 1 Star
    1
Sort by:
  • 1
Sorry, we couldn't find any existing reviews that matched. Try using some different or simpler keywords.
  • 1
Customer Repair Stories
 Average Repair Rating: 4.1 / 5.0, 7 reviews. What's this?
Sort by:
  • 1
Sorry, we couldn't find any existing installation instruction that matched.
Handle broke off
-leave door attached to microwave.

-remove three phillps screws from end of door next to handle.

-use two flathead screw drivers to pry apart the outside cover and unsnap the two sections of the door. Start in the top middle.

-use phillips screw driver to remove two screws holding handle on.

--handle has an up and down side, attach longer side to the top of the door.

-snap two door pieces back together.
  • Randall from CHAPEL HILL, NC
  • Difficulty Level:
    Very Easy
  • Total Repair Time:
    Less than 15 mins
  • Tools:
    Screw drivers
4 of 4 people found this instruction helpful.
Was this instruction helpful to you?
Thank you for voting!
the handle and lower right corner of the plastic door cover had broken
repair was very straight forward and can be done by anyone with reasonable mechanical ability. I read in a couple places where appliance repair people had said it was best to replace micro wave unit as it was near impossible to do repair. Pure rubbish; only problem I had was when the door and glass u it arrived the glass wasn't glued in completely and I had to clue it myself. I removed the three screws on the right end of the door and took my large pocket knife and ran it down the joint where the outer cover meets the metal door. first the top and then the bottom and the old door popped right off. removed the old handle from old door for the screws needed to reattach the new handle to new cover. I started the screws on the counter to get threads started in plastic made attaching to cover easier. hen started by pushing the new cover onto the left end of door the continued squeezing the cover on along to the right first top and then the bottom a little at a time and it snapped right in for me with a fair amount of pressure, replaced the three screws and it works great looks like new. I did remove the upper vent to clean and that helped some with installing. Very easy and beat the heck out of trying to replace the entire unit. I think the so called appliance repair people only wanted to sell and install a new one for $$$$.
Other Parts Used:
Exterior Door Panel with Glass - Black Door Handle
  • Dale from South Woodstock, VT
  • Difficulty Level:
    Really Easy
  • Total Repair Time:
    15 - 30 mins
  • Tools:
    Screw drivers
4 of 4 people found this instruction helpful.
Was this instruction helpful to you?
Thank you for voting!
Microwave Door Exterior panel was cracked and the handle was broken
I disassembled the door by removing three screws from the side opposite the hinges and pried (lifted) that edge up and rotated the panel away from the metal portion of the door towards the hinges. I assembled the new door panel by attaching the handle (2 screws). I attached the new door panel by starting at the hinge side of the door and working towards the opposite end of the door. The last little bit was tough to get it to snap over the metal sub-door. I reinstalled the 3 screws to snug, not tight because I did not want to crack the plastic.
Other Parts Used:
Exterior Door Panel with Glass - Black SCREW SCREW Door Handle
  • MILES from ALAMOGORDO, NM
  • Difficulty Level:
    Really Easy
  • Total Repair Time:
    15 - 30 mins
  • Tools:
    Screw drivers
10 of 11 people found this instruction helpful.
Was this instruction helpful to you?
Thank you for voting!
Replacement of door handle
I made a video. There were specific instructions to note which needed to be explained. Interested?
  • Denise from Hollywood Beach, FL
  • Difficulty Level:
    A Bit Difficult
  • Total Repair Time:
    30 - 60 mins
  • Tools:
    Screw drivers
15 of 16 people found this instruction helpful.
Was this instruction helpful to you?
Thank you for voting!
Installation door handle
Is there an instruction video?
  • Peter from NEW YORK, NY
  • Difficulty Level:
    Really Easy
  • Total Repair Time:
    30 - 60 mins
2 of 2 people found this instruction helpful.
Was this instruction helpful to you?
Thank you for voting!
Door handle broke
I removed three screws and then "gently" removed the front door plastic panel. Two more screws were all that was required to remove the broken door handle and replace it. You DO have to BE CAREFUL in removing the plastic panel. It "snaps" on and must be "snapped" off. If you are not careful you could easily break the panel and have to purchase a much more expensive part. If you are careful it is easy and takes only a few minutes.
  • Robert from Webster, TX
  • Difficulty Level:
    Easy
  • Total Repair Time:
    Less than 15 mins
  • Tools:
    Screw drivers
2 of 3 people found this instruction helpful.
Was this instruction helpful to you?
Thank you for voting!
handle and door frame cracked
took door panel off and than took handle off door pannel. took glass out of old door panel washed it and slid it in the door panel very gently until it snapped into place. then I lined up the door on the left side and snapped it in gently into place and put the 3 screws in and complete. about 15 minutes. I read that it was very difficult but that is not so.
Other Parts Used:
Outer Frame Door Panel Door Handle
  • Philip from Howell, NJ
  • Difficulty Level:
    Easy
  • Total Repair Time:
    15 - 30 mins
  • Tools:
    Screw drivers
35 of 49 people found this instruction helpful.
Was this instruction helpful to you?
Thank you for voting!
  • 1
Questions and Answers

Ask our experts a question about this part and we'll get back to you as soon as possible!

1 question answered by our experts.
Sort by:
  • 1
Sorry, we couldn't find any existing answers that matched.Try using some different or simpler keywords, or submit your new question by using the "Ask a Question" button above!
Ray
May 8, 2023
Door handle broke off on its bottom. How to remove the top and how to install the new handle?
For model number MHE14MQ-0
PartSelect logo
Hello Ray, thank you for the question. Based on our research, we are providing you with instructions that will help you replace the door handle. 1- Unthread the screws securing the top vent grill. 2- Unthread the screw of the top hinge. 3- Slide out the top of the door from the hinge and lift all the door assembly from the bottom hinge. 4- Using the putty knife, pry out the door trim, sliding it from the inside, there are a few clips holding it. 5- Remove the screws securing the inner door. 6- Now, remove the screws holding the handle. We hope this helps!

Was this helpful?
Thank you for voting!
  • 1
Model Cross Reference
This part works with the following models:
PartSelect Number: PS373727
Manufacturer Part Number: 4393782
Brand
Model Number
Description
Kenmore
66560601000
Microwave
Kenmore
66560609000
Microwave
Kenmore
66560612000
Microwave
Kenmore
66560617000
Microwave
Kenmore
66560619000
Microwave
Kenmore
66561601100
Microwave
Kenmore
66561609100
Microwave
Kenmore
66561612100
Microwave
Kenmore
66561612101
Microwave
Kenmore
66561614100
Microwave
Kenmore
66561614101
Microwave
Kenmore
66561617100
Microwave
Kenmore
66561617101
Microwave
Kenmore
66561619100
Microwave
Kenmore
66561619101
Microwave
Kenmore
66561701100
Microwave
Kenmore
66561709100
Microwave
Kenmore
66562612200
Microwave
Kenmore
66562612201
Microwave
Kenmore
66562612300
Microwave
Kenmore
66562612301
Microwave
Kenmore
66562614200
Microwave
Kenmore
66562614201
Microwave
Kenmore
66562614300
Microwave
Kenmore
66562614301
Microwave
Kenmore
66562619200
Microwave
Kenmore
66562619201
Microwave
Kenmore
66562619300
Microwave
Kenmore
66562619301
Microwave
Kenmore
66568600890
Microwave
Customer Service Representative

Get in touch, we're here to help!

Daily 8am - 9pm EST

Contact Customer Service