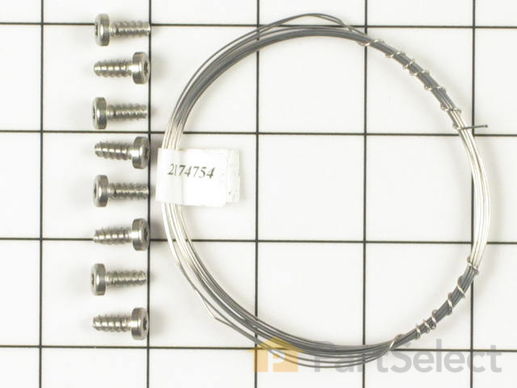
Part Location Diagram of 4387020 Whirlpool Ice Cutting Grid Wire
See part 24 in the diagram
( Grid squares measure 1x1 inch )
Customer Service Representative

Get in touch, we're here to help!

Daily 8am - 9pm EST

customerservice@partselect.com

Ice Cutting Grid Wire 4387020

 Fits your GI1500XHS6!
★★★★★
★★★★★
6 Reviews

Rated by 10 customers 

Easy 

30 - 60 mins 

Ratings submitted by customers like you who bought this part.

$ 60.72
  In Stock
Get FREE EconoShip on orders over $100! T&C apply

Get this part fast! Average delivery time for in-stock parts via standard shipping: 1.8 days.

 Fits your GI1500XHS6!
PartSelect Number PS370853
Manufacturer Part Number 4387020
Manufactured by Whirlpool
Product Description

Ice Cutting Grid Wire Specifications

There is approximately 10' of wire. Note: 2 kits are needed to replace both directions.
How Buying OEM Parts Can Save You Time and Money

How Buying OEM Parts Can Save You Time and Money

Troubleshooting
This part works with the following products:
Ice Maker.
This part works with the following products:
KitchenAid, Whirlpool, Kenmore, Jenn-Air.
Part# 4387020 replaces these:
AP3108059, 585796, 2174754, 4387020
Back to Top
Customer Reviews
Average Rating:
★★★★★
★★★★★
6 Reviews
3.8
Filter By Rating:
  • 5 Stars
    3
  • 4 Stars
    1
  • 3 Stars
    1
  • 2 Stars
    0
  • 1 Star
    1
Sort by:
  • 1
Sorry, we couldn't find any existing reviews that matched. Try using some different or simpler keywords.
  • 1
Customer Repair Stories
 Average Repair Rating: 3.2 / 5.0, 10 reviews. What's this?
Sort by:
  • 1
Sorry, we couldn't find any existing installation instruction that matched.
Ice cutting grid wire broke into.
Removed broke wire and replaced new wire. Use gloves to pull the wire tight. That's very important.
  • William from WINTER HAVEN, FL
  • Difficulty Level:
    Really Easy
  • Total Repair Time:
    15 - 30 mins
  • Tools:
    Nutdriver
1 person found this instruction helpful.
Was this instruction helpful to you?
Thank you for voting!
Top cutter wire broke and unit no longer dropping ice into bin
I took out old grid and removed the top broken wire. I attached the end of new wire to the terminal screw and carefully threaded the new wire back and forth without kinks. I was not able to get wire as tight as it was originally, but able to get it tight enough with pliers. I attached the other end to the opposite terminal screw. I had plenty of wire for the job and cut off the excess. I re-installed the grid and had ice the following morning. Feeling good about myself and saved a lot of money.
  • John from TYLER, TX
  • Difficulty Level:
    A Bit Difficult
  • Total Repair Time:
    30 - 60 mins
  • Tools:
    Pliers, Screw drivers
1 person found this instruction helpful.
Was this instruction helpful to you?
Thank you for voting!
Top grid replaced
My top grid was broken. After removing the old wire and loosening the screws on both ends of the old wire, I carefully unrolled the new wire so there were no kinks. Next, I put one end of the wire in a vice to hold it in place. I put a loop in the other end and attached it to the one end of the frame. You can then hold the grid in both hands and put tension on the wire as you make the wraps. When you get to the end, attach it to the grid screw and tighten the screw while maintaining tension. You can then cut the remaining wire and reinstall the grid. I think this was much easier than the directions that came with the wire. Took 5 minutes to install the wire on the grid and 15 to 20 minutes to everything back together and start making ice.
  • John from ROCK HILL, SC
  • Difficulty Level:
    Easy
  • Total Repair Time:
    30 - 60 mins
  • Tools:
    Nutdriver, Pliers, Screw drivers
2 of 2 people found this instruction helpful.
Was this instruction helpful to you?
Thank you for voting!
Overflow pump-cutting grid wire & spacers
Replaced pump-loop cutting grid wire loosely around spacers-hold loose end with pliers-working from back to front remove all slack. Pull until piano string tight. Wire will not break if not linked. Tighten front screw.
Other Parts Used:
Front or Rear Spacer/Bracket Affresh Ice Machine Cleaner Ice Cutting Grid Wire SPACER
  • Leonard from ALVARADO, TX
  • Difficulty Level:
    Very Easy
  • Total Repair Time:
    30 - 60 mins
  • Tools:
    Nutdriver, Pliers, Screw drivers
3 of 3 people found this instruction helpful.
Was this instruction helpful to you?
Thank you for voting!
My problem was in reading one of the other posts about installing
The post I read said start at the middle and work your way out towards the left and right. This was incorrect. All I did was secure one end to the torx screw and tighten it down. I then slowly pulled the wire as tight as I could around each insulator, going slow so as to not kink the wire (very easy to do). Once I was at the other torx screw I used a pair of linesman plyers to gently tug each wire tighter, I needed an extra pair of hands to hold the grid down. Once everything was tight I wrapped the last torx screw and tightened. Here's what no one is saying, you will not get the wire as tight as it originally was but that's ok. After I got everything reinstalled the ice maker is making ice like a champ.
  • Tom from Louisville, KY
  • Difficulty Level:
    A Bit Difficult
  • Total Repair Time:
    30 - 60 mins
  • Tools:
    Socket set
6 of 6 people found this instruction helpful.
Was this instruction helpful to you?
Thank you for voting!
broken ice cutter wire
remove tray from icemaker by removing 2 screws and disconnecting 2 electrical connectiona. Remove broken wire and restring new wire. Reinstall tray.
  • Leo from Ormond Beach, FL
  • Difficulty Level:
    Really Easy
  • Total Repair Time:
    15 - 30 mins
  • Tools:
    Nutdriver, Screw drivers
10 of 11 people found this instruction helpful.
Was this instruction helpful to you?
Thank you for voting!
Broken Wire On The Cutting Grid.
Removed the grid. Removed the existing top to bottom wire. Restrung the grid with the new wire. Then, it cut ice just fine-better than new. Note: wire provided is only sufficient to rewire side to side or top to bottom, not both. If you need to do both, you'll need 2. Yes, lots of money for a few feet of wire.
  • Jeffrey from Duluth, GA
  • Difficulty Level:
    Easy
  • Total Repair Time:
    30 - 60 mins
  • Tools:
    Pliers, Screw drivers
9 of 11 people found this instruction helpful.
Was this instruction helpful to you?
Thank you for voting!
Ice Maker quit making cubes, cutter wire broken
First I removed the cutter grid assembly by removing two screws. Also disconnect the wire that powers the grid. Once on the bench, simply remove the broken cutter wire. String in the new wire, starting at one end and working back and forth to the other end. Tighten the terminal screw on the first end, and then "strum" the wires, one at a times, pulling the wires taught. Pull the excess wire thru the second terminal, until all wires are taught, with equal tension. Tighten the second terminal screw, and cut off excess wire at both ends. Re-assemble cutter grid into Ice Maker.
Problem solved!
  • Kenneth from New Richmond, OH
  • Difficulty Level:
    A Bit Difficult
  • Total Repair Time:
    30 - 60 mins
  • Tools:
    Pliers, Screw drivers
15 of 16 people found this instruction helpful.
Was this instruction helpful to you?
Thank you for voting!
cutting grid wire was broken
removed broken wire, replaced with new wire and screwed the 6 tensions screws to tighten the grid wire.
  • Audrey from Morrow, GA
  • Difficulty Level:
    Really Easy
  • Total Repair Time:
    15 - 30 mins
6 of 7 people found this instruction helpful.
Was this instruction helpful to you?
Thank you for voting!
the top wire on the cutting grid broke and thus no longer cut the ice. It sat on the wire until the ice melted, depositing no ice into the bin
I removed the cutter grid and unplugged the light bulb and wire heating plug ins. I slid the front cover plate off the cutting grid and loosened the screws on the front of the cutter grid and unthreaded the broken, top grid wire, leaving the bottom wire in place as it was in tact.
I then threaded the new wire through the cutting grid frame starting in the center and threading right and then left. While the threading was not difficult, the wire was easily kinked. The process up to this point was only 15 minutes or so.

Once it was completely threaded, I worked for a couple of hours trying to smooth and straighten the wire so that is was somewhat taut and straight enough to create symetrical ice cubes.
My frustration came in pulling on the wire from the center point to each outside ending point where it was to be wrapped around the screw and the screw tightened back down. The wire was fragile enough that it would break, by the time I was finished I barely had enough wire left to touch the screw let alone hook around the screw.
After 3 or four days of successful opperation, the grid quit cutting again. As I took it apart, it was obvious that the weight of the ice was enough to pull the wire, that was already too short, away from the screw. I refastened it again, but think it is unlikely to hold.
If it won't hold, I would be hard pressed to purchase another wire. I may bite the bullet and purchase the entire grid mechanism with the wires already installed. Even though the cost of the entire grid mechanism is $200 more than the purchase of another wire, it may well be worth the ease of installation!
  • Sherri from Ada, OK
  • Difficulty Level:
    A Bit Difficult
  • Total Repair Time:
    More than 2 hours
  • Tools:
    Pliers, Screw drivers
25 of 26 people found this instruction helpful.
Was this instruction helpful to you?
Thank you for voting!
  • 1
Questions and Answers

Ask our experts a question about this part and we'll get back to you as soon as possible!

1 question answered by our experts.
Sort by:
  • 1
Sorry, we couldn't find any existing answers that matched.Try using some different or simpler keywords, or submit your new question by using the "Ask a Question" button above!
Lexy
October 4, 2017
What type of wire is used in this kit?
PartSelect logo
Hi Lexy, Thank you for your question. Unfortunately the manufacturer does not give us specifications on their parts. You would have to contact them directly to get that information. Good luck with your repair.

Was this helpful?
Thank you for voting!
  • 1
Model Cross Reference
This part works with the following models:
PartSelect Number: PS370853
Manufacturer Part Number: 4387020
Brand
Model Number
Description
Kenmore
1064689482991
Ice Maker
Kenmore
10686482690
Ice Maker
Kenmore
10686482691
Ice Maker
Kenmore
10686485690
Ice Maker
Kenmore
10686485691
Ice Maker
Kenmore
10689482990
Ice Maker
Kenmore
10689482991
Ice Maker
Kenmore
10689482992
Ice Maker
Kenmore
10689482993
Ice Maker
Kenmore
10689482994
Ice Maker
Kenmore
10689482995
Ice Maker
Kenmore
10689482996
Ice Maker
Kenmore
10689482998
Ice Maker - ICE MAKER FREE STANDING
Kenmore
10689483700
Ice Maker - ICE MAKER FREE STANDING
Kenmore
10689483992
Ice Maker
Kenmore
10689483993
Ice Maker
Kenmore
10689483994
Ice Maker
Kenmore
10689483995
Ice Maker
Kenmore
10689483996
Ice Maker
Kenmore
10689483998
Ice Maker - ICE MAKER FREE STANDING
Kenmore
10689485990
Ice Maker
Kenmore
10689485991
Ice Maker
Kenmore
10689485992
Ice Maker
Kenmore
10689489700
Ice Maker - ICE MAKER FREE STANDING
Kenmore
10689489990
Ice Maker
Kenmore
10689489991
Ice Maker
Kenmore
10689489992
Ice Maker
Kenmore
10689489993
Ice Maker
Kenmore
10689489994
Ice Maker
Kenmore
10689489995
Ice Maker
Customer Service Representative

Get in touch, we're here to help!

Daily 8am - 9pm EST

Contact Customer Service