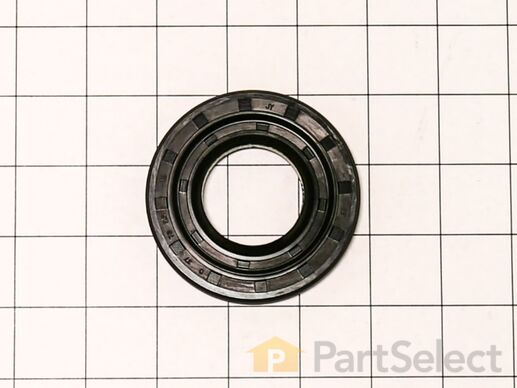
Part Location Diagram of 4036ER2004A LG Rear Tub Gasket
See part K125 in the diagram
( Grid squares measure 1x1 inch )
Customer Service Representative

Get in touch, we're here to help!

Daily 8am - 9pm EST

customerservice@partselect.com

Rear Tub Gasket 4036ER2004A

 Fits your 42192!
★★★★★
★★★★★
15 Reviews

Rated by 14 customers 

Easy 

More than 2 hours 

Ratings submitted by customers like you who bought this part.

$ 31.60
  In Stock
Get FREE EconoShip on orders over $100! T&C apply

Get this part fast! Average delivery time for in-stock parts via standard shipping: 1.8 days.

 Fits your 42192!
PartSelect Number PS3522855
Manufacturer Part Number 4036ER2004A
Manufactured by LG
Product Description

Rear Tub Gasket Specifications

If you notice your washing machine is leaking water from the top of the transmission, it might be due to the gasket being damaged or worn down. When replacing your gasket, consider replacing your tub bearings at the same time. The gasket (or seal) is located at the back of the outer tub of your washing machine. To access this part you will need to pull the top off of the appliance by releasing the screws holding it in place. This part is sold individually, is black in color, and measures 3 inches in diameter.
How Buying OEM Parts Can Save You Time and Money

How Buying OEM Parts Can Save You Time and Money

Troubleshooting
This part fixes the following symptoms:
Leaking | Burning smell
This part works with the following products:
Washer, Washer Dryer Combo.
This part works with the following products:
LG, Kenmore.
Part# 4036ER2004A replaces these:
AP4438637, 4036ER2004A, 4036ER2004B, 4036ER3002A, TAW36858283
Back to Top
Customer Reviews
Average Rating:
★★★★★
★★★★★
15 Reviews
4.5
Filter By Rating:
  • 5 Stars
    11
  • 4 Stars
    2
  • 3 Stars
    1
  • 2 Stars
    0
  • 1 Star
    1
Sort by:
  • 1
  • 2
Sorry, we couldn't find any existing reviews that matched. Try using some different or simpler keywords.
  • 1
  • 2
Customer Repair Stories
 Average Repair Rating: 2.6 / 5.0, 14 reviews. What's this?
Sort by:
  • 1
  • 2
Sorry, we couldn't find any existing installation instruction that matched.
Loud grinding noise, especially during the spin cycle.
First I watched several videos on YouTube, numerous times. When I started to disassemble the washer, I put the parts I removed on the floor in the work area in the order I removed them. I also took a couple of photos of where wiring and hoses went so I would have a reference the next day (I took parts of two days to complete the repair).When I removed fasteners (screws, etc), I labeled them as to what part they went with, making re-assembly easier and faster. The most difficult part was re-installing the wire retainers on the door bellows (make sure you use some liquid dish detergent as lubricant). The results were great, I have a like "new"washer now.
Other Parts Used:
Washer Tub Bearing, Rear BEARING,BALL Gasket Rear Tub Gasket
  • Richard from CUMMING, GA
  • Difficulty Level:
    Easy
  • Total Repair Time:
    More than 2 hours
  • Tools:
    Nutdriver, Pliers, Screw drivers, Socket set
4 of 4 people found this instruction helpful.
Was this instruction helpful to you?
Thank you for voting!
The washer drum sounded like a plane taking off in the mudroom.
Started with some resin paper on the floor, some painter’s tape, and a sharpie to keep track of screws and removed parts (painter’s tape to stick hardware to). Set up iPad on dryer and followed every step by step instruction by pausing the video. The instructions were perfect (but would have liked some more close up shots). Installation of new bearings was exactly as demonstrated and truly appreciated the step by step descriptions to put it all back. Hardest part of the repair was replacing the wire ring on the rubble gasket — only step not displayed. Suggestions for future repair videos: 1) how to organized hardware as removed; 2) more close ups; 3) a video showing the problem at the start followed by a video showing post repair. As a visual person, I have spend the past few days watching the spin cycle wondering if there is a wobble or shudder etc… Similar to the feeling of buying a used car…every clunk or shudder gets you worried. Love that I saved $1000 plus taking on the repair.
Other Parts Used:
Washer Tub Bearing Washer Tub Bearing, Rear Gasket Rear Tub Gasket
  • Woody from RED HOOK, NY
  • Difficulty Level:
    Really Easy
  • Total Repair Time:
    More than 2 hours
  • Tools:
    Pliers, Screw drivers, Socket set, Wrench (Adjustable), Wrench set
1 person found this instruction helpful.
Was this instruction helpful to you?
Thank you for voting!
Dry bearing noise
I researched the symptom, watched a repair video, ordered the parts: one rear bearing, seal, and gasket. After disassembly found inner bearing to be bad. Ordered inner bearing. Then found the spider or hub shaft corroded, and ordered spider. Finally with all the parts replaced, assembled washer and returned it to service.
Other Parts Used:
Washer Tub Bearing, Rear Gasket Rear Tub Gasket
  • ROBERT from BETHLEHEM, GA
  • Difficulty Level:
    Easy
  • Total Repair Time:
    More than 2 hours
  • Tools:
    Pliers, Screw drivers, Socket set, Wrench set
1 of 2 people found this instruction helpful.
Was this instruction helpful to you?
Thank you for voting!
Tub bearing and seal failed
Watched a step-by-step video on you tube and ordered parts. I took apart the washer by following the steps in the same video to disassemble. Once apart I took the opportunity to pressure wash the tub and housing then let dry overnight. It takes a minute to get the washer apart then back together, but no part was difficult. No special tools were needed. Before I put the back and top panel on, I hooked a garden hose with a splitter to the supply lines and ran a cycle in the garage just to make sure all connections were nice and tight. No issues. Washer is running like a champ since. As you take the washer apart for this type of repair you basically unhook or remove every single part that could go out. Great opportunity to familiarize yourself with other components for the "next time".
Other Parts Used:
Washer Tub Bearing Washer Tub Bearing, Rear Gasket Rear Tub Gasket
  • James from NEWARK, TX
  • Difficulty Level:
    Really Easy
  • Total Repair Time:
    More than 2 hours
  • Tools:
    Nutdriver, Pliers, Screw drivers, Socket set, Wrench (Adjustable), Wrench set
1 person found this instruction helpful.
Was this instruction helpful to you?
Thank you for voting!
Very nosey
Replace both bearings and seal also replace spider gear due to the bearing seal surface damage,also replace drum gasket and door gasket and all shock absorber.The clean up two more time then the repairs did.
Other Parts Used:
Washer Tub Bearing, Rear BEARING,BALL LEG ASSEMBLY Rear Tub Gasket
  • Lonnie from JACKSONVILLE, FL
  • Difficulty Level:
    Really Easy
  • Total Repair Time:
    More than 2 hours
  • Tools:
    Nutdriver, Pliers, Screw drivers, Socket set
2 of 2 people found this instruction helpful.
Was this instruction helpful to you?
Thank you for voting!
Very noisy when tub was spinning , tub bearings and seal were bad.
Watched a YouTube video on how to disassemble the washer step by step, replace the bearings, and reassemble the machine. was very helpful.
Other Parts Used:
Washer Tub Bearing, Rear BEARING,BALL Gasket Rear Tub Gasket
  • Gerald from CENTRALIA, KS
  • Difficulty Level:
    A Bit Difficult
  • Total Repair Time:
    1- 2 hours
  • Tools:
    Pliers, Screw drivers, Socket set
4 of 4 people found this instruction helpful.
Was this instruction helpful to you?
Thank you for voting!
Loud noise on spin cycle, berrings went bad
Methodically, no hurry and it went smooth. Most difficult was removing old bearings and installing the new. Glad I had experience doing this. Would not recommend this as a first time experience replacing bearings. Replaced shocks in the process, glad we did, made a huge difference.
Other Parts Used:
BEARING,BALL Bearing,Ball Gasket Rear Tub Gasket Shock Absorber Kit
  • Dennis from OVERLAND PARK, KS
  • Difficulty Level:
    A Bit Difficult
  • Total Repair Time:
    More than 2 hours
  • Tools:
    Nutdriver, Pliers, Screw drivers, Wrench (Adjustable)
2 of 3 people found this instruction helpful.
Was this instruction helpful to you?
Thank you for voting!
Bad/worn drum bearings
Followed the step-by-step video, you end up taking most of the washer apart. Got the drum out & apart, then ran into a wall with the bearings. Couldn't get them out - acted like the housings were frozen. Took all the pieces of the washer to the curb for garbage pickup.
I never opened the replacement parts and will be returning them.
Other Parts Used:
Washer Tub Bearing, Rear BEARING,BALL Gasket Rear Tub Gasket
  • Michael from DUBLIN, OH
  • Difficulty Level:
    Difficult
  • Total Repair Time:
    More than 2 hours
  • Tools:
    Screw drivers, Socket set, Wrench (Adjustable)
5 of 7 people found this instruction helpful.
Was this instruction helpful to you?
Thank you for voting!
washer grinds while running
as expected, the rear bearings were GONE!.. hard part was removing the inner tub from the outer one. hint... put the bolt in the shaft, tighten and pond the crap out of it ... takes time but the tub will come out, after that it's easy
Other Parts Used:
Washer Tub Bearing Washer Tub Bearing, Rear Gasket Rear Tub Gasket
  • mark from REEDSVILLE, WI
  • Difficulty Level:
    Easy
  • Total Repair Time:
    1- 2 hours
  • Tools:
    Pliers, Screw drivers, Socket set, Wrench set
12 of 14 people found this instruction helpful.
Was this instruction helpful to you?
Thank you for voting!
Washer sounded like the 3:10 to Yuma was rolling through the laundry room when the washer hit the spin cycle.
Google LG washing machine bearing replacement, you'll find a very informative video narrated by a British gentleman who will walk you through the steps. If you are even a slightly handy DIY'er this is an easy job although very time consuming. Take your time with reassembling the machine. I missed a couple of connections and while testing it out I flooded the laundry room. Could have been avoided if I had taken a picture of every individual item I disconnected.
Other Parts Used:
BEARING,BALL Washer Tub Bearing Gasket Rear Tub Gasket
  • Joseph from YUMA, AZ
  • Difficulty Level:
    Easy
  • Total Repair Time:
    More than 2 hours
  • Tools:
    Pliers, Screw drivers, Socket set, Wrench (Adjustable), Wrench set
6 of 8 people found this instruction helpful.
Was this instruction helpful to you?
Thank you for voting!
  • 1
  • 2
Questions and Answers

Ask our experts a question about this part and we'll get back to you as soon as possible!

2 questions answered by our experts.
Sort by:
  • 1
Sorry, we couldn't find any existing answers that matched.Try using some different or simpler keywords, or submit your new question by using the "Ask a Question" button above!
Ken
December 15, 2022
The machine was unbalanced during spin cycle when it started to smoke with about six minutes left in the cycle. It came out of the top between the control panel and the frame. There was more smoke inside the drum. Could you tell me which gasket it was more likely to be? The rear gasket or the door gasket? I did not notice any burn marks on the front gasket.
For model number kenmore 796.4027
PartSelect logo
Hello Ken, thank you for contacting us. The rear tub gasket, part number PS3522855, is more susceptible to burns due to an unbalanced spin than the door gasket. We would also recommend replacing the washer tub bearing, part number PS11711138. Customer service is always available to help you place an order if you are having trouble doing so. Good luck with your repair.

1 person found this helpful.

Was this helpful?
Thank you for voting!
Related Parts:
Don
October 24, 2022
Clothes are getting a black stain after washing, rubber gasket at door is suspected. We clean the gasket within two weeks more stain to clothes. Is there somewhere else the black stain could come from? We suspect mold collecting on the gasket
PartSelect logo
Hello Don, thank you for your question. We have researched your issue and found that the main culprit here is fabric softener. Most fabric softeners are oil-based, and if too much is used, or added too soon or late into the cycle, or hits your clothes without being diluted enough, it will cause oily streaks on your clothes. The second most likely issue is that the mold often grows when water doesn't dry around a faulty seal and it will leave a stain when clothing touches it. Try cleaning it with white vinegar, but if that doesn't fix the problem, you may need to have the entire gasket replaced. Let us know if you have further questions!

Was this helpful?
Thank you for voting!
  • 1
You May Also Need ?
Model Cross Reference
This part works with the following models:
PartSelect Number: PS3522855
Manufacturer Part Number: 4036ER2004A
Brand
Model Number
Description
LG
40272
Washer - LG Washing Machine Model 40272 Parts
LG
40311
Washer - Washer
LG
40318
Washer - LG Washing Machine Model 40318 Parts
LG
40441
Washer - LG Washing Machine Model 40441 Parts
LG
40448
Washer - LG Washing Machine Model 40448 Parts
LG
40512
Washer - LG Washing Machine Model 40512 Parts
LG
40518
Washer - LG Washing Machine Model 40518 Parts
LG
41022
Washer - LG Washing Machine Model 41022 Parts
LG
41028
Washer - LG Washing Machine Model 41028 Parts
LG
41029
Washer - LG Washing Machine Model 41029 Parts
LG
41172
Washer - LG Washing Machine Model 41172 Parts
LG
41182
Washer - LG Washing Machine Model 41182 Parts
LG
41272
Washer - LG Washing Machine Model 41272 Parts
LG
41282
Washer - LG Washing Machine Model 41282 Parts
LG
41283
Washer - LG Washing Machine Model 41283 Parts
LG
41372
Washer - LG Washing Machine Model 41372 Parts
LG
41373
Washer - LG Washing Machine Model 41373 Parts
LG
41379
Washer - LG Washing Machine Model 41379 Parts
LG
41472
Washer - LG Washing Machine Model 41472 Parts
LG
41473
Washer - LG Washing Machine Model 41473 Parts
LG
42192
Washer - LG Washing Machine Model 42192 Parts
LG
42198
Washer - LG Washing Machine Model 42198 Parts
LG
42199
Washer - LG Washing Machine Model 42199 Parts
LG
45429
Washer - Washer
LG
48231009799
Washer
LG
48231010108
Washer
LG
498610
Washer Dryer Combo - Washer-Dryer
Kenmore
79628862700
Washer - Kenmore Washing Machine Model 796.28862700 (79628862700, 796 28862700) Parts
Kenmore
79628869700
Washer - Kenmore Washing Machine Model 796.28869700 (79628869700, 796 28869700) Parts
Kenmore
79629872700
Washer - Kenmore Washing Machine Model 796.29872700 (79629872700, 796 29872700) Parts
Customer Service Representative

Get in touch, we're here to help!

Daily 8am - 9pm EST

Contact Customer Service