This motor comes with a redesigned motor switch and new wire terminals. This part runs at 1/4hp. It performs 1725 revolutions per minute and carries 4.5 amps and 115V.
How Buying OEM Parts Can Save You Time and Money
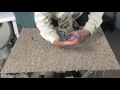
Part Videos
Replacing your Maytag Dryer Drive Motor - 60Hz 115V
Keep searches simple. Use keywords, e.g. "leaking", "pump", "broken" or "fit".
Sorry, we couldn't find any existing reviews that matched. Try using some different or simpler keywords.
★★★★★
★★★★★
Richard S - July 5, 2023
Verified Purchase
Perfect fit for my 1994 Maytag dryer (Performa Plus)
Bearing seal went bad on original motor and was making loud noise and eventually locked up. New motor worked perfectly after putting new fittings on 2 dryer wires. Match the wires per instructions in the 'question and answer' section. My wife didn't think I could fix it.. haha...
★★★★★
★★★★★
Zeno W - July 29, 2021
Verified Purchase
It worked
Received part and was able to replace relatively easily with some changes to some wire ends and wiring diagram from comments.
★★★★★
★★★★★
Jennifer Z - February 2, 2020
Verified Purchase
The part works great. Working with the setup was a little challenging.
Part works as it should. Things to note: * When looking at the terminal pins from the "back" of the motor - where you can't see the numbers - you will be skipping a terminal in between the blue and red wires. It's an un-numbered terminal. Get familiar with this before you put it back in the dryer. * Make sure you really do cut the wires close to the old terminal. You won't have much length left. * Make sure you crimp your new terminal adapters really hard with an actual crimper! I used some needlenose pliers, and it didn't work very well.
*The terminal where the yellow wires go is right in line with the black wires. For some reason, there's no obvious sign which of the 2 numbers goes to the front and which number goes to the back.
Hope this helps someone.
★★★★★
★★★★★
Jorge B - December 18, 2019
Verified Purchase
Great source for parts
I appreciate the fact that you provide instructional videos with the parts that you sell. It's because of this is why I purchased from you.
★★★★★
★★★★★
Daniel C - August 23, 2019
Verified Purchase
Note that the ground wire has a tab and it is NOT numbered...
My dryer is a Maytag LDE4914ACE. This is an electric dryer. The original motor was a S58NXEET-4784. The new motor (W10410999) has a new number (W10410892). Once I figured out what was confusing me with the wiring, everything worked great! There were no instructions included with the motor, but the information for wiring on the this website was correct. There is a pdf file online for the wiring diagram, which may be found with some searching. It would be very helpful if that was made available on this website. Also, the images of the motor on this website are outdated. The wire connectors are not as pictured.
The wire connector tabs are numbered " 2 6 8 4 3 9 7 5 1 " from left to right. The ground wire tab is between tabs 5 and 1 and does not have a number. When installing the wiring, it was difficult to see the numbers or the ground wire because they are at the back of the dryer, facing away. This caused me to accidentally connect the red wire (T5) to the ground tab. When I tried to turn on the dryer, nothing happened at all. However, the light inside the dryer was on when I opened the door. Once, I realized my error, I moved the red wire over one tab which left an empty tab (Ground) between the red wire (T5) and the blue wire (T1).
The Yellow goes to T6, Red to T5, Black to T2, Blue to T1 and the white (gray on mine) you will remove the blue jumper lead between T4 and 1/4" overload protector tab, connect the grey harness lead to the 1/4" overload protector tab.
All of the connectors on my wiring harness were 1/4" The new motor has some 1/4" and some 1/8" tabs. Instead of cutting the wires on my dryer, I made adapter wires with 1/4" male on one end and 1/8" female on the other end. If you do this, make sure you cover any bare metal from the adapter with electrical tape or similar to prevent short circuits.
Other than the lack of wiring information, the videos on this site are extremely helpful. I watched them many times while I was doing the repair. I would pause the video and then complete that step and then watch the video for the next step.
★★★★★
★★★★★
Alain H - August 19, 2019
Verified Purchase
Good motor for my maytag dryer LDG4000AAW
The motor received run very well with the information gived :
The Yellow goes to T6, Red to T5 Black to T2, blue to T1 and the white, you will remove the blue jumper lead between the switch terminal 4 and 1/4" protector tab, connect the grey harness lead to the 1/4" protector tab.
All is goog.
Thanks you.
★★★★★
★★★★★
Donald B - July 10, 2019
Verified Purchase
Not too difficult to replace
Motor comes without instructions...the original motor's switch was color coded terminations but this motor's switch is number coded...luckily you can find the instructions online for the color to number terminations. All in all...works great.
★★★★★
★★★★★
Thomas B - December 28, 2018
Verified Purchase
Parts were exactly what I wanted .
The parts were in great condition. Went back together easy. Machine is running like new.
★★★★★
★★★★★
Ron W - December 20, 2018
Verified Purchase
Great Part
Things went very well.
★★★★★
★★★★★
Leslie C - September 24, 2018
Verified Purchase
Great warehouse folks and customer service!
Wasn’t sure I got the correct part for my dryer, because the plug was so different. Called customer service to verify. They emailed me to send a picture of the part with model number of my dryer. The part was correct, instructions were very good. Installed new motor and works like a charm! Always happy with PartSelect!
< Prev
1
2
Next >
Customer Repair Stories
Average Repair Rating: 2.4 / 5.0, 16 reviews.
What's this?
Sort by:
< Prev
1
2
Next >
Search filter:
Clear Filter
Your search term must have 3 or more characters.
Keep searches simple. Use keywords, e.g. "leaking", "pump", "broken" or "fit".
Sorry, we couldn't find any existing installation instruction that matched.
Dryer would struggle to start, but never run.
When this dryer was given to me, I was told the door switch was going bad. It was originally purchased in 1996 as a REAL MAYTAG, so fixing it was no brainer, but the switch did not fix the problem. I pulled the small panel off the back to expose the motor and struggled to spin it by hand, so I assumed the motor was seizing up.
... Read morer />I entered the model number into this website and found a motor that would work and also decided to go with a belt and a fan. There was an installation video provided when I added the motor to my cart. The dryer was older than mine, but obviously identical on the interior. The only difference was that older dryer didn't have a little deflector shield that I have and I still can't remember where that goes. My dryer appears to be working just fine without it though.
Like the video stated: Remove two screws at the bottom of the front panel to remove the panel while disconnecting the door switch wires. Since I had an old switch, I took the three wires and plugged them into that so I would remember where each one went .
I believe after that was the fan housing with a few bolts, then the drum. I reached through the small back panel to loosen the belt by moving the tensioner back, then removing the drum. The fan was secured by a snap ring and a spring loaded hose clamp that required a small set of pliers.
There were two bolts that held the motor in; once removed, the motor slid out with the bracket. The tough part was using the screwdriver to get the clamps off that hold the motor to the bracket, but the video helped with that.
The new motor did not come with instructions on how to wire it, so I had to go to this site and find somebody who had asked the question. The video did not do all that great a job in showing me where the wires go and since the motor was different than my REAL MAYTAG motor, I had no idea where the wires went, but I found someone who asked the question and he got the answer, so I was able to figure it out.
It had been over a month since I had taken the dryer apart so I went back to that video which, except for the wiring and that tiny little deflector plate, provided excellent detail of how to install everything. I had trouble deciding where I wanted the wires to make sure the drum didn't rub on them, so after it was all back together, I watched the drum rotate with the dryer running from that little panel in the back.
One thing that saved me was every time I took something off, I kept the bolts with that item. It only became a problem when my friend came over and saw the dryer in pieces. He just had to give me his own lecture about fixing dryers and when he talks he has touch everything, so all my bolts are going flying! I was like, "What are you doing? Are you gonna put this back together for me after you lose all my bolts?"
Drum would not turn, drive motor humming loudly and unable to turn drum/blower wheel
The repair video is terrific and many others here have thoroughly described the steps involved to replace the drive motor.
The biggest hurdle for me was that the motor came with a new switch that required a different wiring configuration. No wiring diagram was included. Several others had posted questions about wiring in the
... Read moreQ&A and unfortunately PartSelect kept copy/pasting the same confusing and incomplete answer over and over:
"The Yellow goes to T6, Red to T5 Black to T2, blue to T1 and the white you will remove the blue jumper lead between the switch terminal 4 and 1/4" protector tab, connect the grey harness lead to the 1/4" protector tab."
Reading that doesn't tell me what to do with the white wire, doesn't address that my blue and white wires were crimped into the same connector from the factory, doesn't address that I had 2 black wires crimped into the same connector from the factory, and doesn't address a factory ground wire that connected the frame of the OEM motor to the bracket that the motor sits in.
With all the other excellent info supplied by PartSelect, this was surprising and frustrating. The sales dept ignored an emailed question from me, and the Q&A section didn't allow me to post a question.
Searching the internet, I found a wiring diagram on aceappliancesd dot com that addressed my dryer's OEM wiring configuration. Here's what I ended up with:
TI - Blue and white, crimped together into a single connector T2 - Black & black, crimped together into a single connector (the wiring diagram I found said this should be black & brown, but they both look black to me) T5 - Red T6 - Yellow 1/4" Thermal protector tab - Grey (from the harness)
The new motor switch had a grounding tab with nothing connected to it. I removed the screw holding that tab into the switch and connected the (also grey) OEM short ground wire from the motor frame to the mounting bracket.
I had to cut 2 of the pieces of tape holding the OEM wiring harness together in order to get enough slack for all the connections to reach. If you do this too, make sure all the wires are still clear of the moving parts and the hot bits. You may need to retape the wires together at a different location to keep things tidy.
I also laid the belt over the drum and put 2 pieces of tape over it to hold it in place while I got the drum positioned, then I reached through the back access panel to loop the belt around the motor pulley and idler. Once that's done, just reach over the top of the drum and peel the tape off. I found that much easier than trying to loop the belt by reaching through and past the drum.
The Maytag OEM motor is no longer available, so what you get instead is a Whirlpool which is an exact mechanical match, as for the electrical wiring, good luck getting support from Maytag or Whirlpool as it was non-existent (maybe because I installed the motor on a Saturday) they should have put some wiring instruction in the box with the
... Read more motor, as they were not available on line, I spent almost as much time online as I did working on the dryer trying to find a wiring diagram and finally looking through a bunch of Youtube videos to find one that was close to what I was working on, this task was not an easy one, if you are mechanically inclined you will do just fine.
Read less
Raymond from CYPRESS, CA
Difficulty Level:
Difficult
Total Repair Time:
More than 2 hours
Tools:
Nutdriver, Pliers, Screw drivers, Socket set
1 personfound this instruction helpful.
Was this instruction helpful to you?
Thank you for voting!
Motor Bearings Were Bad Causing A High Pitch Squeak / Squealing Noise When Dryer Was Running
First, it is IMPERATIVE that the dryer is unplugged from the wall or the appropriate breaker is turned off to prevent electrocution!!! The front of the dryer is removed by removing the two screws at the bottom of the front with a Phillips head screwdriver. Next, remove the door wiring from the wiring clamp and set front / door of dryer
... Read moreto the side. Next, remove the bulk head by removing four nuts from the sides with the appropriate nutdriver. The drum belt will have to be disconnected from the motor pulley by lifting the spring of the pulley to release belt tension. This can be done from the front or back access panel of the dryer. The back access panel gives you a better view of the motor pulley and attached belt. After removal of the belt from the motor pulley, the drum of the dryer can be removed. Next, remove the heat shield at the front of the dryer. It is held on with two nuts and can be removed using the appropriate nut driver. Next, remove the blower wheel housing cover using the appropriate nut driver. The blower wheel will be next. It can be removed by using a pair of pliers to remove the circular clamp. A pair of snap-ring pliers will also be need to remove the snap-ring also holding the wheel in place on the motor axle. After the blower wheel is removed from its housing, the housing will need to be removed. The housing is again held in place by several nuts and the appropriate nut driver will be needed to remove them. Next, take all wiring loose from the motor. It would be a good idea to photograph or note how and what wires were attached in specific locations on the wiring harness. The new motor may be different when it comes to wiring and will be accompanied by a wiring diagram and the needed connection ends for the wiring. If it is a different wiring layout, as was my motor that I ordered from this site, a set of wiring strippers / pliers will be needed to cut, strip, and crimp the new connectors. After wiring has been removed from the motor, remove the motor by removing two nuts with the appropriate nut driver from the bottom of the motor mount. The motor, mount, and pulley will then all come out as one piece. The motor will then need to be removed from the mount. This can be accomplished by using a flat head screwdriver and a hammer. Place the flat end of the screwdriver into the raised edge of the motor mount clamp and pull away from the locking bracket. If needed, use a hammer to give that extra tap to the end of the screwdriver to remove the clamps. After the motor is removed from the mount, an Allen wrench will need to be utilized to take the belt glide / seat off of the motor axle. You will also need the snap-ring pliers again to remove a snap ring from this axle as well. Clean the motor mount and dry thoroughly. Grease the pulley housing where it contacts the motor mount for smooth gliding against the mount. It is important that you use a NON-FLAMMABLE grease. This is the end of the "tear-down" phase. Now is a good time to vaccum and clean the inside of the dryer cabinet. This will help insure that excess lint and fuzz is removed to prevent an accidental dyer fire. Next, place the new motor back into the motor mount in reverse order. Make sure the belt glide / seat from the motor axle aligns with the belt marks on the pulley. Reassemble the dryer in reverse order, making sure to follow the wiring diagram provided with your new motor. Also you need to insure that the motor is turned at a 45 degree angle to allow the dryer drum to pass the motor without striking it. After reassembly, plug in the dryer and attempt to start. If your dryer does not start, troubleshoot the wiring first. Wiring was the most difficult part of this repair and working in the tight space provided was a trick. Also look up a video of the repair! This helped me tremendously. Videos can be found on this site or at YouTube.com.
Read less
Cody from BENTON, TN
Difficulty Level:
A Bit Difficult
Total Repair Time:
1- 2 hours
Tools:
Nutdriver, Pliers, Screw drivers, Socket set, Wrench set
2 of 2 peoplefound this instruction helpful.
Was this instruction helpful to you?
Thank you for voting!
Replace motor
I got the motor installation and wiring diagram book from the Ace Appliance web site. I tried to get it 4 times with parts select and got nowhere
Summary: I followed the instructions in the PartSelect.com repair video that was displayed on the motor part page on the site (video here: https://youtu.be/eXJMmn5mwMY).
Details: 1.) I turned off power to the dryer. 2.) I removed the front panel by removing the two screws on the bottom edge with a stubby #2 Phillips s
... Read morecrewdriver, then rotated the panel out until the clips released on the top edge. 3.) I noted the wire connections to the door switch, and then removed the three wires from the terminals on the door switch. I removed the door switch wire harness from the clips and moved it out of the way. 4.) I removed the blue wire from the dryness sensor and set it aside but left the other wire attached since it would come off with the bulkhead. 5.) I removed the front tumbler bulkhead by removing the four hex-head screws that secured it with a 5/16" nutdriver. I set the bulkhead aside. 6.) I reached back under the tumbler drum and slipped the drive belt off the idler pulley beside the motor, then pulled the tumbler drum straight out the front of the dryer. I also removed the belt as it was going to be replaced. 7.) I removed the two hex-head screws holding the guard plate over the temperature and thermal overload sensors with a 5/16" nutdriver and then removed the plate. 8.) I removed the single hex-head screw holding the blower housing to the base of the dryer with a 5/16" nutdriver, then removed the six hex-head screws on the front blower cover with a 3/16" nutdriver. I removed the front blower cover and set it aside. 9.) I removed the retaining ring holding the blower wheel from the blower shaft with a retaining ring pliers, then removed the spring clamp from the blower wheel hub with a pair of needlenose pliers. I used a flat-blade screwdriver to gently open up the slots on the blower wheel hub and was able to pull the blower wheel straight off the shaft. 10.) I removed the four hex-head screws attaching the rear blower housing to the motor mount with a 5/16" nutdriver, then removed the rear blower housing, making sure to gently remove it from the exhaust pipe as well. 11.) I detached the idler pulley spring from the idler pulley arm. 12.) I removed the two hex-head screws holding the motor mount to the base of the dryer with a 5/16" nutdriver, then slid the motor mount to the right do detach the tabs on the base from the mounting slots. I disconnected the wires from the motor (red, blue, grey, black and yellow) and moved the wiring harness out of the way.. 13.) I pulled the motor and motor mount out of the dryer and placed them on the workbench. Then I removed the retaining ring from the blower end of the motor shaft with retaining ring pliers. 14.) I removed the drive pulley from the shaft with a 3/16" hex key to loosen the set screw. This required a few taps on the key with a hammer. 15.) I removed the motor clips from each end of the motor with a flat-bladed screwdriver, pushing the locking tab on the clip down until it disengaged from the hook on the motor mount. 16.) I removed the motor from the motor mount and discarded it. 17.) I placed the new motor into the motor mount and aligned it so that the frame of the motor would not come in contact with the tumbler drum. I put the new motor clips back on with a flat-bladed screwdriver. 18.) I slid the drive pulley onto the drive shaft and lined it up with the belt mark on the idler pulley. Then I tightened the set screw with a 3/16" hex key and several light taps with the hammer. 19.) I placed the rear blower retaining clip onto the blower end of the shaft with the retaining ring pliers. 20.) The motor came with no wiring diagram, and the manufacturer also changed the starting switch with a different model. Some research on the PartSelect.com site yielded instructions on the correct terminal connections. The motor came with several 1/8" crimp connectors to replace the original 1/4" connectors on 2 of the wires. I used the wire strippers to cut the ends off the red and yellow wires, stripped 1/4" of insulation, and the used the crimping tool to crimp new 1/8" connectors on the red and yellow wires. 21.) I replaced the motor mount and motor back in the dryer and connected the wires to the correct terminals. There was a blue jumper wire on the motor that I removed per instructions so that the grey wire could connect to the motor thermal overload terminal. 22.) Reassembly was then the reverse of disassembly. The only tricky part was putting the new belt on and getting it threaded through the drive pulley and idler pulley in the correct orientation. While I had the drum out, I took the opportunity to lubricate the drum roller wheel bearings and the idler pulley bearing and to clean out the accumulated lint from some 20 years of operation.
The job took about 2 hours total, a good portion of which was spent figuring out the correct wiring for the new motor.
The dryer now works quietly and starts without issue.
This website is awesome. After imputing my dryer model I was able to select from the list if symptoms my issue...Dryer will not start. From there was percentage of issues that would cause my issue. After determining it was the motor (after 25 years who would have thought that!!!). In this process I discovered other non related issues that
... Read more i should attend to. So I basically rebuilt the dryer and it worked right away. I am retired military and in the tax preparation/representation business now, so a lot of this was new to me. The detailed instruction and especially the videos provided foolproof methods to complete each of the repairs. It was a little time consuming but very easy to complete. I did gain some new tools and diagnostic equipment that will come in handy in the future. Now I am going to tackle my daughters dishwasher. Thank you Parts Select and Steve (on the videos). John Beazle
Nutdriver, Pliers, Screw drivers, Socket set, Wrench set
6 of 12 peoplefound this instruction helpful.
Was this instruction helpful to you?
Thank you for voting!
motor had loud bearing noise
There are some really good blow-by-blow descriptions on how to go about the repair already listed here. The main thing is to go slowly and take your time. It was really quite logical for a weekend handy man. The best advise was to use a digital camera to record every step of the way as you disassemble the dryer. I referenced the pictu
... Read moreres more than once when I was putting all of the wires and pieces back together. Also, I didn't have a pair of snap ring pliers. My neighbor told me how to use two ice picks to poke in the tiny holes and spread the rings...just be careful! Keep a vacuum handy, there will be lots of lint to clean up. The new motor, belt and pulley work great and I pleased with how well the repair went.
Found step by step instructions on your website, they were posted by another do-it-yourselfer. The exact make of dryer that I have, and the drawings with part numbers listed was quite helpful. The bad motor came out easy enough and the new one was just like the old so it fit right into place. Strung a new belt around the tumbler drum and
... Read moredryer is just like NEW. Thank you so much. Probably saved a couple hundred dollars.
We used previous installation instructions, which were quite good – we embellished the directions where we ran into some things that weren’t mentioned.
1. Remove the back access plate to release the belt from the pulley. 2. Remove the two screws at the bottom front of the dryer, rotate the front to release it at the top. R
... Read moreemove the wires from the door status switch. 3. Remove the 4 nuts holding the drum support frame and pull straight out. 4. Putting one hand inside the drum and supporting it, gently pull the drum toward you until it clears the rollers. Reach in along both sides of the outside top of the drum and slide the belt off the back of the drum. With a hand inside supporting the weight of the drum tip the drum slightly forward and out the front. Set it out of the way. 5. Remove the two bolts holding the thermostat cover (silver odd shaped metal plate at the front of the dryer). 6. Remove the dryer blower cover plate by removing the 6 bolts holding it to the blower housing with a short ¼” nut driver. Remember to remove the bolt holding the plate to the bottom of the dryer. 7. Release the door status wire from the clips on the left side of the dryer and set the blower housing plate to the right, out of your way without removing the wires. 8. Remove the blower wheel by removing the snap-ring at the front of the shaft and then removing the collar- compression clip. 9. Pull out the blower wheel (this was a bear as it was very tight on the shaft – the shaft-collar of the blower wheel has grooves in it. We used very small screw drivers to carefully pry the segment of the collar between the grooves away from the shaft and used a penetrating oil and with a very slight rocking force muscled the blower wheel off then removed the rear snap-ring from the motor shaft. 10. Release the 5 wires attached to the motor. 11. Remove the ground wire on the back of the motor by backing the screw out. 12. Release the front and back motor clips (Use a large straight-blade screw-driver to press down and out on the end of the clips. 13. Lift out the motor. 14. Remove the rear pulley from the motor using an Allen wrench and transfer it to the new motor (We used heavy duty thread locked on the Allen set screw. – When we removed the pulley it was necessary to heat the Allen set-screw area with a propane torch to soften the thread-locker cement. IF YOU NEED TO DO THIS MAKE SURE YOU LEAVE PLENTY OF TIME FOR THE PULLEY TO COOL BEFORE YOU HANDLE IT! 15. Set the new motor in the support frame, ensuring the lips of the vibration isolation rings are pointed down to slip over the frame and are not facing up towards the clips ( makes clip installation much easier). 16. Hook up the wires, following the color coding on the motor controller you are attaching to. 17. Hook up the ground wire on the back of the motor. 18. Reinstall the rear snap-ring, blower wheel (went on a lot easier than it came off), front snap-ring, collar-compression clip, blower housing front cover (Including the bolt to the dryer bottom) , 19. Re-route the door switch wire up the left side and secure with clips. 20. Reinstall the thermostat cover, 21. Reinstall the drum and belt (use scotch tape to temporarily secure belt) , the drum front support frame (ensure the felt seals for the drum and the blower cover are properly aligned and seated correctly), 22. Reinstall the belt through the back access panel over the pulley and idler wheel (make sure the belt smooth side is against the drum, the grooved side against the pulley and the belt is inside the belt guide on the idler wheel and remove the scotch tape from the belt). Make sure no tools are in the dryer cabinet. 23. Rotate the drum clockwise a few revolutions to align the belt and reinstall the rear panel. 24. Hook up the door status wire before you set the front cover and install the 2 screws,
We previously replaced the front drum felt seal and the tumbler glides, the belt and both drum rollers.
Read less
MARCELLE from DUNDEE, NY
Difficulty Level:
A Bit Difficult
Total Repair Time:
1- 2 hours
Tools:
Nutdriver, Screw drivers, Wrench set
12 of 15 peoplefound this instruction helpful.
Was this instruction helpful to you?
Thank you for voting!
< Prev
1
2
Next >
Questions and Answers
Ask our experts a question about this part and we'll get back to you as soon as possible!
33 questions answered by our experts.
Sort by:
< Prev
1
2
3
Next >
Search filter:
Clear Filter
Your search term must have 3 or more characters.
Keep searches simple. Use keywords, e.g. "leaking", "pump", "broken" or "fit".
Sorry, we couldn't find any existing answers that matched.Try using some different or simpler keywords, or submit your new question by using the "Ask a Question" button above!
Jerry
February 6, 2018
The new motor that I received today is a little different then the old motor prat number w10410999. The old motor had color coordinated dots to show which wire go to which terminal. It has yellow, black on one side and red, grey, and blue and white on the other side. The new motor has numbers on the relay 2-6-8-4-3-9-7-5. I would like to know where does the red wire connect to? The yellow wire? The black wire? The grey wire? And the blue and white wire ?
For model number DG7500
Hi Jerry, Thank you for the question.The Yellow goes to T6, Red to T5 Black to T2, blue to T1 and the white you will remove the blue jumper lead between the switch terminal 4 and 1/4" protector tab, connect the grey harness lead to the 1/4" protector tab. Hope this helps!
23 people found this helpful.
Was this helpful?
Thank you for voting!
Ed
March 6, 2018
Shouldn`t there have a connection diagram included?
Hello Ed, thank you for your question. If the part comes from the manufacturer (Whirlpool) with instructions we always forward them on with the part to our customer. For the new motor the connections are as follows. The Yellow goes to T6, Red to T5 Black to T2, blue to T1 and the white you will remove the blue jumper lead between the switch terminal 4 and 1/4" protector tab, connect the grey harness lead to the 1/4" protector tab. Hope this helps!
11 people found this helpful.
Was this helpful?
Thank you for voting!
Jerry
February 7, 2018
The new motor that i received today is a little different then the old motor prat number w10410999. The old motor had color coordinated dots to show which wire go to which terminal. It has yellow, black on one side and red, grey, and blue and white on the other side. The new motor has numbers on the relay 2-6-8-4-3-9-7-5. I would like to know where does the red wire connect to? The yellow wire? The black wire? The grey wire? And the blue and white wire ? I have two yellow wires that are together on one terminal is this ok?, and also the blue and white wires and connected together, do they both go on the t1?Jerry for model number dg7500
For model number DG7500
Hi Jerry, Thank you for the question.the yellow goes to t6, red to t5 black to t2, blue to t1 and the white you will remove the blue jumper lead between the switch terminal 4 and 1/4" protector tab, connect the grey harness lead to the 1/4" protector tab. hope this helps!
4 people found this helpful.
Was this helpful?
Thank you for voting!
Ben
August 16, 2017
My dryer stopped and will not restart. I checked all thermal switches, door switch, etc. All points to motor burned out, but not certain.
For model number Maytag LDE7304ACE
Hello Ben, thank you for contacting us. If you get no lights or anything on the dryer it could be the thermal fuses. part numbers PS11740687 and PS11740678. If lights come on but it wont start it could be the door switch, if its faulty the dryer will not start thinking the door is open, part number PS1964648. If you have tested all these and they are all good then it could be the motor. Good luck with the repair!
How do i wire thiss moter i have yellow red blue black and grey wires i do not have a white wire all your instructians talk about a white wire
For model number ps3500893
Hello Richard, thank you for your question. The grey wire and white wire are the same. You would follow the instructions but when they indicate the white wire, that is the grey wire that you have. The grey/white wire goes to the terminal on the overload as per the video online. I hope this helps!
3 people found this helpful.
Was this helpful?
Thank you for voting!
John
February 5, 2019
Is there supposed to be grease around the outside of the motor especially at the idler arm, or is this a sign that the bearing seals have failed?
For model number LDE610
Hello John, Thank you for the question. There should not be grease or oil around the motor and idler. It does sound like you have a leak. Thank you for your inquiry, good luck with this repair!
3 people found this helpful.
Was this helpful?
Thank you for voting!
Ritch
November 1, 2019
Hello. I am trying to totally understand how to install a motor on a dg7800 before i order one. Our motor died. Looking at the questions and answers i am not sure i totally understand the wiring directions. Is there a blue and white wire? Or a blue wire and a separate white wire? If the latter, i don't know what you are saying to do with the white wire. The rest of the directions sound straightforward and easy. It reads yellow to t6, red to t5, black to t2, blue to t1, and the white
I think that the next word is another sentence. you will remove the blue jumper....etc.
please clarify so i can be sure i understand. thanks.
For model number DG7800 Motor
Hello Ritch, Thank you for the question. I suggest watching the How to Video we have posted. Here is a link to the video on YouTube as well. Hope this helps!
https://www.youtube.com/watch?v=eXJMmn5mwMY
3 people found this helpful.
Was this helpful?
Thank you for voting!
Lionel
January 12, 2020
What is the size of the motor shaft that comes with this model.
For model number DE 308
Hi Lionel,
Thank you for your question. The diameter of the shaft is approximately a 1/2 inch by 10-1/2 inches long. Where this part is listed under the model number that you provided, it would be the correct motor for your dryer. We hope this helps. Thank you and have a great day!
3 people found this helpful.
Was this helpful?
Thank you for voting!
Scott
February 28, 2022
The blue and white wires share a common connector. Are both wires supposed to connect to the T1 terminal? Thank-you.
For model number DG7500
Hello Scott, Thank you for your inquiry. The red wire would go to terminal 5, the blue and white wires would go to terminal 1, the double yellow wires would go to terminal 6, and the double black wires would go to terminal 2. We hope this helps and if you need help placing an order, customer service is open 7 days a week. Please feel free to give us a call. We look forward to hearing from you!
2 people found this helpful.
Was this helpful?
Thank you for voting!
Henry
August 12, 2021
Runs but no heat.
For model number LDE8414ACE
Hello Henry, Thank you for the question. There could be several parts that may need to be replaced. We suggest testing the High Limit Thermostat, Heating Element and the Multi-Temp Cycling Thermostat with Internal Bias Heater. You can use a Multi Meter to check for continuity. We hope this helps!


 – Part Number: WP306604")


 – Part Number: WP303396")

