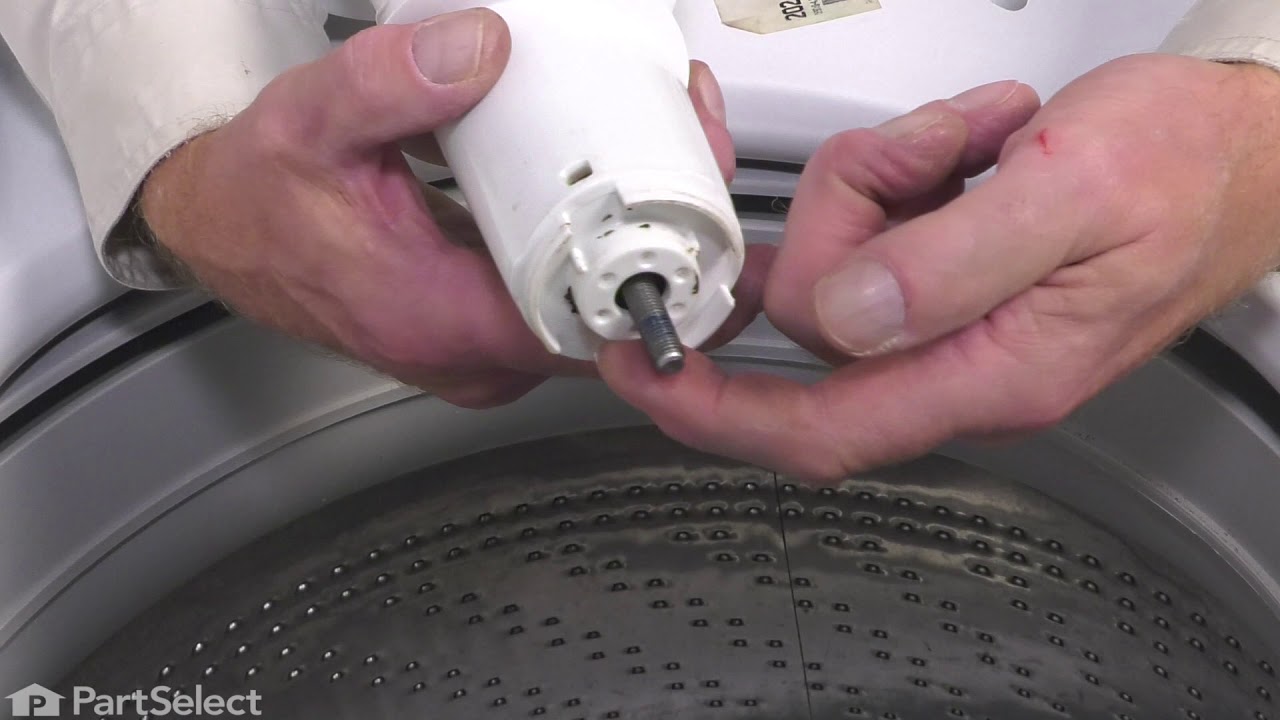
This agitator repair kit comes with a long cam, a thrust spacer and four dogs ears (agitator cogs). This repair kit is used to move the upper agitator and it connects the base of the agitator with the agitator top (mover). This part has been updated by the manufacture.
Keep searches simple. Use keywords, e.g. "leaking", "pump", "broken" or "fit".
Sorry, we couldn't find any existing reviews that matched. Try using some different or simpler keywords.
★★★★★
★★★★★
Bruce T - April 24, 2023
Verified Purchase
Easy peezy
Part came rapidly , site was easy to use, repair took the amount of time expected..
★★★★★
★★★★★
John B - June 8, 2022
Verified Purchase
Worked as expected
Part was received when promised. 15 minute repair job and back in action within an hour.
★★★★★
★★★★★
Frederick W - June 2, 2022
Verified Purchase
Correct part, Easy repair - Worked as expected
The part was what I needed. Fast shipping, excellent website and great repair videos. My old Kenmore washing machine is back in action!
★★★★★
★★★★★
Derek W - February 18, 2022
Verified Purchase
Perfect Part and Easy Install
Part was delivered quickly and was easy to install
★★★★★
★★★★★
Paul F - January 30, 2022
Verified Purchase
Easy repair
The part fit perfectly. The video was a great help
★★★★★
★★★★★
John D - January 28, 2022
Verified Purchase
easy repair
Parts installed and were perfect fit. Video was very helpful.
★★★★★
★★★★★
James B - November 8, 2021
Verified Purchase
Easy repair. Took 5 minutes.
parts were as described and fit perfectly.
★★★★★
★★★★★
Sandra B - September 27, 2021
Verified Purchase
Easy repair
This one small part saved us from buying a new washer. My son said the install was simple and I couldn't be happier.
★★★★★
★★★★★
Homer B - August 14, 2021
Verified Purchase
The parts were spot on right
Replacement of the parts took just about ten minutes and is doing it job as it should, this washer is 21 years old, I'm surprised that there are parts still available for it. Unlike my stoveoven thermostat that is 53 years old, when it hit 700 degrees i knew something was wrong!
★★★★★
★★★★★
Arnold J - April 23, 2021
Verified Purchase
Easy repair
It only took about 15 minutes to install
< Prev
1
2
3
Next >
Customer Repair Stories
Average Repair Rating: 4.5 / 5.0, 57 reviews.
What's this?
Sort by:
< Prev
1
2
3
Next >
Search filter:
Clear Filter
Your search term must have 3 or more characters.
Keep searches simple. Use keywords, e.g. "leaking", "pump", "broken" or "fit".
Sorry, we couldn't find any existing installation instruction that matched.
Wouldn't agitate
Removed lid panel changed lid lock switch. Took cap off removed 7/16 bolt changed out thrust spacer and agitater repair kit. Took about an hour.
I needed the washer ASAP. I paid extra for the expedited shipping. The parts arrived as promised. I watched the on-line video. I read and followed the included instructions. Removed cap and nut. Pulled out part with "dogs", swapped new dogs and assembly. Re-installed components, I was wary from information gleaned from the video, wh
... Read moreich warned of proper orientation of "dogs", as they can be inserted backwards. Tightened bolt and re-installed cap. Presto! Repaired washing machine worked as good as new. My coffee didn't even get cold.
Read less
William from RENO, NV
Difficulty Level:
Very Easy
Total Repair Time:
Less than 15 mins
Tools:
Screw drivers, Socket set
3 of 3 peoplefound this instruction helpful.
Was this instruction helpful to you?
Thank you for voting!
Rotation cogs (4) worn out and the upper part of the agitator wouldn't turn with the lower agitator.
Popped the cap off the agitator (pocket Knife) Look down in the center of the agitator. I saw I needed a 7/16 socket, 6" extention and ratchet. I used 1/4" drive. I took the retaining bolt out and lifted the upper portion of the agitator off of the iower portion and out of the tub. Set the part I took out on the dryer. I pulled the cone s
... Read morehaped part that houses the 4 cogs pieces out of the center of the upper agitator part. Once the coned shaped part was out, turned it upside down and placed it on the closed washing machine lid, then again used my pocket knife to lift the plastic retaining ring that securely holds the 4 cogs in place upward on the cone as to remove and replace the 4 worn out cogs with the new ones purchased in a repair kit. Pay close attention the direction the old cogs are facing, so the new ones go back in the same facing direction. It can be extremely easy to install the new ones backwards. I have to say at this point, I was quite disappointed with the retrofit repair kit I purchased. The new cone part the holds the cogs and goes down into the center of the upper agitator wouldn't allow the bolt that locks the whole agitator to the shaft to line up straight and wanted the bolt to "cross" thread into the main shaft. I took it all apart again and reused the original coned shaped part that came with the machine. I should have purchased just the 4 cogs for considerably less money. Reassembled the cone part and put it back together. Reinstalled the upper agitator in reverse order of removing it. Turned on the washer and it works like it's supposed to once again. Hope this helps the next person.
Read less
David from LOVELAND, CO
Difficulty Level:
Really Easy
Total Repair Time:
15 - 30 mins
Tools:
Socket set
6 of 6 peoplefound this instruction helpful.
Was this instruction helpful to you?
Thank you for voting!
The top agitator was not working.
I followed the instructions and removed the old part. I assembled the replacement parts and installed them. I also watched a video of the repair before I attempted the repair. All in all it went very smoothly.
Kerry from LINCOLN, NH
Difficulty Level:
Very Easy
Total Repair Time:
Less than 15 mins
Tools:
Screw drivers, Socket set
1 personfound this instruction helpful.
Was this instruction helpful to you?
Thank you for voting!
top half of the agitator failed to turn when washer was on, it just spun freely
I removed the fabric sofner dispenser, then removed the cap on the top of the agitator housing. I then removed the agitator retention bolt with a 3/8 drive craftsman ratchet , a craftsman half inch socket and 10 inch extension. I removed the broken pawls inside the agitator as they had crumbled from age and replaced the old items with th
... Read moree new items in the agitator repair kit and reassembled everything just reversing the steps.
My kit didn't have instructions, and there was one thing not mentioned by others, so I'll pitch in this info: 1) pry off the agitator cap. 2) Removed the bolt with nut driver & lift out agitator. 3) Now, to get the cam assembly out, I had to use some long needle-nose pliers to snap off small horizontal tabs that extend from the old cam as
... Read moresembly. These tabs exert outward pressure on some vertical tabs that extend upward from the agitator base and hold the cam assembly in place. It probably wouldn't be a big deal if you broke off the vertical tabs by mistake, since the bolt would hold the cam assembly in place anyway. With the horizontal tabs gone, the old cam assembly can be lifted off the agitator base. 4) The new assembly can be put in place, but the vertical tabs just mentioned need to be positioned so that the new assembly can be slid over the top. If they are bent, the new cam assembly will not drop down in place! 5) re-assemble the rest. ALL IS GOOD!
Read less
Richard from Grass Valley, CA
Difficulty Level:
A Bit Difficult
Total Repair Time:
15 - 30 mins
Tools:
Nutdriver, Pliers
1 personfound this instruction helpful.
Was this instruction helpful to you?
Thank you for voting!
No motion in top agitator.
Repair was very simple as others have stated. I also had to break the small tabs holding the cam in place. The only other element I have to add is the original cam assembly is better quality than the supplied one, even so I replaced it, however kept the old one. Look for a small slot under the agitator cap to insert the screw driver.
... Read moreAs is turned out, all I needed was the dogs, therefore, you may want to take it apart first to see if that's all you need. The small ridges in the dogs wear smooth, and no longer grip the gear ring on the agitator body.
Read less
Dan from Greenville, FL
Difficulty Level:
Really Easy
Total Repair Time:
Less than 15 mins
Tools:
Screw drivers, Socket set
1 of 3 peoplefound this instruction helpful.
Was this instruction helpful to you?
Thank you for voting!
Top Agitator Not Moving
Incredibly easy, literally five to ten minutes. Removed Fabric Softener cup, then lid over agitator attachment bolt (no tolls needed), removed attachment bolt and top agitator, replaced dogs and re-assembled all. Works like new.
Dan from Gilbert, AZ
Difficulty Level:
Really Easy
Total Repair Time:
Less than 15 mins
Tools:
Socket set
0 of 1 peoplefound this instruction helpful.
Was this instruction helpful to you?
Thank you for voting!
Upper agitator would not move
Removed the fabric softner despenser on to of agitator. Removed the filter inside the agitator, pull straight up Removed the bolt in the center of the agitator using a an extension on a 5/!6 socket. Pulled the agitator out of washer removed inner works by hand. There are 4 fiberglass parts with teeth on them, I removed thes
... Read moree 4 units and replaced them with new ones and it them put agitator back together in the reverse order. Works great.
Read less
Gary from Lake Havasu city, AZ
Difficulty Level:
Really Easy
Total Repair Time:
15 - 30 mins
Tools:
Socket set
2 of 3 peoplefound this instruction helpful.
Was this instruction helpful to you?
Thank you for voting!
Top agitator didn't agitate
Unplugged washer from 110 outlet. Lifted up plastic lock down ring, to remove soap dispenser, pulled off soap dispenser. Used a short plain screwdriver to remove plastic cap. Used a 3/8 drive ratchet with an extension and a 7/16 socket to remove bolt. Lifted up and removed agitator. Sat agitator on a rag,as there Is a littl
... Read moree grease.I put my feet on the bottom agitator and pulled up. Had to kind of pull and jerk as the top part of agitator came apart harder than expected. The plastic thrust washer between agitators fell on the floor. I re-used It, but bought a new one at a later date. I replaced broken plastic coggs and put back together.
Read less
rick from Soldotna, AK
Difficulty Level:
Really Easy
Total Repair Time:
15 - 30 mins
Tools:
Screw drivers, Socket set
1 of 2 peoplefound this instruction helpful.
Was this instruction helpful to you?
Thank you for voting!
< Prev
1
2
3
Next >
Questions and Answers
Ask our experts a question about this part and we'll get back to you as soon as possible!
2 questions answered by our experts.
Sort by:
< Prev
1
Next >
Search filter:
Clear Filter
Your search term must have 3 or more characters.
Keep searches simple. Use keywords, e.g. "leaking", "pump", "broken" or "fit".
Sorry, we couldn't find any existing answers that matched.Try using some different or simpler keywords, or submit your new question by using the "Ask a Question" button above!
Laura
January 31, 2019
I ordered this agitator repair kit for my Kenmore washer because from the options on your website, it seemed to be the part it needed. It was easy to install due to your video, thank you! However, it must not be the part that i needed, because my washer is still not running properly. It does not agitate, or spin. I put the load in and the washer fills with water, the lid stays locked the whole time, it goes through the cycles but i never hear any agitation or spinning noise. When i open it after it says it is done, the water has drained but the spin cycle didn't work, so the clothes are still wet and towards the bottom of the load the clothes are sopping wet. I can tell the machine didn't agitate either, because the clothes look like they just soaked in the water and didn't get clean. Can you please tell me what part would be a better choice? I really appreciate it!
For model number 11020022011
Hello, thank you for inquiring! As your appliance is not agitating or spinning, we would recommend checking your drive motor and your gearcase, as they are what creates the movement of the tub. More than likely, one of these parts is faulty and will need to be replaced. The drive motor for your model is PS11747980, and the gearcase is PS12584225. We hope this helps!
10 people found this helpful.
Was this helpful?
Thank you for voting!
Norma
December 28, 2021
Will this fit for a Maytag washer.
For model number MVWC416FWO
Hello Norma, thank you for writing. No, the part you had chosen is not compatible for your model. The parts for your model are Washplate PartSelect Number PS11728097, Washing Machine Upper Agitator PartSelect Number PS11727882, Agitator Bolt PartSelect Number PS11748116, Washer PartSelect Number PS11742027. We have an installation videos for you to access. We hope to hear from you soon.