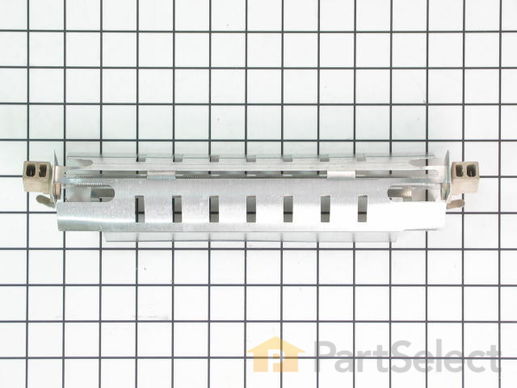
Part Location Diagram of WR51X10055 GE Defrost Heater and Bracket Assembly
See part 230 in the diagram
( Grid squares measure 1x1 inch )
Customer Service Representative

Get in touch, we're here to help!

Daily 8am - 9pm EST

customerservice@partselect.com

Defrost Heater and Bracket Assembly WR51X10055

 Fits your DSL26DHWCSS!
★★★★★
★★★★★
29 Reviews

Rated by 42 customers 

Easy 

30 - 60 mins 

Ratings submitted by customers like you who bought this part.

$ 106.51
  In Stock
Get FREE EconoShip on orders over $100! T&C apply

Get this part fast! Average delivery time for in-stock parts via standard shipping: 1.8 days.

 Fits your DSL26DHWCSS!
PartSelect Number PS303781
Manufacturer Part Number WR51X10055
Manufactured by GE
Product Description

Defrost Heater and Bracket Assembly Specifications

The defrost heater keeps the cooling coils from frosting over. The heater will get hot and melt any ice or frost build up around the coils.
How Buying OEM Parts Can Save You Time and Money

How Buying OEM Parts Can Save You Time and Money

Troubleshooting
This part fixes the following symptoms:
Fridge too warm | Freezer not defrosting | Freezer section too warm | Frost buildup
This part works with the following products:
Refrigerator.
This part works with the following products:
General Electric, Hotpoint, Kenmore.
Part# WR51X10055 replaces these:
AP3183311, 914088, WR51X10055, WR51X10030
Back to Top
Customer Reviews
Average Rating:
★★★★★
★★★★★
29 Reviews
4.8
Filter By Rating:
  • 5 Stars
    25
  • 4 Stars
    3
  • 3 Stars
    0
  • 2 Stars
    0
  • 1 Star
    1
Sort by:
  • 1
  • 2
  • 3
Sorry, we couldn't find any existing reviews that matched. Try using some different or simpler keywords.
  • 1
  • 2
  • 3
Customer Repair Stories
 Average Repair Rating: 3.4 / 5.0, 42 reviews. What's this?
Sort by:
  • 1
  • 2
  • 3
Sorry, we couldn't find any existing installation instruction that matched.
Freezer Cold Refrigerator warm
The defrost heater failed. The coils frosted completely over so no airflow to the fridge. Step 1. Empty the freezer. Ice maker and top shelf can stay. Remove power, pull plug or open breaker. Step 2. Remove shelves and bottom food drawer. Step 3. Remove bottom food drawer rails. 2 phillips screws on each side. Step 4. Remove back panel, 2 screws at the top. Work panel out. Note there may be a green ground wire hook on it at the top. This will expose the heater and the cooling coils. The heater is at the bottom of the cooling coils and is the width of the coils. Step 5. There will be 2 wires, one on each end, and two phillips screws holding it in. Wires pull straight out. Note which way the heater is installed and remove the 2 screws. Step 6. Assemble in reverse order. Be very careful with the heater. It is in a glass tube and is very easy to break.
  • Steve from DOWS, IA
  • Difficulty Level:
    Really Easy
  • Total Repair Time:
    30 - 60 mins
  • Tools:
    Nutdriver, Screw drivers
2 of 2 people found this instruction helpful.
Was this instruction helpful to you?
Thank you for voting!
Freezer coils were iced up,was not cold enough,suspected the heater was the culprit
I had looked at videos on you tube,it looked simple enough. I mostly do my own repairs so I gave it a shot. the job went well,if you do not fix things around the house don't try to do the repair,find a handyman in your neighborhood to help you out,cheaper than calling a refrigeration man. It is not that hard to do.
  • robert from WOONSOCKET, RI
  • Difficulty Level:
    Easy
  • Total Repair Time:
    30 - 60 mins
  • Tools:
    Nutdriver, Pliers, Screw drivers
1 person found this instruction helpful.
Was this instruction helpful to you?
Thank you for voting!
warm refrigerator, and freezer not defrostt
i replace the defrost thermostat and defrost heater and bracket assembly. i did not know what was wrong with the refrigerator until i found your web site. i would like to thank all the friends who explain this process. this save me the price of a service call. this was a very easy job
Other Parts Used:
Defrost Heater and Bracket Assembly Defrost Thermostat
  • barry from HARTFORD CITY, IN
  • Difficulty Level:
    Really Easy
  • Total Repair Time:
    30 - 60 mins
  • Tools:
    Nutdriver, Screw drivers
1 person found this instruction helpful.
Was this instruction helpful to you?
Thank you for voting!
Freezer intermittently thawing and refreezing.
Local repairman was called. He replaced the condenser fan motor as it had an intermittent noise several days before. Cost of the repair was 252.00. Two days later freezer was thawing again. He then came back again and said it was probably the evaporator fan and would replace it for 339. dollars or the mother board which he would replace for 500 dollars. He recommended replacing the unit. Since my unit was still in pristine looking condition I decided to do some further research. That is when I found your web site. After reviewing the possible causes on your site I ordered the defrost themostat and and all three thermistors.As a precaution I also ordered the evaporator fan and defrost heater and bracket Assembly. When the parts arrived I disconnected the power to the unit. Removed the shelves and lower pan. Removed the light shield and light bulb. Reovede the two screws holding the evaporator coil cover. This allowed access to the evaporator themostat. I then cut the wires from the old themostat and removed it from the coil. I then stripped the wires on the colored wires and also cut the wires on the new themostat and stripped those. Then using wire nuts I aatached the wires making sure they were properly color coded. Wrapped with electrical tape and attached the new thermostat to the evaporator coil. I then located the evaporator temperature sensor and removed it from the coil and removed the clip and placed it aside for use on the new sensor. I cut the wires and discarded old sensor. Stripped wires on the new sensor after determining the proper length and stripped the wires where the old one was removed and the using in line connectors I first crimped the wires on the new connector and the crimped both wires to the wires previously cut and stripped. Reinstalled the connector to the clip and clipped it back onto the evaporator coil. I then disconnected the wires attached to the defrost heater bracket assembly, located the two screws holding it to unit and removed it from the unit. I did a continuity check on it and it checked ok but was black so I replaced it as a precaution since I already had a new one. Hung the new unit onto the mounting bracket reinstalled the two mounting screws and reattached the two wires. Reinstalled the evaporator cover making sure to reattach the ground wire clip. Reinstalled screws and light cover and all shelves and pan. Reconneceted electrical power. Unit operated fine for a couple of days and then thawed again. I then retraced the steps removing what I had to remove to replace the evaporator fan motor and replaced it per the installation instructions on your site. The unit has now been operating for five days maintaining -8 degrees in the freezer and 37degrees in the refrigerator. I probably could have done a little more trouble shooting at the main board but didn't want to risk damaging that since I already had the parts I thought would fix the problem if it wasn't the main board. I only replaced the one temperature sensor so I will probably return the two I did not use. Thanks for your excellent "how to"videos.
Other Parts Used:
Evaporator Fan Motor Defrost Heater and Bracket Assembly
  • Donald from HAINES CITY, FL
  • Difficulty Level:
    Really Easy
  • Total Repair Time:
    30 - 60 mins
  • Tools:
    Nutdriver, Screw drivers, Socket set
3 of 3 people found this instruction helpful.
Was this instruction helpful to you?
Thank you for voting!
Fresh food compartment of refridgerator not cooling. Water dispenser freezing
I am going to start by talking about the problems. I woke up one beautiful morning around 4 am and grabbed my breakfast and coffee. I was not happy and realized there was a problem when the milk was almost as warm as the coffee. I was confused because I could hear the compressor running and the freezer was cold. On line directed me the right direction but I did not want to believe it. I did eventually confirm the evaporator coils in the freezer were frozen over because the heater was evap coil defrost heater was burnt out (multi-meter). I never realized a refridgerator had a heater, weird. The water dispenser in the freezer door had been freezing up for the past year. I could never find a real problem or solution to fix it. I did not find anything relating the evaporator coils freezing over causing the water line to freeze but thinking about the problem it made sense. The freezer was much cooler than it needed to be to cool the fresh food side. The temp control ensures the freezer is at least a certain temp, it did not limit how cold it would get. The hardest part of the repair was waiting for the part. I installation and reassembly of the freezer was easy. I replaced the cooling fan because the old one looked a little chewed up on the sides. It was not recommended or required. After the repair I was able to feel good airflow in the upper freezer and in the fresh food compartment. I think the fix will effect the temperature, the water line and also should help me get more ice from the ice maker (the freezer ducting feeds cold air to the ice maker area). Good luck.
Other Parts Used:
EVAPORATOR FAN BLADE Defrost Heater and Bracket Assembly
  • Daniel from MARANA, AZ
  • Difficulty Level:
    Easy
  • Total Repair Time:
    30 - 60 mins
  • Tools:
    Nutdriver, Screw drivers
2 of 3 people found this instruction helpful.
Was this instruction helpful to you?
Thank you for voting!
The eavporator coils were completely frozen which prevented fridge-freezer air circulation
1. Removed all food, shelves, and ice bin from freezer compartment.
2. Removed freezer light hood and unscrewed freezer bulb.
3. Removed rear evaporator cover panel (2 Phillip’s screws, 2 hex screws).
4. Melted ice on coils with hair blow dryer (needed bath towels to collected water).
5. Removed old defrost heater (2 Phillips screws, 2 plug-ins).
6. New heater connected without any adjustments.
7. Replaced evaporator cover ice bin, shelves and food.
  • chris from GROVE CITY, OH
  • Difficulty Level:
    Really Easy
  • Total Repair Time:
    15 - 30 mins
  • Tools:
    Screw drivers, Socket set
2 of 2 people found this instruction helpful.
Was this instruction helpful to you?
Thank you for voting!
Therefrigerator side was not cooling
I removed the cover on the back of the freezer side of refrigerator to expose the anti freeze element use the hair blow dryer to melt the ice on the coils put 2 towels to colect the water thats wath take me time, to replace the heath element was a 1 minute job.
  • Enrique from east stroudsburg, PA
  • Difficulty Level:
    Really Easy
  • Total Repair Time:
    30 - 60 mins
  • Tools:
    Socket set
1 person found this instruction helpful.
Was this instruction helpful to you?
Thank you for voting!
howling sounds in the freezer; blower fan cycles on/off
------------- defrost heater replacement --------------------------
- unplug the refrigerator
- unload all shelves underneath ice maker
- move ice crem into the refrigerator section
- remove all shelves and the bottom tray.
- remove light bulb cover and the bulb
- unscrew two 1/8" screws on top corners of the back panel
- unclip the ground clip on top
- pull the back panel up; pull the left side toward yourself
- test 3 thermistors (see instructions below)
- test the thermostat (see instructions below)
- if either thermistors or the thermostat units are defective, they may be the reason for fan malfunction, not the fan itself.
- unscrew 2 philips screws on either side of the defrost heater
- pull it out and unplug the 2 wires on either end. Replace with a new part.
- putting together is the reverse of disassembly
- move ice cream back to the freezer


--- thermistor testing

- unplug the refrigerator
- locate thermistors to be tested. There's one on evaporating coils, one on bot. left of the freezer (behind deep tray, with white wires), 1 in fridge section (top left, in the corner, inside square white wire conduit; undo the top 1/8" screw ONLY and pull conduit up).
- without disconnecting from the circuit, place a thermistor in a cup of ice water. Wait for 5 minutes
- locate the main control board. Locate and unplug the J1 connector. The pinout, starting from the side with all wires connected:
* pin 5: ground
* pin 4: evaporator thermistor
* pin 3: freezer
* pins 2,1: fresh food thermistor
- use an ohmmeter to measure resistance. Push the needle of the ohmmeter into the socket, where the wire plugs in, without trying to remove the wire. It should be 16.3 kOhm +/- 5% (for 0 deg C)

to replace a thermistor
- cut out the old thermistor, leaving as much wire as possible
- strip the wires, twist them pairwise
- use a bell connector filled with RTV silicone, to ensure that no moisture can get to the connection
* others have also used butt splices and screw-on caps with electrical tape (for moisture isolation)
- using a proper crimping tool, squeeze the bell connector to secure the wire

------------- thermostat testing ---------------------------------
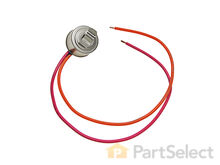
- it's a round quarter-sized cylinder w/ pink and orange wires
- check for bulging (= burnt)
- locate temperature ratings on the side of the thermostat. It should read e.g. 140-30F. This means it's switches to open circuit when >140F is reached and switches to closed circuit when <30F is reached.
- unplue the 6 pin connector that has thermostat.
- test the thermostat. Orange wire is in the 6-pin connector; pink wire can be disconnected from the defrost heater under the evaporation coil. It should read closed circuit (no R).
- place the thermostat into a cup of boiling water. It should open.
- if OK, reattach the thermostat
  • William from Champaign, IL
  • Difficulty Level:
    Easy
  • Total Repair Time:
    15 - 30 mins
  • Tools:
    Socket set
1 person found this instruction helpful.
Was this instruction helpful to you?
Thank you for voting!
Ice build-up in back of freezer, not cool enough
Defrost heater turned black. Test showed infinite resistance. Problem went away after the heater was replaced.
  • Wenshui from Irivne, CA
  • Difficulty Level:
    Easy
  • Total Repair Time:
    15 - 30 mins
  • Tools:
    Screw drivers, Socket set
1 of 2 people found this instruction helpful.
Was this instruction helpful to you?
Thank you for voting!
Freezer compartment would freeze sold so the fridge would go warm.
Emptied the fridge and freezer. Unplugged it and in so do doing defrosted the freezer coils. Replace the listed parts, for they were right there easy to get at and replace. Between the three of them we had an 80% chance of getting what was wrong. The freezer and the refridgerator are both working just fine. No more warm milk.
Other Parts Used:
Defrost Thermostat Temperature Sensor Defrost Heater and Bracket Assembly
  • Michael from American Fork, UT
  • Difficulty Level:
    Easy
  • Total Repair Time:
    30 - 60 mins
  • Tools:
    Nutdriver, Pliers, Wrench (Adjustable)
76 of 92 people found this instruction helpful.
Was this instruction helpful to you?
Thank you for voting!
  • 1
  • 2
  • 3
Questions and Answers

Ask our experts a question about this part and we'll get back to you as soon as possible!

34 questions answered by our experts.
Sort by:
  • 1
  • 2
  • 3
Sorry, we couldn't find any existing answers that matched.Try using some different or simpler keywords, or submit your new question by using the "Ask a Question" button above!
Mike
October 13, 2017
How do I check the old part to make sure this is the problem?
For model number gsh25jfxlww
PartSelect logo
Hi Mike. Thank you for the question. You can test the Defrost Heater with an Multi Meter. You will need to check for Continuity. The meter should read between 1-50 ohms. Hope this helps!

47 people found this helpful.

Was this helpful?
Thank you for voting!
Don
August 27, 2017
Evaporator coils icing up. Replaced defrost thermostat, defrost heater, temperature sensor. Is mother board next? Evaporator fan runs and seems ok feel air flow. Also find that freezer temp controller must be set at Max warm setting #1 to get about 5 deg in freezer. Any recommendations?
For model number GSH25IGRBWW
PartSelect logo
Hi Don, Thank you for your inquiry. When humid air passes over your coils, that will cause the ice build up. You have changed most of the major parts that I would think you would have to check. I would also suggest checking your gaskets to see if they are sealing correctly. If your gaskets look fine then you will probably have to look into seeing if there is an issue with your main control board. I hope this helps. Good luck with your repair.

18 people found this helpful.

Was this helpful?
Thank you for voting!
Frank
February 11, 2018
Is there an installation video for this part?
PartSelect logo
Hello Frank, Thanks for your question. We do not have an installation video for this part, but the instructions are as follows. Unplug the fridge. Open the freezer door and remove all of the shelves, followed by the light shield and the bulb. Take out the two screws that hold the top edge of the back panel, then the ground wire clip that attaches to the back panel. Pull out the left side of the panel and remove it. You may want to remove the bottom drawer as well. Remove the screws retaining the defrost heater assembly and pull it out slightly. Remove the two wires at the side of the heater. Reverse this procedure to install the new part. I hope this helps.

18 people found this helpful.

Was this helpful?
Thank you for voting!
Dan
November 5, 2017
I have a GE side by side, the coils are freezing. I have replaced the control panel, thermostat and the defrost heater. The gaskets around the doors are good also turned the freezer down and still the freezer is freezing up.
For model number GSH25KGMBBB
PartSelect logo
Hi Dan, Thank you for the question. I suggest testing the Defrost Thermostat.The best way to do this is to remove the Thermostat from the refrigerator so you can control the temperature of the sensor. You can let the sensor warm up to room temperature. With the sensor warmed up to room temperature the sensor should read approximately 6.2K Ohms at 68°F. With the thermistor submerged is a glass full of ice water, the sensor should be very close to 32°F which should read approximately 16.3K Ohms. If the values that you are getting are far off from these readings, then the sensor is bad and should be replaced. Hope this helps!

15 people found this helpful.

Was this helpful?
Thank you for voting!
Dale
November 7, 2017
The heater element for allowing water dispenser to not freeze was added to this unit, so we've had no probs since. However in 2014 i replaced a defrost heater element due to probs in the freezer. Worked fine since. I now have prob with refrigerator not being cold enough over past few days and now the water dispenser not working. I haven't been able to take everything out of the freezer yet to look. But can a bad defrost heater element cause the water to stop dispensing if it has caused the coils behind the big panel of freezer to ice up? Thanks
For model number GSH25JSXLSS
PartSelect logo
Hi Dale, Thank you for your inquiry. If the refrigerator section is too warm, the defrost heater and bracket is one part you will need to check, but there are some other parts that you will need to check to see which one is causing the issue. You will need to check the temperature sensor, the dc condenser fan motor, the compression ring, the evaporator fan blade, the dispenser door assembly or flapper, the fresh food door gasket, the inverter kit with jumpers, the evaporator thermistor clip and the defrost thermostat. I hope this helps. Thank you and have a great day!

7 people found this helpful.

Was this helpful?
Thank you for voting!
Jim
June 3, 2019
GE refrigerator is starting to run a little louder and for a longer period of time. The cooling temps seem to be normal. Ice bucket is full. Six years old.
For model number GSH25JGDDWW
PartSelect logo
Hello Jim, Thank you for the question. This would depend on what part of the appliance the noise is coming from. In most cases it is a sign the Evaporator Fan Motor, PartSelect Number PS1019114 will need to be replaced. Hope this helps!

3 people found this helpful.

Was this helpful?
Thank you for voting!
Related Parts:
Jean
June 6, 2019
The freezer and refrigerator separation section of the refrigerator frame gets very warm. The wall of either sides of the freezer and the refrigerator are normally cold. Only the front frame where the 2 doors meet when closed gets warm. What electrical part(s) are located along that separation that would cause such a heating condition?Thanks,
For model number GSS25QSWASS
PartSelect logo
Hi Jean, Thank you for your question. If the space between the doors is warmer than normal, there is an issue with air flow over the coils. You will need to clean the condenser coils. When your condensor coils are clogged up, the heat gets trapped. This causes your condensor fan to run constantly where it may become damaged or cause it to stop working. The fan blade may also become damaged. This extended use can also lead to damage to the fan blade itself like warping or breaks. If you notice that you no longer hear the fan running, the first thing you will want to check is that the fan blade is intact and clear of any blockages. If it seems to be working normally, you’ll need to test that the motor is not damaged, and replace if needed. I hope this helps. Thank you and have a great day!

3 people found this helpful.

Was this helpful?
Thank you for voting!
Jarrett
December 26, 2017
When I ohm out my ps303781 heater bracket assembly i get approximately 23 ohms. I read on this website it should check between 1 and 50. I also noticed some yellowing of the coils inside the tube. Should this be of any concern. Repairman states he replaced it. It does not look new to me.
For model number GSH25JFTEWW
PartSelect logo
Hi Jarrett, Thank you for the question. If there is yellowing I suggest having it replaced, as this is a sign the element is bad. Hope this helps!

2 people found this helpful.

Was this helpful?
Thank you for voting!
Blair
November 26, 2018
Freezer side is cold. Refrigerator side is too warm. I have adjusted the sliding controls to full cold. No change in problem. What do you think is wrong?
For model number TPX24BPBEBB
PartSelect logo
Hello Blair, Thank you for the question. I suggest first checking the Evaporator Fan Motor at the back of the freezer. PartSelect Number PS304600. The fan circulates air over the refrigerator coils. These coils will convert the heat into cool air, which is then circulated to the Fresh Food Section to keep it cool. If the fan is running normally you can check the Defrost Thermostat, PartSelect Number PS303471. The best way to do this is to remove the thermostat from the refrigerator so you can control the temperature of the sensor. You can let the sensor warm up to room temperature. With the sensor warmed up to room temperature the sensor should read approximately 6.2K Ohms at 68°F. With the thermistor submerged is a glass full of ice water, the sensor should be very close to 32°F which should read approximately 16.3K Ohms. If the values that you are getting are far off from these readings, then the sensor is bad and should be replaced. Hope this helps!

2 people found this helpful.

Was this helpful?
Thank you for voting!
Related Parts:
Ricardo
January 21, 2019
How many inches does this part have
For model number Ps303781
PartSelect logo
Hello Ricardo, thank you for your question. This part is approximately 12 inches long. I hope this helps!

1 person found this helpful.

Was this helpful?
Thank you for voting!
  • 1
  • 2
  • 3
You May Also Need ?
Model Cross Reference
This part works with the following models:
PartSelect Number: PS303781
Manufacturer Part Number: WR51X10055
Brand
Model Number
Description
Kenmore
36350622000
Refrigerator
Kenmore
36350627000
Refrigerator
Kenmore
36358072894
Refrigerator
Kenmore
36358072896
Refrigerator
Kenmore
36358075894
Refrigerator
Kenmore
36358075896
Refrigerator
Kenmore
36358077894
Refrigerator
Kenmore
36358077896
Refrigerator
Kenmore
36358472894
Refrigerator
Kenmore
36358472896
Refrigerator
Kenmore
36358472897
Refrigerator
Kenmore
36358475894
Refrigerator
Kenmore
36358475896
Refrigerator
Kenmore
36358475897
Refrigerator
Kenmore
36358477894
Refrigerator
Kenmore
36358477896
Refrigerator
Kenmore
36358477897
Refrigerator
Kenmore
36358772894
Refrigerator
Kenmore
36358772896
Refrigerator
Kenmore
36358775894
Refrigerator
Kenmore
36358775896
Refrigerator
Kenmore
36358777894
Refrigerator
Kenmore
36358777896
Refrigerator
Kenmore
36358892894
Refrigerator
Kenmore
36358892896
Refrigerator
Kenmore
36358892897
Refrigerator
Kenmore
36358892898
Refrigerator
Kenmore
36358895894
Refrigerator
Kenmore
36358895896
Refrigerator
Kenmore
36358895897
Refrigerator
Customer Service Representative

Get in touch, we're here to help!

Daily 8am - 9pm EST

Contact Customer Service