This drain hose support clip is a piece for your washer. The purpose of the drain hose support clip is to hold the drain hose in place by attaching to a cabinet. This piece is off-white and is roughly 3.5 inches long, almost 2.5 inches wide, and less than half an inch thick. To install this piece onto your washing machine you will need a quarter-inch nut driver. Before starting this repair, make sure to disconnect the power source to your washer, as well as the inlet fill hoses.
How Buying OEM Parts Can Save You Time and Money
Part Videos
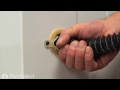
Replacing your General Electric Washer Drain Hose Clip
Troubleshooting
This part fixes the following symptoms:
Leaking
This part works with the following products:
Washer.
This part works with the following products:
General Electric, Hotpoint.
Part# WH16X513 replaces these:
AP2046140, 2454
Customer Reviews
Average Rating:
★★★★★
★★★★★
3 Reviews
5.0
Filter By Rating:
5 Stars
3
4 Stars
0
3 Stars
0
2 Stars
0
1 Star
0
Sort by:
< Prev
1
Next >
Search filter:
Clear Filter
Your search term must have 3 or more characters.
Keep searches simple. Use keywords, e.g. "leaking", "pump", "broken" or "fit".
Sorry, we couldn't find any existing reviews that matched. Try using some different or simpler keywords.
★★★★★
★★★★★
Gordon E - June 25, 2019
Verified Purchase
Exactly right
Just what I needed as always
★★★★★
★★★★★
Stanley Senter 1 - May 27, 2019
Verified Purchase
Very easy to install parts.
Parts arrived in a timely manner.
★★★★★
★★★★★
Terry A - February 13, 2019
Verified Purchase
Drain hose clip
It is exactly what I needed.
< Prev
1
Next >
Customer Repair Stories
Average Repair Rating: 4.4 / 5.0, 22 reviews.
What's this?
Sort by:
< Prev
1
2
3
Next >
Search filter:
Clear Filter
Your search term must have 3 or more characters.
Keep searches simple. Use keywords, e.g. "leaking", "pump", "broken" or "fit".
Sorry, we couldn't find any existing installation instruction that matched.
REMOVED THE OLD HOSE, CLEANED THE FEMALE WASHER OPENING AND PUSHED THE NEW HOSE IN AND SECURED THE DRAIN CLIP WITH TWO SHEET METAL SCREWS. THE VIDEO SUPPLIED BT PARTS SELECT MADE THIS A NO BRAINER.
After going to the store where I purchased the washer which did not have my part, got online to this site and received the exact part I needed promptly. This is not the first time this site get me out of a bind! All I needed was a nut driver and five minutes of time.
Pulled washing machine away from wall. Cut tie strap on old drain hose. Used socket set to unscrew old drain hose clip and pulled old hose out of washing machine. Inserted new hose clip on end of new hose and inserted into washing machine. screwed hose clip onto washing machine. Pushed washing machine into place and tied hose to wall w
... Read moreith new tie strap.
This was the easiest repair of a drain hose I have ever done. Thought I would need a "stubby, and hose clamps, but didn't. Just screwed the clamp to the back of the machine, and snapped the hose in the opening. clicked in three times to seat and thats all there was!
Ask our experts a question about this part and we'll get back to you as soon as possible!
2 questions answered by our experts.
Sort by:
< Prev
1
Next >
Search filter:
Clear Filter
Your search term must have 3 or more characters.
Keep searches simple. Use keywords, e.g. "leaking", "pump", "broken" or "fit".
Sorry, we couldn't find any existing answers that matched.Try using some different or simpler keywords, or submit your new question by using the "Ask a Question" button above!
Riley
August 14, 2017
Does the drain hose clip come with screws? If not where can i find them?
For model number S1070A1WW
Hi Riley,
Thank you for your inquiry. The screws for the drain hose clip are sold separately. The part number for them is PS268950. I hope this helps. Thank you and have a great day!
Drain hose with clamp behind washer at bottom when replaced still leaks out bottom. Put on tight, level, screws on holding clamp tight, height to overflow good. What to do?
For model number GTWN3000M1WS
Hi Harry, thank you for your question. You may have to start looking at your interior parts to see if there is an issue inside of your appliance itself. I would suggest taking a look at your drain pump and see if that part is leaking. I hope that helps. Good luck with your repair.
3 people found this helpful.
Was this helpful?
Thank you for voting!
< Prev
1
Next >
✖
Ask a Question
Ask our experts a question on this part and we'll respond as soon as we can.