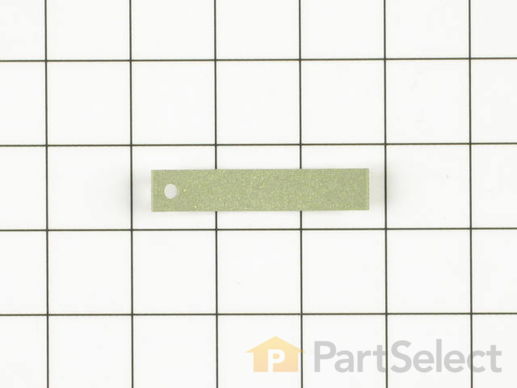
Part Location Diagram of WE3X87 GE Drum Slide
See part 454 in the diagram
( Grid squares measure 1x1 inch )
Customer Service Representative

Get in touch, we're here to help!

Daily 8am - 9pm EST

customerservice@partselect.com

Drum Slide WE3X87

★★★★★
★★★★★
4 Reviews

Rated by 16 customers 

Easy 

30 - 60 mins 

Ratings submitted by customers like you who bought this part.

$ 21.04
  In Stock
Get FREE EconoShip on orders over $100! T&C apply

Get this part fast! Average delivery time for in-stock parts via standard shipping: 1.8 days.

PartSelect Number PS267877
Manufacturer Part Number WE3X87
Manufactured by GE
Product Description

Drum Slide Specifications

This slide is sold individually. Some dryers require up to three of these slides . Be sure to check to make sure you order the necessary amount for your dryer.
How Buying OEM Parts Can Save You Time and Money

How Buying OEM Parts Can Save You Time and Money

Troubleshooting
This part fixes the following symptoms:
Noisy | Marks left on clothes
This part works with the following products:
Dryer.
This part works with the following products:
General Electric, Hotpoint.
Part# WE3X87 replaces these:
AP2042543, 2305, WE03X0076, WE03X0083, WE03X0084, WE03X0087, WE3X76, WE3X83, WE3X84
Back to Top
Customer Reviews
Average Rating:
★★★★★
★★★★★
4 Reviews
4.5
Filter By Rating:
  • 5 Stars
    2
  • 4 Stars
    2
  • 3 Stars
    0
  • 2 Stars
    0
  • 1 Star
    0
Sort by:
  • 1
Sorry, we couldn't find any existing reviews that matched. Try using some different or simpler keywords.
  • 1
Customer Repair Stories
 Average Repair Rating: 3.4 / 5.0, 16 reviews. What's this?
Sort by:
  • 1
  • 2
Sorry, we couldn't find any existing installation instruction that matched.
Front bearings worn out
REMOVE BOTH TOP COVERS , PULL WIRES FOR LIGHT AND SWITCH , LOOSEN SCREWS ON BOTTOM OF FRONT COVER THEN TAKE TWO SCREWS OUT OF TOP ,THEN I REMOVED FRONT COVER
REMOVED BEARING , WHITE AND GRAY AND PUT NEW ONES IN , THEN I REVERSE THE JOB
EASY JOB ! GLAD I DID NOT BUY A NEW ONE
Other Parts Used:
Top Bearing Drum Slide
  • richard from TICONDEROGA, NY
  • Difficulty Level:
    Really Easy
  • Total Repair Time:
    30 - 60 mins
  • Tools:
    Screw drivers
2 of 2 people found this instruction helpful.
Was this instruction helpful to you?
Thank you for voting!
drum noise - screeching & banging
Unfastened 4 screws and lifted the top panel; unfastened 2 top screws, loosened bottom 2 screws holding the front panel,lifted and removed front panel with door. Unfastened 10 screws holding rear access panel, removed panel. Relieved tension on drive belt, removed belt; Removed drum through front of cabinet. Rpelaced rear bushing. Replaced 2 front bearings. Reassembled all components
Other Parts Used:
Drum Slide Rear Drum Bearing
  • Richard from Bethlehem, PA
  • Difficulty Level:
    Easy
  • Total Repair Time:
    30 - 60 mins
  • Tools:
    Nutdriver, Screw drivers
1 of 2 people found this instruction helpful.
Was this instruction helpful to you?
Thank you for voting!
Screching noise as tumbler rotaded
Removed the two screws found inside top portion of the door frame. This allows you to remove the front of the dryer but remember to disconect the two wires to the stop switch. After this, top will just lift out, set it aside. Proceeded to place front section on mat on the floor. The parts ordered consisted of drum slide bearing (3) these are just friction pads, the molded front plastic drum bearing and the air dust seal. Proceeded to pull the dust seal, and front drum bearing. Just reversed with the new parts and installation was a breeze.
Other Parts Used:
Air Duct Felt Seal Drum Slide Front Drum Bearing
  • Richard from Sebring, FL
  • Difficulty Level:
    Really Easy
  • Total Repair Time:
    30 - 60 mins
  • Tools:
    Screw drivers, Socket set
0 of 2 people found this instruction helpful.
Was this instruction helpful to you?
Thank you for voting!
Squealing/rubbing noise clothes getting stuck
Removed the screws (torx head) from the top of the control panel and pulled out of the way.
Then remove the top cover gaining access to the inside. Removed two screws near top inside of front panel, 5/16" nut driver. Then removed front wear the front bearing guide is. The old guide was worn thru badly. Removed the bearing guide, snaps out, but it took a little effort. After cleaning installed parts and make sure you secure the felt at the ends. Reassembled in reverse order. The dryer works great now, no clothes are getting eaten and it is much quieter.
Other Parts Used:
Air Duct Felt Seal Drum Slide Front Drum Bearing
  • Lee from Little Egg Harbor, NJ
  • Difficulty Level:
    Easy
  • Total Repair Time:
    15 - 30 mins
  • Tools:
    Screw drivers
1 of 2 people found this instruction helpful.
Was this instruction helpful to you?
Thank you for voting!
clothing was getting stuck on inside near top of door
I followed instructions provided by other users of this site. Two screws removed allowed the top to be raised. Two more screws allowed the front to be removed and swung to the side. I removed the felt, and replaced it, after looking which way the bevelled edge faced. The teflon drum slide bearings were simple to replace. The front drum bearing was a little difficult to remove, but I just kept prying with a flathead screwdriver and it eventually began to pop off. I vacuumed and removed a ton of lint from everywhere I could get at, and the dryer now runs quieter with no more clothing getting hung up inside.
Other Parts Used:
Air Duct Felt Seal Drum Slide Front Drum Bearing
  • Robert from Avon, NY
  • Difficulty Level:
    Easy
  • Total Repair Time:
    30 - 60 mins
  • Tools:
    Screw drivers, Wrench set
3 of 4 people found this instruction helpful.
Was this instruction helpful to you?
Thank you for voting!
Loud screaching when turning
Open door,remove two screws at top,push top up unroll it is straight up,remove two wires for the door switch,remove the two sheet metal screws ,pull up on the complete front asembly then out,hold drum when doing this.then remove trim ring most likely you will need to break it because it's very hard to remove.replace ring and bearing slides
Other Parts Used:
Drum Slide Front Drum Bearing
  • robert from holliston, MA
  • Difficulty Level:
    A Bit Difficult
  • Total Repair Time:
    30 - 60 mins
  • Tools:
    Screw drivers
3 of 4 people found this instruction helpful.
Was this instruction helpful to you?
Thank you for voting!
Noises during cycle
I was actually able to do the repair based on the other repair stories listed on this site. Their instructions were clear and concise which made the job a breeze. The last time I had a repairman come out the bill was $95.00 to disconnect and reconnect a wire. For less than $50.00 I was able to do a much bigger job for a whole lot less. The best part of it all: my wife thinks I'm a genius.
Other Parts Used:
Front Drum Bearing Drum Slide Drum Bearing Slide - Green (Sold individually)
  • Ronald from Urbana, IL
  • Difficulty Level:
    Really Easy
  • Total Repair Time:
    15 - 30 mins
  • Tools:
    Socket set
0 of 1 people found this instruction helpful.
Was this instruction helpful to you?
Thank you for voting!
Squealing noise during tumbling (metal wear)
First read very helpful reviews on PartSelect from:
Summit Health and Fitness From Flagstaff AZ
and Michael From Warwick RI

The parts diagram on PartSelect is good as an overview. Having two people makes a big difference detaching and re-attaching the drum.

Knowing how to get the lid and front door off each specific model is important. That's where the stories mentioned above were essential. After that, many generic dryer repair stories will work.

I recommend changing all wearable parts while you are in there. I wish I had ordered some new felt, but I did rear bearing, slides, and belt even though the belt probably was good to go.

PartSelect shipped from Windsor Locks, CT. The parts were nearly exact replacements. Some fasteners were different, so I used the old ones and had the tap the sheet metal on the retainer with the fasteners before installing it.

Really glad to have stumbled on this site via Google.
Other Parts Used:
Drive Belt Drum Slide Rear Drum Bearing Kit
  • Joel from Bernardston, MA
  • Difficulty Level:
    A Bit Difficult
  • Total Repair Time:
    More than 2 hours
  • Tools:
    Nutdriver, Screw drivers, Socket set
3 of 4 people found this instruction helpful.
Was this instruction helpful to you?
Thank you for voting!
It was an awful sreeching noise
I removed the two screws from inside the door at the top, which were holding down the top.

Removed top,then two screws at the top of front in the inside of the unit

Tilted out the front so the wires would not come disconnected, slip in new bushings, and put it back together.

Thanks,
Saved me from buying a new dryer
  • raymond from madison heights, VA
  • Difficulty Level:
    Easy
  • Total Repair Time:
    15 - 30 mins
  • Tools:
    Screw drivers
2 of 3 people found this instruction helpful.
Was this instruction helpful to you?
Thank you for voting!
drive belt broke
I unplugged the machine, then unscrewed two screws that hold the top and front together, and lifted off the front door. When I pulled the drum out through the front, the belt came out broken. It was the original, so this is not a surprise. I ALWAYS take this dryer apart once a year to vacuum it out, clean all the ducts and fan, and check everything. This dryer is fifteen years old, and has survived three teenage daughters with their laundry. This time I noticed that the sliders on the front door were worn, blower wheel was loose, and rear bearing was loose,so I ordered everything. The parts came in three days. By then, you could no longer see the basement floor with piles of laundry and Friday night dates looming. I had everything replaced and working in under an hour, after which there was a conflict over who gets to use it first. Hey, I only fixed it, then I walked away. So, for 140 bucks, I have now replaced virtually every critical part, and with no rust, this thing will last as long as these guys have parts. I'm happy, my daughters are happy, and that means the wife is happy. And we all know what that means...
Other Parts Used:
Blower Wheel Drum Slide Rear Drum Bearing CLAMP& SCREW Drive Belt
  • Brian from Yarmouth, MA
  • Difficulty Level:
    A Bit Difficult
  • Total Repair Time:
    30 - 60 mins
  • Tools:
    Nutdriver, Screw drivers, Wrench (Adjustable)
27 of 48 people found this instruction helpful.
Was this instruction helpful to you?
Thank you for voting!
  • 1
  • 2
Questions and Answers

Be the first to ask our experts a question about this part!
You May Also Need ?
Model Cross Reference
This part works with the following models:
PartSelect Number: PS267877
Manufacturer Part Number: WE3X87
Brand
Model Number
Description
General Electric
BJLR473ET0WW
Dryer - Electric
General Electric
BJLR473EV0WW
Dryer - Electric
General Electric
BJLR473GT0WW
Dryer - Gas
General Electric
BJLR473GV0WW
Dryer - Gas
General Electric
BLLR113ET0WB
Dryer - Electric
General Electric
BVLR333ET0WW
Dryer - Electric
General Electric
BVLR333EV0WW
Dryer - Electric
General Electric
BVLR333GT0WW
Dryer - Gas
General Electric
BVLR333GV0WW
Dryer - Gas
General Electric
DBLR333ET0AA
Dryer - Electric
General Electric
DBLR333ET0WW
Dryer - Electric
General Electric
DBLR333ET1AA
Dryer - Electric
General Electric
DBLR333ET1WW
Dryer - Electric
General Electric
DBLR333GT0AA
Dryer - Gas
General Electric
DBLR333GT0WW
Dryer - Gas
General Electric
DBLR333GT1AA
Dryer - Gas
General Electric
DBLR333GT1WW
Dryer - Gas
General Electric
DBLR333T0WW
Dryer - ELECTRIC DRYER
General Electric
DBLR453ET0AA
Dryer - Electric
General Electric
DBLR453ET0WW
Dryer - Electric
General Electric
DBLR453ET1AA
Dryer - Electric
General Electric
DBLR453ET1WW
Dryer - Electric
General Electric
DBLR453GT0AA
Dryer - Gas
General Electric
DBLR453GT0WW
Dryer - Gas
General Electric
DBLR453GT1AA
Dryer - Gas
General Electric
DBLR453GT1WW
Dryer - Gas
General Electric
DCCB330ET0AC
Dryer - Electric
General Electric
DCCB330ET0WC
Dryer - Electric
General Electric
DCCB330EV0AC
Dryer - Electric
General Electric
DCCB330EV0WC
Dryer - Electric
Customer Service Representative

Get in touch, we're here to help!

Daily 8am - 9pm EST

Contact Customer Service