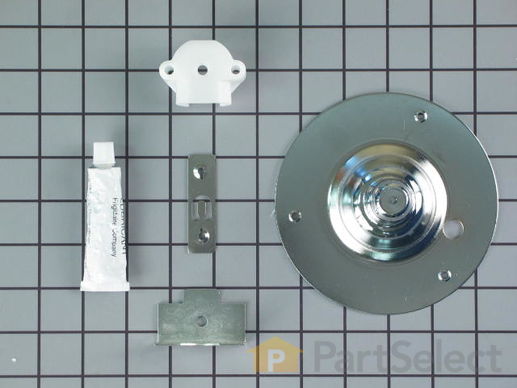
Part Location Diagram of WE25X10001 GE Rear Bearing Kit
See part 1201 in the diagram
( Grid squares measure 1x1 inch )
Customer Service Representative

Get in touch, we're here to help!

Daily 8am - 9pm EST

customerservice@partselect.com

Rear Bearing Kit WE25X10001

 Fits your DBL333GB4WW!
★★★★★
★★★★★
7 Reviews

Rated by 6 customers 

Easy 

1- 2 hours 

Ratings submitted by customers like you who bought this part.

$ 134.25
  In Stock
Get FREE EconoShip on orders over $100! T&C apply

Get this part fast! Average delivery time for in-stock parts via standard shipping: 1.8 days.

 Fits your DBL333GB4WW!
PartSelect Number PS267556
Manufacturer Part Number WE25X10001
Manufactured by GE
Product Description

Rear Bearing Kit Specifications

This kit comes with the rear bearing, shaft support, lubricant and other items required for the installation.
How Buying OEM Parts Can Save You Time and Money

How Buying OEM Parts Can Save You Time and Money

Troubleshooting
This part fixes the following symptoms:
Noisy
This part works with the following products:
Dryer.
This part works with the following products:
General Electric, Hotpoint.
Part# WE25X10001 replaces these:
AP2044401, 771336, WE25X10001
Back to Top
Customer Reviews
Average Rating:
★★★★★
★★★★★
7 Reviews
4.6
Filter By Rating:
  • 5 Stars
    5
  • 4 Stars
    1
  • 3 Stars
    1
  • 2 Stars
    0
  • 1 Star
    0
Sort by:
  • 1
Sorry, we couldn't find any existing reviews that matched. Try using some different or simpler keywords.
  • 1
Customer Repair Stories
 Average Repair Rating: 2.9 / 5.0, 6 reviews. What's this?
Sort by:
  • 1
Sorry, we couldn't find any existing installation instruction that matched.
Loud squeal when dryer in operation
This was done to a washer/dryer that is in a closet and was worked on in place and not removed so it was all done through the front. Its a good idea to vacuum the inside out before putting it all back together. 1.Remove all of the screws that hold down the top of the dryer and remove top. 2. Remove the front slanted panel below the controls then Remove the two small black screws holding the plastic inserts on the left and right sides of the controls panel plus the two silver screws that will allow it to drop so that you can access the tabs that hold the front section on. 3. Remove screws holding the front section with the door on. The last two will be tabs at bottom that were hidden by control panel. Unplug connector and remove front. 4. Note how belt is positioned around motor and tensioner before removing belt.(just push tensioner until belt is loose enough to slide off of drum to remove belt). 5.Slide out drum and remove old bearing and replace with new one. Be especially careful tightening the three screws that attach the bearing as they are easy to strip. 6. To remove the bushing at the back of the dryer you will remove the two screws. but you will need to hold the clip on the back of the dryer or it will drop when the screws are removed. When re-installing MAKE SURE not to lose your ball bearing that the drum bearing will rest against. I used a strong small magnet to hold the ball bearing against the back of the nylon cradle bushing so I wouldn't lose it when re-installing the bushing and it worked great. Once the nylon bushing was back in place I lubed it thoroughly and put everything back in reverse order. I usually would not fill out one of these do-it-yourself forms but the instructions that are already listed with this part are completely different from what I encountered up to the actual bearing and bushing replacement. Hope this helps.
  • Tracy from Washington, DC
  • Difficulty Level:
    A Bit Difficult
  • Total Repair Time:
    1- 2 hours
  • Tools:
    Nutdriver, Screw drivers
1 of 2 people found this instruction helpful.
Was this instruction helpful to you?
Thank you for voting!
Back Drum Bearing Worn Out
It took about 20 minutes, first I popped the top off using a flat screwdriver in my leatherman and removed the wires on the door switch then two screws holding the front on, and then I removed the drum which took a little longer because the belt tensioner was difficult to release because of limited space. Removed old bearing (ball and socket) and replaced with new one. I then reassembled in reverse order. Working great. . .
  • Gene from LaGrange, GA
  • Difficulty Level:
    Easy
  • Total Repair Time:
    15 - 30 mins
  • Tools:
    Nutdriver
3 of 8 people found this instruction helpful.
Was this instruction helpful to you?
Thank you for voting!
Loud noise & clothes hanging in drum.
1. Remove power cord from wall outlet. Unlatched the top lid of the dryer by pushing a flat screwdriver under the R & L sides where a metal clip on each side holds the top down.
2. Removed the yellow clip screwed onto the top frame.
3. Removed the front frame of the dryer by unscrewing the two screws holding the front frame on – one on either side.
4. Mark w/ an (x) on same side of alignment for the 2 wiring connectors before separating them.
5. Removed the front panel by tilting it forward & lifted to unlatch it from the 2 clips at the bottom of dryer.
6. Unwound the belt encircling the drum by releasing the tension between the tensioner roller & drive pulley. (Its better to remove back access panel at this time & do this at the back since I found it necessary to do this anyway when re-installing the new belt).
7. W/ lifting motion, pulled the drum out from the plastic holder attached to the back of the dryer frame. Guided & completely removed the drum out of the dryer.
8. Unscrewed the 3 screws holding the old big bearing to the back of the drum.
8. Unscrewed the 2 screws & removed the plastic that had held the bearing at back of the frame.
8. Installed the new bearing by screwing it to the back of the drum with 3 screws. Be careful not to strip screws. Used help to hold new bearing in place & aligned w/ screws.
9. From the front, installed the plastic holder to the back of the frame by 2 screws and put the ball bearing in-between holder & the metal strip retainer coming from the back of dryer.
10. Used the grease that came with the kit on the plastic holder & the big bearing at the back of the drum.
11. Replaced w/ new belt then re-inserted the drum back into the body of the dryer frame, w/ lifting motion, re-inserted the bearing into the plastic holder.
12. Putting the belt into the drive & tension pulleys through the back access panel was easy but could be very hard to do if coming from the front.
13. Had to replace the front panel's top felt w/ glides that holds the drum at the front w/ a new one. Really important to pay attention to where the plastic glides excess portion is facing (towards front panel), otherwise the front panel might not fit when you snap it back to place.
14. Removed old felt remnants w/ blade scraper & sandpaper. Used adhesive that came w/ kit. Once tacky, put the new felt w/ glides on & used clamps to hold it in place.
15. Waited for 2 hrs. (watched a movie) then re-installed front panel. Make sure that the drum (front) lid rides on top of the plastic glides.
16. Latched bottom of front panel to the metal clips. Replace the 2 screws back into place holding the front panel.
17. Snapped the wiring connectors in place where the (x) marks align.
18. Lowered the top panel & snapped it back into place
Note: All parts came w/ fast delivery & OEM fit - very satisfied! Took my time & on every chance I cleaned & vacuumed all areas of lint & dirt since the dryer hasn't been serviced for more than 10 years...
Other Parts Used:
Drum Belt Rear Bearing Kit Top Drum Glide Kit
  • Raul from Fountain, CO
  • Difficulty Level:
    Easy
  • Total Repair Time:
    More than 2 hours
  • Tools:
    Nutdriver, Screw drivers, Socket set
79 of 84 people found this instruction helpful.
Was this instruction helpful to you?
Thank you for voting!
Broken shaft in rear bearing
Take the top off and front off and disconnect the belt and lift the drum out and there it is . Easy and alot cheaper then new dryer and works like new .
  • frederick W from wall, NJ
  • Difficulty Level:
    Easy
  • Total Repair Time:
    15 - 30 mins
  • Tools:
    Screw drivers, Wrench set
3 of 6 people found this instruction helpful.
Was this instruction helpful to you?
Thank you for voting!
Very loud squeek in rear of dryer
The part arrived in only 3 days and I didn't even pay for express shipping!

Once I popped the top lid off, and removed the two screws holding the front on it was a breeze from there. Simply take the drive belt off by loosening the spring loaded tensioner on the bottom, lift entire drum slightly up and then out. Remove the screws to replace bearing on rear of drum (4) and the screws that hold the bushing assembly in place (2). Reverse the process and you will be up and running in no time at all.

I was about to buy an ew washer and dryer set, but thanks to PartSelect.com, i saved over $1000!
  • Russell from Fort DIx, NJ
  • Difficulty Level:
    Really Easy
  • Total Repair Time:
    30 - 60 mins
  • Tools:
    Screw drivers
8 of 9 people found this instruction helpful.
Was this instruction helpful to you?
Thank you for voting!
Loud screeching noises from the rear of the dryer whenever in was running.
We unlatched the top of the dryer by pushing a screwdriver under the two areas where there were metal clips holding it down. We then removed the yellow clip screwed onto the top frame. We removed the front frame of the dryer by unscrewing the two screws holding the front frame on--one on either side. We didn't undo the wiring to the controls, we just kind of pivoted the front aside. We pulled the drum out from the plastic holder attached to the back of the dryer frame also unwinding the belt encircling the drum. Then we unscrewed the 3 screws holding the bearing to the back of the drum. We removed the plastic that had held the bearing by undoing the screws to the back of the frame. We installed the new bearing by screwing it to the back of the drum with 3 screws. We installed the plastic holder to the back of the frame by 2 screws and put the little ball bearing in. We used the grease that came with the kit to grease up the plastic where it held the big bearing attached to the back of the drum and inserted the drum back into the body of the dryer frame, pushing the bearing into the plastic holder. The hard part was getting the belt back around the drum and through the pulley on the motor that holds the belt. When that was accomplished, we put the yellow plastic holder back on the front frame with the screws and put the front back on after thoroughly cleaning the inside bottom area where there was a lot of lint. Then we snapped the top back into place.
  • Kenneth from Boise, ID
  • Difficulty Level:
    A Bit Difficult
  • Total Repair Time:
    30 - 60 mins
  • Tools:
    Nutdriver, Screw drivers
11 of 13 people found this instruction helpful.
Was this instruction helpful to you?
Thank you for voting!
  • 1
Questions and Answers

Be the first to ask our experts a question about this part!

You May Also Need ?
Model Cross Reference
This part works with the following models:
PartSelect Number: PS267556
Manufacturer Part Number: WE25X10001
Brand
Model Number
Description
General Electric
DBL333EA0AA
Dryer - Electric
General Electric
DBL333EA0CC
Dryer - Electric
General Electric
DBL333EA0WW
Dryer - Electric
General Electric
DBL333EA1CC
Dryer - Electric
General Electric
DBL333EA1WW
Dryer - Electric
General Electric
DBL333EB0CC
Dryer - Electric
General Electric
DBL333EB0WW
Dryer - Electric
General Electric
DBL333EB1CC
Dryer - Electric
General Electric
DBL333EB1WW
Dryer - Electric
General Electric
DBL333EB3CC
Dryer - Electric
General Electric
DBL333EB3WW
Dryer - Electric
General Electric
DBL333EB4CC
Dryer - Electric
General Electric
DBL333EB4WW
Dryer - Electric
General Electric
DBL333EB6CC
Dryer - Electric
General Electric
DBL333EB6WW
Dryer - Electric
General Electric
DBL333EBC
Dryer - GE Dryer Model DBL333EBC Parts
General Electric
DBL333EBW
Dryer - GE Dryer Model DBL333EBW Parts
General Electric
DBL333EY0AA
Dryer - Electric
General Electric
DBL333EY0WW
Dryer - Electric
General Electric
DBL333GA0AA
Dryer - Gas
General Electric
DBL333GA0CC
Dryer - Gas
General Electric
DBL333GA0WW
Dryer - Gas
General Electric
DBL333GA1CC
Dryer - Gas
General Electric
DBL333GA1WW
Dryer - Gas
General Electric
DBL333GB0CC
Dryer - Gas
General Electric
DBL333GB0WW
Dryer - Gas
General Electric
DBL333GB1CC
Dryer - Gas
General Electric
DBL333GB1WW
Dryer - Gas
General Electric
DBL333GB4CC
Dryer - Gas
General Electric
DBL333GB4WW
Dryer - Gas
Customer Service Representative

Get in touch, we're here to help!

Daily 8am - 9pm EST

Contact Customer Service