Keep searches simple. Use keywords, e.g. "leaking", "pump", "broken" or "fit".
Sorry, we couldn't find any existing reviews that matched. Try using some different or simpler keywords.
★★★★★
★★★★★
Kristine M - September 24, 2018
Verified Purchase
Good part
The I ordered worked out well. We got in and my dryer is much more quiet.
< Prev
1
Next >
Customer Repair Stories
Average Repair Rating: 2.9 / 5.0, 9 reviews.
What's this?
Sort by:
< Prev
1
Next >
Search filter:
Clear Filter
Your search term must have 3 or more characters.
Keep searches simple. Use keywords, e.g. "leaking", "pump", "broken" or "fit".
Sorry, we couldn't find any existing installation instruction that matched.
Noisy dryer operation
Removed front panel and rear access panel of dryer. Removed drum just far enough to access old drum bushing and removed and replaced it. Removed pulley spring arm retainer bracket in back of dryer. Removed old pulley and nut and replaced them with new ones and new bushing. Only problem encountered is when my daughter's cat ate 2 of the bo
... Read morelts that hold the rear access cover. Dryer runs well and quiet and cat is fine.
First unscrew the two screws at top to disconnect the control panel. Lay unit on the back. Remove door(be careful not to lose washers and hinges). Remove four screws to lift off top. Wiggle drum, slip belt over drum. Replace door, then put Four screws back in place.Stand unit upright.Remove back panel, you should see belt hanging.Pulley w
... Read moreheel is in front of you.Follow instuctions sent with pulley wheel.Reattach you're ready to roll, make sure you sllip the belt on the drum until the drum spins.
Read less
Barry from Dunellen, NJ
Difficulty Level:
A Bit Difficult
Total Repair Time:
30 - 60 mins
Tools:
Nutdriver, Screw drivers, Wrench set
1 of 2 peoplefound this instruction helpful.
Was this instruction helpful to you?
Thank you for voting!
Dryer became very noisy
--Removed bottom rear panel (right under where 220 line comes in) which exposed belt and idler pulley. --Relieved tension on belt by moving idler arm and moved belt off idler puller (just to the side). --Removed e-clip. --Removed old pulley and washers. --Installed new thick plastic washer first, then pulley, then e-cl
... Read moreip. --Relieve tension and place belt back on new pulley. --Replace back panel. -Fini!
Read less
Sam from Durham, PA
Difficulty Level:
Really Easy
Total Repair Time:
15 - 30 mins
Tools:
Nutdriver, Pliers, Screw drivers
13 of 14 peoplefound this instruction helpful.
Was this instruction helpful to you?
Thank you for voting!
new belt / pulley
Took front off , put new belt over and under drum. Laid on front put new pulley in place on back side. Stood back up, put belt back on motor pulley. Then put idler pully wheel back in place. Put front back on, lid down in place, ready to run.
After opening the front door there are screws that are holding the top to the door. Take those screws out using a Phillips screwdriver. The top should lift up and rest at a near 90 degree angle.
The door has two screws at the bottom that need to be taken out. Once those are out there are two screws on both sides at the top h
... Read moreolding it to the frame. Remove those as well.
Before you remove the front you should document the wiring for the door light switch. I took these off to give the door a little extra room so I could rest it on a toolbox without taking all the wires completely off.
Once the door is free, on the back there is a metal plate with two screws in it roughly in the middle of the unit. Unscrew the top completely but leave the bottom screw in and just slightly loosen it. This will allow it to swing down out of the way without the need to completely remove it and have one more part to put back together in the end.
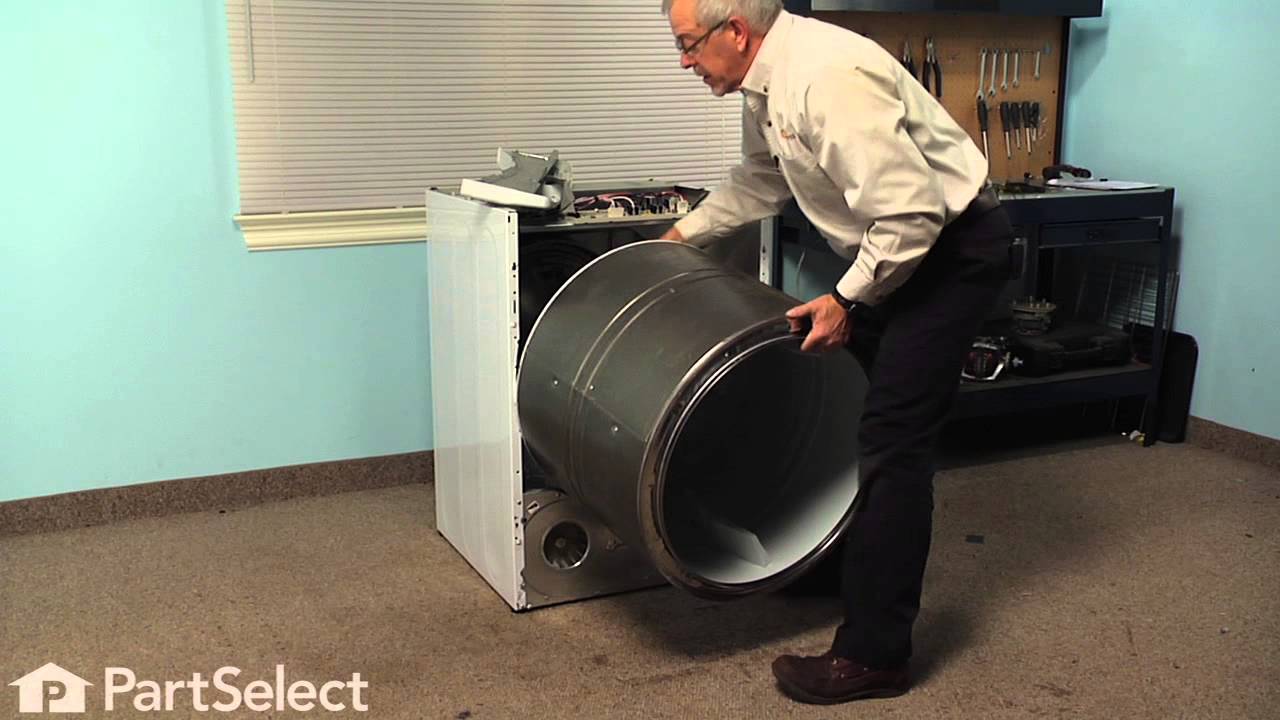
What this plate is covering is the center of the drum. There is a small metal tab that you can push on and it will push the drum out so it can be removed. Gripping the drum, you can lift it out by guiding it through the notches on each side where the drum protrudes.
With the drum removed you'll see the motor and idle pulley. On my model the pulley was attached to a metal rod that was spring loaded. The pulley is held on by a small tension washer that was easily removed with pliers. Installation was somewhat more difficult but mostly just getting it lined up and started. Once on the rod it was easy to push it into place.
With the new pulley installed it's time to install the new belt. To do this first put the belt over the drop and then replace the drum back into the frame. Once the drum is pushed back into the hole it will support itself.
Now you need to remove the panel on the back to get access to the motor and pulley. This panel has a lot of screws. Once that's off you can then guide the belt over the motor and get the idle pulley to put tension on the belt.
Once that is complete just replace all the screws you removed, plug it back in and watch as your new belt moves the drum once again.
Drum in dryer making uneven grinding noise when turning.
I removed the top by removing the four screws holding the top on. Then I could access the screws holding the front of the dryer (including the door) on.
I removed the back panel so I could slip the belt off the idler pulley. There was also a small panel covering the back of the drum bearing. I removed the clip holding the
... Read moredrum bearing shaft in place. Then the entire drum assembly with the drum bearing was removed by shifting the drum toward the front and lifting it out.
I removed the drum bearing assembly by taking out the three screws holding it to the drum.
Once I received the drum bearing kit I reassembled it in reverse order.
The idler pulley had a clip holding the pulley on the shaft. I removed the clip, took off the old pulley and replaced it with the new one, replacing the clip. Then I rethreaded the drum belt around the motor shaft and ilder pulley and put the panels back on.
Note: Lint is combustable, save yourself the disaster of a dryer fire.
Position dryer face down on floor. Access rear of unit, vacume clean. Upright unit. Access front of unit by removing sheet metal screws above door to float the lid. Using screwdriver gently s
... Read moreeperate drum at top from housing. Hold open with wedges. Thread new belt through hole a foot or so. Tape belt to drum near drum center. Rotate drum until belt is fully around.
Note: Taping new belt to drum will assist you in reassembling. Belt will not fall off drum when unit is face down on floor.
Remove wedges and resecure sheet metal screws to top of unit. Place the unit face down again. Ensure belt clears all front mounts.
Note: gentaly pull drum from mount and slide belt between.
Remove old belt and idler pully.
Note: replace the idler pully with every new belt it will save you time later.
Install new idler pulley and rethread in new belt. Rotate drum to access and remove tape attaching new belt to drum. Upright unit and test. Re-attach access panels, reposition unit and re-attach duct work. Done
First I took the lower bottom off the back of the dryer (bolts), pulled the old pulley off the idler and put new one on. Second, I took the screws out in front (under lip of top) and then removed bolts from bottom of the front. Then lifted lid up and swung front to the side. I was then able to take the drum out and clean it before putt
... Read moreing it back in with the new belt. The put everything back together. Dryer ran for ten mintues and then quite again. Seems to be in the motor and not the less expensive parts I found to be worn.
After finding the belt was broken, I also discovered the idler pulley was broke. Your website made it incredibly easy to identify and purchase the parts. This is my third great experience with your site. The last repair was the whole front bearing assembly and that went very smooth thanks to your site. Keep up the great work and thank
... Read mores again.
Ask our experts a question about this part and we'll get back to you as soon as possible!
2 questions answered by our experts.
Sort by:
< Prev
1
Next >
Search filter:
Clear Filter
Your search term must have 3 or more characters.
Keep searches simple. Use keywords, e.g. "leaking", "pump", "broken" or "fit".
Sorry, we couldn't find any existing answers that matched.Try using some different or simpler keywords, or submit your new question by using the "Ask a Question" button above!
Lori
December 29, 2017
Does the idler pulley have a tensioning spring? Mine is just located on a metal rod, not sure how this will allow the belt to turn the drum.
For model number DDE7109VML
Hi Lori, Thank you for the question. The Idler Pulley on this model was designed so a spring is not required. Hope this helps!
3 people found this helpful.
Was this helpful?
Thank you for voting!
Gary
January 5, 2022
the tension wheel is attached to a rectangular piece, small bend at far end - that piece is supposed to slide back and forth, adjusting belt tension on the drum. I can't figure out how to put the rectangular piece back into the metal piece it slides up and down in -- many thanks
For model number 520A1 W
Hello Gary, thank you for writing. The Pulley goes onto the Idler Arm down by the Motor. The Belt runs on the Pulley. We suggest watching the How to Video on installing the Pulley. We hope this helps!