The drain valve shaft seal is a part for your dishwasher drain pump valve. This seal creates a watertight closure around the flapper valve shaft. This part can be accessed through the access panel at the front for a built-in. For a portable dishwasher, consider disconnecting and unplugging the taps and lay on a blanket to access the bottom of the machine. This will need to be replaced if you notice leaking coming from the pump. This part measures approximately 3/8 inches in diameter and is black in color. This is a genuine OEM part that comes right from the manufacturer.
How Buying OEM Parts Can Save You Time and Money
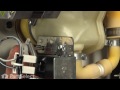
Part Videos
Replacing your General Electric Dishwasher Drain Valve Shaft Seal
Troubleshooting
This part fixes the following symptoms:
Leaking
This part works with the following products:
Dishwasher.
This part works with the following products:
General Electric, Kenmore, Hotpoint, Amana.
Part# WD8X181 replaces these:
AP2038837, 274144, WD8X181
Customer Reviews
Average Rating:
★★★★★
★★★★★
11 Reviews
4.6
Filter By Rating:
5 Stars
8
4 Stars
2
3 Stars
1
2 Stars
0
1 Star
0
Sort by:
< Prev
1
2
Next >
Search filter:
Clear Filter
Your search term must have 3 or more characters.
Keep searches simple. Use keywords, e.g. "leaking", "pump", "broken" or "fit".
Sorry, we couldn't find any existing reviews that matched. Try using some different or simpler keywords.
★★★★★
★★★★★
Jason C - November 28, 2020
Verified Purchase
Easy repair, did the trick and stopped the leak!
The only complaint I have is the price..it just seems ridiculous to pay so much for a tiny o-ring, but it did fix the leaking problem so as long as it lasts a few years it's well worth it.
★★★★★
★★★★★
James D - June 6, 2019
Verified Purchase
Too expensive
$22 is extremely expensive for an o-ring. I also bought an impeller with several other components with the kit for the same dishwasher for a dollar more.
★★★★★
★★★★★
Tracy J - March 14, 2019
Verified Purchase
Quick service
You provided the correct parts in a timely manner. You saved me from buying a new dishwasher. Thank you
★★★★★
★★★★★
Jerry H - January 30, 2019
Verified Purchase
leak stops when you have the right part.
I found the drain valve shaft leaking just a little. So I started working on it. Tried washers and different O-rings. It got worse. So bad the customer could not use the dishwasher till I got the right part. $20.00 seems a little steep but is a special design and it worked first time. Note that it is near impossible to get the retainer clip off. You will need a new clip.
★★★★★
★★★★★
Doug R - January 11, 2019
Verified Purchase
leak fixed
Watched the videos from several sites before starting the job but after failing to stop the leak on the first attempt the instructions sent with the part was the solution.
I recommend that the part select video be modified to emphasize that the seal be moist and installed with the flat side out.
Worked like a charm once I installed per the enclosed instructions.
Also customer support was outstanding. Easy to return parts that I did not need and replace parts that I needed to do the job again.
I will recommend this site to my other DIY friends.
★★★★★
★★★★★
John P - December 12, 2018
Verified Purchase
Easy
Good
★★★★★
★★★★★
Carl B - August 14, 2018
Verified Purchase
seal and push on nut
the parts were just what i ordered. partselect was very helpful and nice. the success rate was estimated to be 13%. the dishwasher still leaks. i do not blame partselect. i think the shaft was too worn for the seal to be effective. thanks guys.
★★★★★
★★★★★
Russell F - May 20, 2018
Verified Purchase
Difficult Repair/Fixed leak
My 14 year old Ge dishwasher was leaking from the drain valve shaft every time the solenoid went into drain mode. My dishwasher was not installed properly so this repair was very frustrating with the wires and water supply line in the way. The old seal had a lip side seal on both sides, this one only had one. I replaced this seal along with the push on nut and a new solenoid assembly, the old one was covered in a dry soapy mess. After reinstalling everything the dishwasher did not leak. The push on nut and shaft seal should really be included with solenoid assembly kit.
★★★★★
★★★★★
John W - April 17, 2018
Verified Purchase
Exact fit & clear instructions
This part was an exact fit for the repair. The additional push-nut which was suggested was necessary & made the repair more seamless. The videos provided were perfect in explaining the removal & re-installation.
★★★★★
★★★★★
Tom L - February 9, 2018
Verified Purchase
Worked good
Worked well to stopping the leak from the discharge flapper valve shaft. Difficult to get the OD to seal into the housing. Be sure to replace the locking washer also the shaft. Careful not to damage the plastic housing when removing the washer.
< Prev
1
2
Next >
Customer Repair Stories
Average Repair Rating: 3.1 / 5.0, 29 reviews.
What's this?
Sort by:
< Prev
1
2
3
Next >
Search filter:
Clear Filter
Your search term must have 3 or more characters.
Keep searches simple. Use keywords, e.g. "leaking", "pump", "broken" or "fit".
Sorry, we couldn't find any existing installation instruction that matched.
Leaking water in the shaft seal.
I follow the instruction showing in your video and the replacement was very easy. I am very please that you provided a didactic video. Now the dishwasher is working like new. Thanks.
Repair not yet done. Video incorrectly shows a different washer not the model number shown above. I stopped immediately and did not proceed until I had more time to investigate further. Video showed washer where the front panel is easily removed. My washer does not have a front panel which can be removed. Front panel is one piece with sid
... Read morees. Access is obviously from below or from the back. I will try to move out the washer and try to see what's visible from the rear.
Followed the sequence from on line video provided by PartSelect. Knowing the sequence and the secret of the push on nut made the replacement simple. My dishwasher is built in therefore I pulled my dishwasher half way out to gain better access and did not need to disconnect drain or water supply. Just unplugged the power and went to work.
Original Push on nut had corroded and was not retaining seal properly. Leaked water every drain cycle.
I would like to start-off by saying that I love this site . I've never been even remotely dissatisfied with parts I've ordered and the installation videos are awesome! I would recommend this site to anyone looking to repair appliances. Secondly, I am a retired mechanical designer with over 35 years of experience. I have a broad range of
... Read moredesign experience in consumer, governmental, industrial and military part and product design. My opinion about the design having to do directly with my appliance is not very high and after talking with another local parts supplier discovered that this particular design is approximately 20 years old. I wonder how many dishwashers are leaking without the consumer realizing they have this problem. I followed the installation instructions provided by this site verbatim and the dishwasher still leaked like a sieve. This in my opinion goes back to my remarks concerning the design. This is a weak design at best and could benefit from an improvement in that area. After I installed the new parts, the push on nut (upon being seated onto the shaft for the drain valve flapper) was loose and spun freely. The push on nut did not properly compress the seal onto and around the flapper shaft nor into the valve housing. Water leaked through the seal as a result. I disassembled all of the parts again and placed a flat washer between the push on nut and the seal, to help compress the seal onto the flapper shaft and into the valve housing. The washer was a stainless steel flat washer with an ID that fit onto the shaft closely, but was a smaller OD than the seal. The washer was about 1/32" thick. Upon reassembly and observation, the dishwasher leak was stopped with the addition of the flat washer and my issue was resolved.
With non-use the drain control shaft started leaking
As the washer is slightly undersized to perform correctly, following standard instructions to replace the drain valve staff seal and retaining washer I wound Teflon tape between the retaining ring and washer to slightly increase pressure on the washer and seal the opening.
I removed the front bottom panels to give me access to the Solenoid area. I did not take out the dishwasher from the cabinetry. I removed the screws holding the solenoid assembly and the C clip holding the hand fan shaped white nylon thing onto the valve shaft. I slipped these to the side. Then I cut through and removed the push on nu
... Read moret with a wire snipper plier. Then I used a knife blade tip to pick out the black seal. I then slipped the new seal onto the shaft, being careful that the flat side was outward, and slid it down the shaft and , with my fingernail, pushed it completely flush into position. The biggest challenge was the push on nut. It does not push on easily and must have the lips pointed outward. It required the use of a 3/8" diamater tube slipped over the shaft to tap the nut down the shaft. This caused the shaft to push into the pump housing, which caused the valve to bind. So I used a vice grip to pull out on and hold the shaft while I tapped the push on nut with a flat head screwdriver. Then I just reversed the solenoid assembly removal. But , when I ran the dishwasher, it no longer leaked.
Based on what I read from other people and partselect, it was fairly easy to ascertain what was wrong. I removed the solonoid valve by removing the two screws that held in place. Had to clean up the solonoid valve rod due to water leaking into it by running it on a wire brush. Pulled out the stop nut and old seal and replaced it with
... Read morethe new seal. Could not get the new stop nut on but it does not seem to move so let it go. Have to say that reading all the comments certainly helped me with the repair. Additionally, ordered parts by email at 10:30 in the morning and receiving them the very next day. Could not believe they were delivered so quickly.
The leak was coming from the drain valve shaft and I found the tips to replace the seal from this website. I was able to reach everything without removing the dishwasher from the cabinet. Once I got the cam lifter off the old push on nut was corroded so it was easy to get off. The old seal was recessed so I used the point of an ice pick t
... Read moreo gently pry it out. The new seal was easy to push in place but the push on nut was a bear. I saw other comments about using a deep socket to push it on but I didn't have one the right size. I was able to hold the end of the shaft with pliers and pushed the nut in place using a screwdriver. Ran a short cycle and no more leak. Thank goodness for this website. Found the part easily and the other written comments were very helpful.
The solenoid and linkage was easy to disasemble, but getting the retainer (push on nut) off was difficult without removing the motor and pump. Once removed it was a snap. Getting the pump/motor back onto the pipes was near impossible from underneath. I had to remove the dishwasher from under the countertop to get it back correctly. I woul
... Read mored reccomend doing this for this repair, as it made life a lot easier. Unwiring and removing the water supply line was not a problem either. WORKS AS GOOD AS NEW!
Ask our experts a question about this part and we'll get back to you as soon as possible!
5 questions answered by our experts.
Sort by:
< Prev
1
Next >
Search filter:
Clear Filter
Your search term must have 3 or more characters.
Keep searches simple. Use keywords, e.g. "leaking", "pump", "broken" or "fit".
Sorry, we couldn't find any existing answers that matched.Try using some different or simpler keywords, or submit your new question by using the "Ask a Question" button above!
Ben
August 27, 2017
How does the drain valve shaft seal go in...there's a flat side and a side with a channel...which side faces in and which side faces out
For model number GSD4010Z05AA
Hi Ben,
Thank you for your inquiry. You will have to first dip your new seal in water. Then install it on to the shaft with the lip side facing downward. Make sure that the seal is positioned below the mounting clip groove when you install it. I hope this helps. Good luck with your repair.
6 people found this helpful.
Was this helpful?
Thank you for voting!
Victoria
March 4, 2019
Is this seal interchangeable with wp913108?
Hello Victoria, thank you for contacting us. If you can please provide the model number for your appliance, we will be able to look up the correctly compatible seal. We look forward to hearing back from you!
3 people found this helpful.
Was this helpful?
Thank you for voting!
Kurt
July 13, 2021
Does this replacement drain valve shaft seal work on the original motor or the upgraded replacement?
For model number Gsm2100zzo
Hi Kurt,
Thank you for your question. This seal is listed under your model number and it is designed to work with motor. If you would like to place an order for it, you may order it either online or by calling our customer service line and anyone will be happy to assist you. We hope this helps! If you have any questions, please let us know.
Looking for a tutorial on how to drain standing water.
For model number GSD3360D50SS
Hello Donna, Thank you for the question. After checking for any blockage in the drain pump and hose and making sure the filter is clean, mix together about one cup each of baking soda and vinegar and pour the mixture into the standing water at the bottom of the dishwasher. Leave for about 20 minutes. If the water is draining or starting to drain at that time, rinse with hot water and then run the dishwasher's rinse cycle. If you need help placing an order, customer service is open 7 days a week. Please feel free to give us a call. We look forward to hearing from you!
Was this helpful?
Thank you for voting!
Doug
October 7, 2022
Will this seal work with the impeller motor shaft?
(since the impeller and seal assembly is no longer available)
Thanks
Doug
For model number VRD2304G00WW
Hello Doug, Thank you for your inquiry. We show that this part is designed to form a watertight seal around the flapper valve shaft and is only 1/3 of an inch in diameter so would not fit the impeller motor shaft. We do show a replacement part number for the impeller and seal kit, PS10055464. Good luck with your repair and if you need assistance with placing an order, please do not hesitate to call our customer service, open 7 days a week to help you. We look forward to hearing from you.
Was this helpful?
Thank you for voting!
< Prev
1
Next >
✖
Ask a Question
Ask our experts a question on this part and we'll respond as soon as we can.