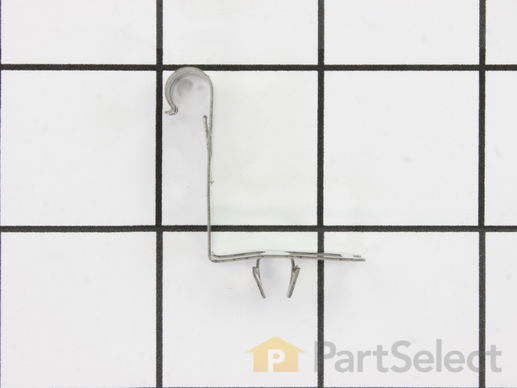
Part Location Diagram of WB2X9719 GE Single Heating Element Support Clip
See part 132 in the diagram
Replacing your Kenmore Range Single Heating Element Support Clip
( Grid squares measure 1x1 inch )
Customer Service Representative

Get in touch, we're here to help!

Daily 8am - 9pm EST

customerservice@partselect.com

Single Heating Element Support Clip WB2X9719

★★★★★
★★★★★
7 Reviews

Rated by 16 customers 

Really Easy 

15 - 30 mins 

Ratings submitted by customers like you who bought this part.

$ 16.68
  In Stock
Get FREE EconoShip on orders over $100! T&C apply

Get this part fast! Average delivery time for in-stock parts via standard shipping: 1.8 days.

PartSelect Number PS243701
Manufacturer Part Number WB2X9719
Manufactured by GE
Product Description

Single Heating Element Support Clip Specifications

The metallic clip, or also known as a broil element support, is for a oven element on a range. This part holds the broil element in place on top of the oven. If your support clip is broken then this replacement should be the solution. The tools needed for this project are slip joint pliers. For safety precautions, make sure to unplug your range from the power source, or shut off the house circuit breaker before starting this project. Refer to the installation instructions for best results and accuracy.
How Buying OEM Parts Can Save You Time and Money

How Buying OEM Parts Can Save You Time and Money

Part Videos

Replacing your Kenmore Range Single Heating Element Support Clip

Replacing your Kenmore Range Single Heating Element Support Clip
Troubleshooting
This part fixes the following symptoms:
Element will not heat
This part works with the following products:
Range, Wall Oven, Microwave Oven Combo.
This part works with the following products:
Kenmore, General Electric, Hotpoint, Roper.
Part# WB2X9719 replaces these:
AP2014510, 251560, 285840, 324808, 334565, 339593, 4334357, 4337249, 4338587, 8004768, WB02X9438, WB02X9576, WB02X9719, WB2X9438, WB2X9576
Back to Top
Customer Reviews
Average Rating:
★★★★★
★★★★★
7 Reviews
5.0
Filter By Rating:
  • 5 Stars
    7
  • 4 Stars
    0
  • 3 Stars
    0
  • 2 Stars
    0
  • 1 Star
    0
Sort by:
  • 1
Sorry, we couldn't find any existing reviews that matched. Try using some different or simpler keywords.
  • 1
Customer Repair Stories
 Average Repair Rating: 4.4 / 5.0, 16 reviews. What's this?
Sort by:
  • 1
  • 2
Sorry, we couldn't find any existing installation instruction that matched.
Broiler in oven stop working
Unplugged over and remove oven racks. Dry fit new clips to hold up broiler element; using piers to insure secure fit to the element. Removed screws that hold element and attached clothes pins to wires to keep from falling back into the oven. Removed element from wires. Secured new/replacement element to wires removed clothes pins. Position element to be screwed into back of oven. Screwed into oven attached clips to oven and element. Plugged stove back into outlet. Turned oven on to test. Worked job done.
Other Parts Used:
Broil Element - 240V Single Heating Element Support Clip
  • Stan from BOLIVAR, OH
  • Difficulty Level:
    Really Easy
  • Total Repair Time:
    30 - 60 mins
  • Tools:
    Pliers, Socket set
2 of 2 people found this instruction helpful.
Was this instruction helpful to you?
Thank you for voting!
Single Heating Element Support Clip was needed to hold up the heating element in the oven. Old single heating element support clip broke and came out of the hole.
Simply inserted the clip into the hole in the oven. It took less than 20 seconds. :D
  • Marion from METHUEN, MA
  • Difficulty Level:
    Very Easy
  • Total Repair Time:
    Less than 15 mins
6 of 6 people found this instruction helpful.
Was this instruction helpful to you?
Thank you for voting!
Old broil element started burning with being on OFF position requiring need to turn off breaker and cut element in two to stop progression of burn
1. Turn breaker off at breaker box. 2.Disconnect old broil element. Pull electric wires out 3-4 inches from BACK of oven. Clamp wires or tie off so they do not retreat behind back oven wall. INSTALL wires to new element and secure back plate. Install NEW clamps to new element. Switch on breaker and check operation.
Other Parts Used:
Broil Element - 240V Single Heating Element Support Clip Screw
  • Jack from MONTGOMERY, TX
  • Difficulty Level:
    Easy
  • Total Repair Time:
    30 - 60 mins
  • Tools:
    Nutdriver, Pliers
2 of 4 people found this instruction helpful.
Was this instruction helpful to you?
Thank you for voting!
The old single heating element support clips came loose over time.
I ordered the replacement clips from this site and they arrived in a timely manner. The clips were perfect, but due to the age of the oven, the holes had elongated and the new clips kept falling out also. I modified the clips by widening the tips with a pair of pliers. They are holding just fine. I don't think the older clips could've withstood the modification.
  • David from SALISBURY, CT
  • Difficulty Level:
    Easy
  • Total Repair Time:
    15 - 30 mins
  • Tools:
    Pliers
4 of 4 people found this instruction helpful.
Was this instruction helpful to you?
Thank you for voting!
Rusted burn box
I simply removed drop in range and removed screws holding burn box and installed new box. Total time was approxmately !hr.
Other Parts Used:
BOTTOM BURN BOX Single Heating Element Support Clip
  • Joseph N from Hazletownship, PA
  • Difficulty Level:
    Easy
  • Total Repair Time:
    30 - 60 mins
  • Tools:
    Nutdriver
3 of 7 people found this instruction helpful.
Was this instruction helpful to you?
Thank you for voting!
Hanging broiler
Quick and easy, thanks!
  • Doris from Aberdeen, NJ
  • Difficulty Level:
    Really Easy
  • Total Repair Time:
    Less than 15 mins
  • Tools:
    Pliers
2 of 4 people found this instruction helpful.
Was this instruction helpful to you?
Thank you for voting!
The bake elemement burned out & the clips for the top element were broken
The bake element basically just plugs in remove the two screws in the back with a nut driver pull the element out unplug the spade connectors and reconnect the new element . As far as the clips just snap them on to the top element and snap back in the holes at the top of the oven.
Also very fast delivery less then 48 hours from ordering to delivery
Other Parts Used:
Bake Element Single Heating Element Support Clip
  • Jim from Arlington, MA
  • Difficulty Level:
    Really Easy
  • Total Repair Time:
    Less than 15 mins
  • Tools:
    Nutdriver
1 of 2 people found this instruction helpful.
Was this instruction helpful to you?
Thank you for voting!
Dryer old and worn out
Dryer started making noises years ago. Finally it was intermittently starting, then...didn't start at all. It made a buzzing noise, like the motor was in over-torque. Then it over heated and wouldn't do anything until it cooled down. Then the cycle started all over again. I thought it best to change out all the worn parts. Found the belt, the rear seal, the rollers and motor all needed to be replaced. All were very simple to do. Followed the instructions and videos from others located on this site.
Other Parts Used:
Rear Drum Support Roller Kit Multi Rib Belt - 92-1/4" Rear Drum Seal Kit Single Heating Element Support Clip
  • Harald from Port Washington, NY
  • Difficulty Level:
    Easy
  • Total Repair Time:
    30 - 60 mins
  • Tools:
    Pliers, Screw drivers, Socket set, Wrench (Adjustable)
8 of 13 people found this instruction helpful.
Was this instruction helpful to you?
Thank you for voting!
Heating element dangling
Snapped in the clip
  • Victor from Miami Beach, FL
  • Difficulty Level:
    Really Easy
  • Total Repair Time:
    Less than 15 mins
10 of 13 people found this instruction helpful.
Was this instruction helpful to you?
Thank you for voting!
broiling element had burned through, req. its replacement
First I removed the two screws that hold the element in place. I also removed a screw that held one end of a support bracket. I then pulled the element out about 3 inches and disconnected the two wires. Reversing these steps, I finished the element's replacement.

I had noticed that the former element was sagging at the front end. I installed the additional clips (not original) on each forward end of the element for additional support.
Other Parts Used:
Broil Element Single Heating Element Support Clip
  • Paul from Canton, NY
  • Difficulty Level:
    Really Easy
  • Total Repair Time:
    Less than 15 mins
  • Tools:
    Pliers, Socket set
45 of 55 people found this instruction helpful.
Was this instruction helpful to you?
Thank you for voting!
  • 1
  • 2
Questions and Answers

Ask our experts a question about this part and we'll get back to you as soon as possible!

1 question answered by our experts.
Sort by:
  • 1
Sorry, we couldn't find any existing answers that matched.Try using some different or simpler keywords, or submit your new question by using the "Ask a Question" button above!
Richard
September 22, 2022
F3 code after about 20 minutes at 375 degrees bake. Replaced Heat Sensor and still has the same code? Suggestions. #91147465971
For model number 91147465791
PartSelect logo
Hello Richard, thank you for your question. F3 error indicates a faulty oven sensor, part number PS236043. If you have replaced it then we would recommend checking for an open wire connection between EOC (Electronic Oven Control - Clock) and the oven temperature sensor. Let us know if you have further questions!

Was this helpful?
Thank you for voting!
Related Parts:
  • 1
You May Also Need ?
Model Cross Reference
This part works with the following models:
PartSelect Number: PS243701
Manufacturer Part Number: WB2X9719
Brand
Model Number
Description
Kenmore
1034688610
Range
Kenmore
1036208511
Range
Kenmore
1036268412
Range
Kenmore
1036348412
Range
Kenmore
1036408412
Range
Kenmore
1036408413
Range
Kenmore
1036408710
Range
Kenmore
1036417610
Range
Kenmore
1036417611
Range
Kenmore
1036417612
Range
Kenmore
1036427510
Range
Kenmore
1036427540
Range
Kenmore
1036427560
Range
Kenmore
1036427610
Range
Kenmore
1036427611
Range
Kenmore
1036427612
Range
Kenmore
1036428412
Range
Kenmore
1036428413
Range
Kenmore
1036437710
Range
Kenmore
1036447710
Range
Kenmore
1038357210
Range
Kenmore
1038357211
Range
Kenmore
1038357212
Range
Kenmore
1038357220
Range
Kenmore
1038357221
Range
Kenmore
1038357222
Range
Kenmore
1038357240
Range
Kenmore
1038357241
Range
Kenmore
1038357242
Range
Kenmore
1038357260
Range
Customer Service Representative

Get in touch, we're here to help!

Daily 8am - 9pm EST

Contact Customer Service