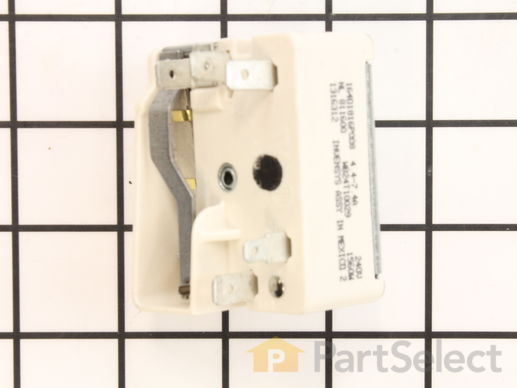
Part Location Diagram of WB24T10029 GE Range Surface Element Control Switch - 6 Inch - 1560 W
See part 3 in the diagram
Replacing your General Electric Range Range Surface Element Control Switch - 6 Inch - 1560 W
( Grid squares measure 1x1 inch )
Customer Service Representative

Get in touch, we're here to help!

Daily 8am - 9pm EST

customerservice@partselect.com

Range Surface Element Control Switch - 6 Inch - 1560 W WB24T10029

 Fits your JB600WK1WW!
★★★★★
★★★★★
18 Reviews

Rated by 18 customers 

Really Easy 

30 - 60 mins 

Ratings submitted by customers like you who bought this part.

$ 45.15
  In Stock
Get FREE EconoShip on orders over $100! T&C apply

Get this part fast! Average delivery time for in-stock parts via standard shipping: 1.8 days.

 Fits your JB600WK1WW!
PartSelect Number PS236754
Manufacturer Part Number WB24T10029
Manufactured by GE
Product Description

Range Surface Element Control Switch - 6 Inch - 1560 W Specifications

This switch controls the small burner on a range/stove top.
How Buying OEM Parts Can Save You Time and Money

How Buying OEM Parts Can Save You Time and Money

Part Videos

Replacing your General Electric Range Range Surface Element Control Switch - 6 Inch - 1560 W

Replacing your General Electric Range Range Surface Element Control Switch - 6 Inch - 1560 W
Troubleshooting
This part fixes the following symptoms:
Element will not heat | Will Not Start
This part works with the following products:
Range, Cooktop.
This part works with the following products:
General Electric, Hotpoint, Kenmore.
Part# WB24T10029 replaces these:
AP2024076, 769696
Back to Top
Customer Reviews
Average Rating:
★★★★★
★★★★★
18 Reviews
4.8
Filter By Rating:
  • 5 Stars
    15
  • 4 Stars
    2
  • 3 Stars
    1
  • 2 Stars
    0
  • 1 Star
    0
Sort by:
  • 1
  • 2
Sorry, we couldn't find any existing reviews that matched. Try using some different or simpler keywords.
  • 1
  • 2
Customer Repair Stories
 Average Repair Rating: 3.9 / 5.0, 18 reviews. What's this?
Sort by:
  • 1
  • 2
Sorry, we couldn't find any existing installation instruction that matched.
Oven shut down due to overtemperature (code F2). Also, one surface element had erratic control.
Putting the faceplate graphics onto the oven control is tricky. Use the tabs on the bottom and one side of the control unit to line up the faceplate. Be careful because once the faceplate sticks it sticks. That was the hardest part of the repair process. Installing the oven control unit and the surface control unit was straight forward.
Other Parts Used:
FACEPLATE GRAPHICS (WW) CONTROL OVEN TO9 (Electric) Range Surface Element Control Switch - 6 Inch - 1560 W
  • Michael from YORKTOWN HTS, NY
  • Difficulty Level:
    Easy
  • Total Repair Time:
    30 - 60 mins
  • Tools:
    Nutdriver, Screw drivers
2 of 2 people found this instruction helpful.
Was this instruction helpful to you?
Thank you for voting!
The back burner was not providing constant temperature...turn it warmer and it got too hot...turn it down and it would be cold.
I viewed the video available through part-select. The most important thing I learned to do was to change one wire at a time instead of removing the old switch completely and then installing the new one. With 5 wires involved, it was really simple to install and not have to remember which wire went where. I was surprised how easy it was and it works wonderfully!
Other Parts Used:
Range Surface Element Control Switch Range Surface Element Control Switch - 6 Inch - 1560 W
  • James from Merrimac, WI
  • Difficulty Level:
    Really Easy
  • Total Repair Time:
    Less than 15 mins
  • Tools:
    Nutdriver, Pliers
4 of 4 people found this instruction helpful.
Was this instruction helpful to you?
Thank you for voting!
front lift burner not working and surface light on with everything off
unplugged the range removed 4 screws from back top cover then took the knob off controller removed 2 screws from behind the knob removed 1 wirer at a time and placed it on the new controller in same order the wires came off put everything back to gather did not fix the problem .
  • kevin from GAYLORD, MI
  • Difficulty Level:
    Really Easy
  • Total Repair Time:
    15 - 30 mins
  • Tools:
    Nutdriver, Screw drivers
1 person found this instruction helpful.
Was this instruction helpful to you?
Thank you for voting!
Defective switch
Replaced element control switches
  • Mary from EDENTON, NC
  • Difficulty Level:
    Easy
  • Total Repair Time:
    15 - 30 mins
  • Tools:
    Screw drivers, Socket set
2 of 2 people found this instruction helpful.
Was this instruction helpful to you?
Thank you for voting!
Switch was not turning off range indicator light
Pulled stove out and unplugged. At the rear of the range there were 4 faster. Used a nutdriver piece in an electric drill. Pulled off the cover and located the switch. At the front of the stove, I removed the knob and unscrewed two screws releasing the switch. I undid and replaced each wire connector one-by-one to avoid any wrong connections. Replaced and secured the switch and replace the back panel. All secured, power on and fixed! Easy repair, but something that had been put off for a year!
Also follow the installation videos from PartSelect - very helpful!
  • Charles from PORTLAND, OR
  • Difficulty Level:
    Really Easy
  • Total Repair Time:
    Less than 15 mins
  • Tools:
    Nutdriver, Screw drivers
1 person found this instruction helpful.
Was this instruction helpful to you?
Thank you for voting!
Red Light On
Red Light Off
  • Lawrence from DECATUR, AL
  • Difficulty Level:
    Really Easy
  • Total Repair Time:
    30 - 60 mins
5 of 5 people found this instruction helpful.
Was this instruction helpful to you?
Thank you for voting!
Element blew hole in self then no power to burner.
Replaced burned element, did not fix no power problem. Ordered receptor replacement, replaced it, took less than 10 mminutes, but still no power to burned. Then ordered replacement switch, replacement too less than 10 minutes again and burner works fine.
  • Melvin from Portland, TN
  • Difficulty Level:
    Easy
  • Total Repair Time:
    Less than 15 mins
  • Tools:
    Screw drivers, Socket set
1 of 3 people found this instruction helpful.
Was this instruction helpful to you?
Thank you for voting!
surface burner switch was burned
After receiving the new swith from part select in less than four days with surface mail as they promised, it took me less than five minutes to replace the new swith with the old one. The only tools that I needed were A) a 5/16 nut driver to remove the back panel in order to get an access to the swith.B) a phillips screw driver to remove the swith assembley from the front panel.

I had an estimate from a technician to do the job for 196.27 dollars!!!!!:(:(. I only paid 29.56 Dollars to part select to get this swith, including the shipping.:):):)
  • abbas from redmond, WA
  • Difficulty Level:
    Really Easy
  • Total Repair Time:
    More than 2 hours
  • Tools:
    Nutdriver, Screw drivers
5 of 6 people found this instruction helpful.
Was this instruction helpful to you?
Thank you for voting!
Burner not heating.
Isolated to control switch.

Replaced
  • Jack from Greensboro, GA
  • Difficulty Level:
    Really Easy
  • Total Repair Time:
    30 - 60 mins
  • Tools:
    Screw drivers
1 of 5 people found this instruction helpful.
Was this instruction helpful to you?
Thank you for voting!
burner was inoperative
verified switch operation , checked continuity of burner element found open ordered new part and installed next day
after extremely fast
service from partselect thank you
  • bryan from cocoa, FL
  • Difficulty Level:
    Really Easy
  • Total Repair Time:
    15 - 30 mins
  • Tools:
    Nutdriver, Pliers, Screw drivers
0 of 2 people found this instruction helpful.
Was this instruction helpful to you?
Thank you for voting!
  • 1
  • 2
Questions and Answers

Ask our experts a question about this part and we'll get back to you as soon as possible!

13 questions answered by our experts.
Sort by:
  • 1
  • 2
Sorry, we couldn't find any existing answers that matched.Try using some different or simpler keywords, or submit your new question by using the "Ask a Question" button above!
Jacki
January 25, 2018
The 10" burners on my GE stove no longer "simmer." they're fine at full or half heat but below that, they remain too hot, making it impossible to simmer anything. I'm thinking i need to replace the burner control switch. Or do i need to replace the burner unit itself? Thanks to your wonderful video, i feel i can make the switch repair without calling a service person, if that's what i need.
For model number JBP35DM1BB
PartSelect logo
Hello Jacki, Thank you for your inquiry. We would recommend testing both the element and switch with a multimeter to see if they have continuity. If you are unfamiliar with how a multimeter functions, there are YouTube videos available to assist you. If both show continuity, I would check the wiring. Hope this helps!

8 people found this helpful.

Was this helpful?
Thank you for voting!
Lazarus
February 23, 2018
My triple burner does not work and the hot surface light is constantly on. I believe the whole part number is GE wb30t10155 element haliant 12 triple, however it seems that only a limiter may need be replaced. Do you have it sold separately and if so what is a part number? Thank you.
For model number JB750EF2ES
PartSelect logo
Hi Lazarus, Thank you for the question. The Limiter is only sold as part of the element its self. Hope this helps!

4 people found this helpful.

Was this helpful?
Thank you for voting!
Jake
January 3, 2019
So i have a glass cooktop that the right rear element stays on after turning the switch off, i would assume just replacing that switch would solve the problem but the strange thing is if i unplug the stove it resets the switch to off until used again
For model number JB700EJ1ES
PartSelect logo
Hello Jake, thank you for your question. Removing the power to the unit is allowing the switch to reset to off. Replacing the switch will fix the issue and allow the burner to be turned off when you're done using it without having to unplug the stove. I hope this helps!

4 people found this helpful.

Was this helpful?
Thank you for voting!
David
October 3, 2019
When using the front left burner, i hear an arcing/crackling sound in the area of the burner's control dial. I suspect a bad connection in the control dial. Any thoughts?
For model number RB790DT2BB
PartSelect logo
Hello David, Thank you for the question. I suggest checking the wiring and if it is secure and not damaged, you may need to replace the switch. Hope this helps!

3 people found this helpful.

Was this helpful?
Thank you for voting!
RONALD
February 4, 2020
The burner light stays on at all times, no burner on or oven on.
For model number JBP24DM1WW
PartSelect logo
Hello and thank you for writing. A broken hot surface switch on one of the surface elements (also called burners) causes the Hot Surface light to stay on constantly. To find out which surface switch to replace, test each of the hot surface switches. We hope this helps. Please contact us anytime if you require further assistance.

2 people found this helpful.

Was this helpful?
Thank you for voting!
Jacki
January 25, 2018
Oops, i just sent an email referring to 1o" burner on my GE stove. I meant 8", obviously. Your site says the burner switch fixes the problem if the eye will not heat or start. Mine heat, but i can never reduce the heat to simmer. Perhaps it's the burner unit itself?
For model number JBP35DM1BB
PartSelect logo
Hello Jacki, Thank you for your inquiry. You can test both the switch and burner element with a multimeter. If you are unfamiliar with how a multimeter functions, there are YouTube videos available to assist you. Hope this helps!

2 people found this helpful.

Was this helpful?
Thank you for voting!
Paul
January 28, 2024
The large front right burner will only go to high or low I have no control of in between HEAT settings? Can you suggest a part to replace? Thank You.
For model number JB750DJ3WW
PartSelect logo
Hi Paul, thank you for writing in. Our research has found, it is either the Element, part number PS2321564 or the Switch, part number PS11729102. We hope this helps.

1 person found this helpful.

Was this helpful?
Thank you for voting!
Related Parts:
Jeff
September 16, 2022
None of the burners work. Indictor lites come and stove and boiler. What part need to be checked
For model number PCB905SV1SS
PartSelect logo
Hello Jeff, thank you for your inquiry. We would recommend testing both the burner elements and switches with a multimeter to see if they have continuity. Please contact us anytime if you require further assistance.

1 person found this helpful.

Was this helpful?
Thank you for voting!
Related Parts:
Daryl
March 16, 2018
Could you please help me? My range will not heat up the burners or oven. The ciock, timer, and corresponding lights all work fine when knobs are turned. So far, i replaced the bake element and the control board, but still no heat. Any suggestions? Thank you
For model number JBP64BB4WH
PartSelect logo
Hi Daryl, Thank you for your question. If the oven is not heating correctly, then the issue is likely with the oven sensor, sometimes called the oven thermostat, and you will need to check it with a multimeter. When testing the sensor with a multimeter, the sensor should be tested at room temperature. You will need to measure the resistance between the two prongs at the end of the sensor connector. Replace the oven sensor if the reading is less than 900 Ohms or more than 1200 Ohms. If the sensor checks out okay, there are some other parts that you will need to check to see which ones are causing the issue. You will also need to check the bake and broil elements, surface burners, the burner switches, the electronic control board and the light switch. I hope this helps. Thank you and have a great day!

Was this helpful?
Thank you for voting!
Kim
November 1, 2022
I have a radiant cooktop and at this point, all the burners fluctuate in their heat consistency. They cannot be trusted to stay at the set temperature.
For model number JCBP630DT1WW
PartSelect logo
Hello Kim, thank you for contacting us. It looks like the control switches, part number PS236754, and part number PS236752, are problematic. These switches control the heat production of the surface elements. Customer service is available 7 days a week if you need help placing an order. Glad to be of assistance!

Was this helpful?
Thank you for voting!
Related Parts:
  • 1
  • 2
You May Also Need ?
Model Cross Reference
This part works with the following models:
PartSelect Number: PS236754
Manufacturer Part Number: WB24T10029
Brand
Model Number
Description
General Electric
137480
Range
General Electric
137481
Range
General Electric
15451-0
Range
General Electric
154510
Range
General Electric
155910
Range
General Electric
157710
Range
General Electric
15781-0
Range
General Electric
157810
Range
General Electric
15785-0
Range
General Electric
157850
Range
General Electric
15786-0
Range
General Electric
157860
Range
General Electric
15891
Range - Electric Range
General Electric
15891 1
Range
General Electric
158911
Range
Kenmore
91192502990
Range
Kenmore
91192502991
Range
Kenmore
91192502992
Range
Kenmore
9119250799
Range - Kenmore Range/Stove/Oven Model 911.9250799 (9119250799, 911 9250799) Parts
Kenmore
91192507990
Range
Kenmore
91192507991
Range
Kenmore
91192507992
Range
Kenmore
91192712020
Range
Kenmore
91192714020
Range
Kenmore
91192812300
Range
Kenmore
91192812301
Range
Kenmore
91192814300
Range
Kenmore
91192814301
Range
Kenmore
91193490010
Range
Kenmore
91193490300
Range
Customer Service Representative

Get in touch, we're here to help!

Daily 8am - 9pm EST

Contact Customer Service