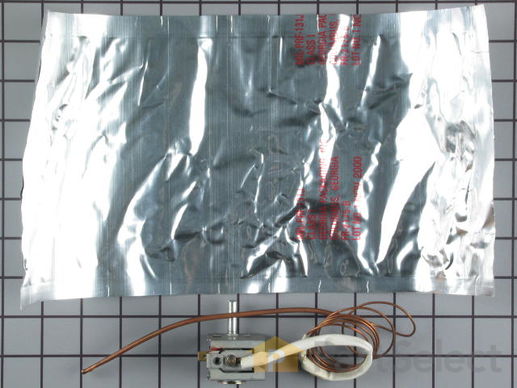
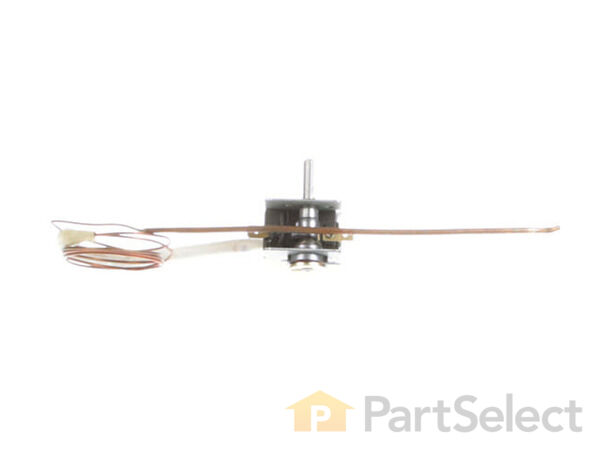
Part Location Diagram of WB20K8 GE Oven Thermostat
See part 17 in the diagram
( Grid squares measure 1x1 inch )
Customer Service Representative

Get in touch, we're here to help!

Daily 8am - 9pm EST

customerservice@partselect.com

Oven Thermostat WB20K8

★★★★★
★★★★★
6 Reviews

Rated by 13 customers 

Easy 

30 - 60 mins 

Ratings submitted by customers like you who bought this part.

$ 228.39
  On Order
Get FREE EconoShip on orders over $100! T&C apply
PartSelect Number PS235170
Manufacturer Part Number WB20K8
Manufactured by GE
Product Description

Oven Thermostat Specifications

This part establishes and maintains the internal temperature of the oven cavity.
How Buying OEM Parts Can Save You Time and Money

How Buying OEM Parts Can Save You Time and Money

Troubleshooting
This part fixes the following symptoms:
Oven is too hot | Will Not Start | Little to no heat when baking | Gas igniter glows
This part works with the following products:
Range.
This part works with the following products:
General Electric, Kenmore, Hotpoint.
Part# WB20K8 replaces these:
AP2623073, 251863, WB20K8, 164D2793P001, 183D5463P001, 223C3823P001, WB20K0006, WB20K0008, WB20K10008, WB20K10023, WB20K6, WB24X20656
Back to Top
Customer Reviews
Average Rating:
★★★★★
★★★★★
6 Reviews
4.5
Filter By Rating:
  • 5 Stars
    4
  • 4 Stars
    1
  • 3 Stars
    1
  • 2 Stars
    0
  • 1 Star
    0
Sort by:
  • 1
Sorry, we couldn't find any existing reviews that matched. Try using some different or simpler keywords.
  • 1
Customer Repair Stories
 Average Repair Rating: 3.1 / 5.0, 13 reviews. What's this?
Sort by:
  • 1
  • 2
Sorry, we couldn't find any existing installation instruction that matched.
Getting thew the back
I put it in the same way tuck it out
  • William from BOSCOBEL, WI
  • Difficulty Level:
    Really Easy
  • Total Repair Time:
    30 - 60 mins
  • Tools:
    Pliers, Screw drivers
1 person found this instruction helpful.
Was this instruction helpful to you?
Thank you for voting!
Oven ,Going on/off intermittently" Very Dangerous during day /at night especially when all is asleep /away from home,not knowing!
To: Remove.Four(4)nuts. Six(6)screws. Two (2) clips. To:Reinstall reverse process. "Very simple stright forward, and most enjoyable."
  • Leroy-Anthony from Jamaica, NY
  • Difficulty Level:
    Really Easy
  • Total Repair Time:
    30 - 60 mins
  • Tools:
    Nutdriver, Screw drivers
4 of 6 people found this instruction helpful.
Was this instruction helpful to you?
Thank you for voting!
Oven would not turn off due to inoperative thermostat
1st ensure thermostat is intact, I thought it was broken but upon further investigation I noticed that one of the screws that hold the thermostat in place had came loose which cause the thermostat knob not to be able to turn the thermostat stem. Re-installed thermostat mounting screw and it worked just fine.
  • Timothy from Lake Elsinore, CA
  • Difficulty Level:
    Easy
  • Total Repair Time:
    15 - 30 mins
  • Tools:
    Screw drivers
7 of 13 people found this instruction helpful.
Was this instruction helpful to you?
Thank you for voting!
Screws fell into a black hole and trouble threading the thermostate
My husband and I probably could have done the repair in 15 minutes except for the difficulty lifting up the range top, dropping the screws into the range where they could not be retreived, threading the thermostate into the little holes from the top to the inside of the oven and then trying to hook the range top back into place. Even with all the difficulties we still accomplished the task in one hour. Thank goodness we had 4 extra screws that worked (actually only takes 2 but of the 6 we had, 4 fell into a place you could not reach into). Glue on the end of the screw driver finally kept the screws from falling into the black hole. It was an adventure and would do it again.
  • Lenora from Crowley, TX
  • Difficulty Level:
    Really Easy
  • Total Repair Time:
    30 - 60 mins
  • Tools:
    Screw drivers
4 of 10 people found this instruction helpful.
Was this instruction helpful to you?
Thank you for voting!
The temperature of the oven was running wild.
The R&R of the defective thermostat was at first look relatively simple. The job was made more complicated because in order to remove the old thermostat and then route the new thermostat across the top of the stove, under the burners, and down through a small hole into the oven space I had to remove the whole top of the stove. This process is not hard, just time consuming. Be very careful of razor sharp edges, they make you bleed. The final calibration of the oven is an easy adjustment in the oven knob. All in all it was an good experience.


Lyle Nelson
  • Lyle from Morro Bay, CA
  • Difficulty Level:
    A Bit Difficult
  • Total Repair Time:
    30 - 60 mins
  • Tools:
    Screw drivers, Socket set, Wrench (Adjustable), Wrench set
15 of 19 people found this instruction helpful.
Was this instruction helpful to you?
Thank you for voting!
oven Thermostat stem broken
The repair was fairly easy, you take off all the burner knobs there are small screws on the face of the cover panel and a few on the bottom That come off the cover panel should come off after you remove the screws and the switch for the oven light the wires just clip on the switch there are two .the thermostat is held on by two small screws that are on the cover panel.you lift up the burner panel you have room to feed the thermostat wire in the stove,there is a small hole in the back were you feed the wire through then the metal part is held in place by two small clips that are in the oven on the back wall.I didnt have to trouble shoot becase I knew what part I needed because it was broken,It was a fairly easy repair hopefully this is helpful

Good Luck
  • Joseph from Bartlett, IL
  • Difficulty Level:
    Easy
  • Total Repair Time:
    30 - 60 mins
  • Tools:
    Screw drivers
38 of 44 people found this instruction helpful.
Was this instruction helpful to you?
Thank you for voting!
Oven came on by itself, finally burning out the igniter
Once I figured out how to get the top off it was not too bad. all of the screws and igniters for the burners had to be removed. The actual install of the thermostat was simple after that. The igniter was also an easy install. Overall, it takes more time to disassemble the stove to get to the problem than to install the part.
Other Parts Used:
Oven Thermostat Flat Style Oven Igniter Kit
  • Donald from Shelbyville, KY
  • Difficulty Level:
    A Bit Difficult
  • Total Repair Time:
    1- 2 hours
  • Tools:
    Nutdriver, Screw drivers
29 of 37 people found this instruction helpful.
Was this instruction helpful to you?
Thank you for voting!
Oven went full blast and wouldn't shut off.
My Hotpoint gas oven became extremely hot after using it . Only after unplugging the electrical cord, turned it off. Replacing the control valve (thermostat) solved the problem. The stove top had to be pried up with a flat screw driver then propped up. Prying off the oven control valve revealed two mounting screws (philips head). Next remove thermostat sensor bulb inside oven at back wall. Remove old thermostat control and bulb assembly. Installation is reverse order of disassembly.
  • RALPH from DALY CITY, CA
  • Difficulty Level:
    Easy
  • Total Repair Time:
    30 - 60 mins
  • Tools:
    Screw drivers
19 of 23 people found this instruction helpful.
Was this instruction helpful to you?
Thank you for voting!
No ignition
The repair was somewhat easy, it would have been easiere if I had figured out the right part in the first place! Replacing the Thermostat is a simple task and actually only took abut 10 minutes. The harder task was replacing the glow bar in the broiler area! What a pain! The part had the same gender connector as the existing wiring. Had to cut the connectors off and use ceramic wire nuts... should be simple but the wires on the replacement part were about 1/2 inch too short! After some creative manuvering and about an hour of cussing out the OEM part manufacturer it went together and worked OK but I suggest before trying to solve a problem like this remember the basics... always check the obvious first!
  • Karen from Dale City, VA
  • Difficulty Level:
    A Bit Difficult
  • Total Repair Time:
    30 - 60 mins
  • Tools:
    Socket set
6 of 14 people found this instruction helpful.
Was this instruction helpful to you?
Thank you for voting!
The oven stayed on after the switch was turned off
Check the switch with an ohm meter, 0 resistance in the closed position = a bad switch. I went to the web site found the part. ordered it next day it shows up. Removed the pot grids and all control knobs for the burners and oven lifted the top of the stove up, and off. I removed face plate behind the control knobs 3 screws, I removed the 2 screws holding the oven switch. opened the oven and un cliped the thermostat wire from the back wall. Uncoiled new wire feed under the burner shield to the back of the unit and back down the old hole cliped in the new wire. put the 2 screws into the new switch and re-assembled the rest in the reverse order i took it off . all this while watching my 11 month old grandaughter.
  • robin from Merrill, WI
  • Difficulty Level:
    Easy
  • Total Repair Time:
    30 - 60 mins
  • Tools:
    Nutdriver, Screw drivers
93 of 114 people found this instruction helpful.
Was this instruction helpful to you?
Thank you for voting!
  • 1
  • 2
Questions and Answers

Ask our experts a question about this part and we'll get back to you as soon as possible!

18 questions answered by our experts.
Sort by:
  • 1
  • 2
Sorry, we couldn't find any existing answers that matched.Try using some different or simpler keywords, or submit your new question by using the "Ask a Question" button above!
Paul
January 23, 2018
I have a good working basic GE stove/oven(no electronic displays). Electric start(igniter) stays on(glowing) entire time oven is on: Is this normal?(igniter does not cycle off after main burner ignites.) i am probably going to replace the "thermostat" because the oven sometimes turns on for a few seconds when in off position. Is the only thing controlling the oven; the termostat?, when you turn knob that is the thermostat or switch?
For model number JGBS07DEM1WW
PartSelect logo
Hello Paul, Thank you for your inquiry. The igniter stays on continuously while the burner is operating. It will turn off once the oven reaches the set temperature, then it will cycle on and off when needed to ignite the burner to maintain the oven set temperature. The thermostat is what establishes and maintains the oven temperature. The pressure regulator is what controls the flow of gas into the oven in conjunction with the safety valve-which lets the gas in for the ignitor to ignite it. When you turn the switch, all of these parts work together to ignite the stove. If your oven is coming on when the switch is off, I would have the regulator, safety valve and ignitor checked. Hope this helps!

12 people found this helpful.

Was this helpful?
Thank you for voting!
Michael
June 18, 2019
The oven temperature in my gas stove keeps going up. I have reset the knob to a cooler temperature. I'm thinking the temperature probe/thermostat is the problem. I replaced this part 8 years ago. Just a few months ago i replaced the oven igniter. Is there any chance the igniter is the problem.
For model number WB20K8
PartSelect logo
Hi Michael, Thank you for your question. If the oven is not heating correctly, then the issue is likely with the oven sensor, sometimes called the oven thermostat, and you will need to check it with a multimeter. When testing the sensor with a multimeter, the sensor should be tested at room temperature and it should be unplugged from the oven. You will need to measure the resistance between the two prongs at the end of the sensor connector. Replace the oven sensor if the reading is less than 900 Ohms or more than 1200 Ohms. I hope this helps. Thank you and have a great day!

7 people found this helpful.

Was this helpful?
Thank you for voting!
Linda
October 10, 2017
Our oven turns on even when turned off.We have replaced the thermostat and the timer/clock panel but still have the problem.
For model number JGBS23SEH3SS
PartSelect logo
Hi Linda, Thank you for the question. I suggest checking the Igniter, PartSelect Number PS952857. Sounds like it is defective and igniting on its own. This igniter will need to be replaced. Hope this helps!

2 people found this helpful.

Was this helpful?
Thank you for voting!
ROBERT
November 12, 2017
First i'd like to test thermastat switch,cause while their was no continuity on igniter(which i'll order),the thermastat was replaced several months ago and i'm wondering on the thermastat running too hot would influence the igniter.Oh,and the gas safety valve had continuity of 1.0
For model number JGBS07PEH1WW
PartSelect logo
Hi Robert, Thank you for your inquiry. The oven thermostat establishes and maintains the internal temperature of the oven cavity, so it would have an influence over the heat in the oven. The igniter kit is used to heat your oven. If you notice that your oven will not heat up properly, the igniter kit may need to be replaced. I would use a multimeter to check both parts to see which one is causing the issue. I hope this helps. Thank you and have a great day!

2 people found this helpful.

Was this helpful?
Thank you for voting!
Tami
December 18, 2017
My oven temperature is not heating to correct temperature. Could it be the heating element or thermostat?
For model number JGBS04PEA6WH
PartSelect logo
Hello Tami, Thank you for your inquiry. The oven ignitor and oven thermostat are usually the top two parts to check. You can test the parts with a multimeter. If you are unfamiliar with how a multimeter functions, there are YouTube videos available to assist you. Good Luck with your repair!

2 people found this helpful.

Was this helpful?
Thank you for voting!
Steve
May 2, 2019
Our GE gas range is taking two times longer than normal to heat up. It does generally get to the correct temperature eventually. Do you know what part might be causing this?Thanks, steve
For model number JGBS23WEL3WW
PartSelect logo
Hello Steve, Thank you for the question. I suggest testing the thermostat, Testing the thermostat sensor probe on your oven is easy. With the sensor at room temperature, measure the resistance between the two prongs at the end of the sensor connector. The resistance of the sensor should read approximately 1080 – 1090 ohms at room temperature. Thank you for your inquiry, good luck with this repair!

2 people found this helpful.

Was this helpful?
Thank you for voting!
MAX
November 25, 2019
All valves off but get gas leak in the oven.
For model number jgas02sen4ss
PartSelect logo
Hello Max, thank you for writing. This is likely due to either a faulty Pressure Regulator, part number PS8754389, or Safety Valve, part number PS2339821 for your model range. You can test the resistance of the Safety Valve with a multimeter. It should read between 0-50 ohms of resistance to be functioning properly. Good luck with your repair!

1 person found this helpful.

Was this helpful?
Thank you for voting!
Mark
January 6, 2018
We have this gas range running on propane the oven will only heat up to 350 and maintain but will not go hotter. Could you please tell me the likely cause and the part that needs to be replaced. Sn# is md143309p
For model number JGBS10DEF1BB
PartSelect logo
Hello Mark, Thank you for your inquiry. The most likely part sounds like the oven thermostat. You can test it with a multimeter. If you are unfamiliar with how a multimeter functions, there are YouTube videos available to assist you. Hope this helps!

1 person found this helpful.

Was this helpful?
Thank you for voting!
Eddy
June 21, 2019
I asked a question 2 days ago and received your answer for the problem of the oven going on by itself at times. Thank you for the reply. 2 possible part replacements were offered as culprits. Which one?And also based on not knowing which one exactly and if both parts get replaced, it seems like a new oven would make more sense? Both parts cost over $220.00.
For model number RGB530DEP2WW
PartSelect logo
Hi Eddy, Thank you for your question. To verify which part is causing the issue, you will need to test the parts with a multimeter. Here is a link to one of our videos on YouTube that you may reference on how to use one, https://www.youtube.com/watch?v=bWC44fHn0As. I hope this helps. Thank you and have a great day!

Was this helpful?
Thank you for voting!
Kathy
June 24, 2019
The oven knob got snapped off. Can I replace the whole unit that controls the oven. It is a gas stove.
For model number JGBS16GEP2
PartSelect logo
Hello Kathy, Thank you for contacting us. I have researched the model you have provided and have found the part you are looking for is PartSelect Number PS235170 for the thermostat switch. I looking up the Knob, PartSelect Number PS248661 and it is showing to be discontinued sorry. There are no part substitutions listed. My suggestion here would be to call the manufacturer and see if they can provide you with a substitution for these part numbers. Hope this helps!

Was this helpful?
Thank you for voting!
Related Parts:
  • 1
  • 2
Model Cross Reference
This part works with the following models:
PartSelect Number: PS235170
Manufacturer Part Number: WB20K8
Brand
Model Number
Description
General Electric
1C3061BI3A
Range - *gas Range Mabe 30 Inch White
General Electric
1C3091I2A
Range - *gas Range Mabe 30 Inch Bk
Kenmore
36261111699
Range
Kenmore
3626111192
Range
Kenmore
3626111193
Range
Kenmore
3626111194
Range
Kenmore
3626111195
Range
Kenmore
3626111196
Range
Kenmore
3626111197
Range
Kenmore
3626111198
Range
Kenmore
36261118699
Range
Kenmore
3626111892
Range
Kenmore
3626111893
Range
Kenmore
3626111894
Range
Kenmore
3626111895
Range
Kenmore
3626111896
Range
Kenmore
3626111897
Range
Kenmore
3626111898
Range
Kenmore
36261120101
Range
Kenmore
36261120102
Range
Kenmore
36261120103
Range
Kenmore
36261120104
Range
Kenmore
36261121890
Range
Kenmore
36261121891
Range
Kenmore
36261121892
Range
Kenmore
36261121893
Range
Kenmore
36261121894
Range
Kenmore
36261121895
Range
Kenmore
36261121896
Range
Kenmore
36261128890
Range
Customer Service Representative

Get in touch, we're here to help!

Daily 8am - 9pm EST

Contact Customer Service