Part Location Diagram of LA-1053 Whirlpool High Limit Kit
See part 12 in the diagram
Replacing your Norge Dryer High Limit Kit
( Grid squares measure 1x1 inch )
Customer Service Representative

Get in touch, we're here to help!

Daily 8am - 9pm EST

customerservice@partselect.com

High Limit Kit LA-1053

 Fits your YG206KA!
★★★★★
★★★★★
46 Reviews

Rated by 95 customers 

Easy 

30 - 60 mins 

Ratings submitted by customers like you who bought this part.

$ 33.01
  In Stock
Get FREE EconoShip on orders over $100! T&C apply

Get this part fast! Average delivery time for in-stock parts via standard shipping: 1.8 days.

 Fits your YG206KA!
PartSelect Number PS2162282
Manufacturer Part Number LA-1053
Manufactured by Whirlpool
Product Description

High Limit Kit Specifications

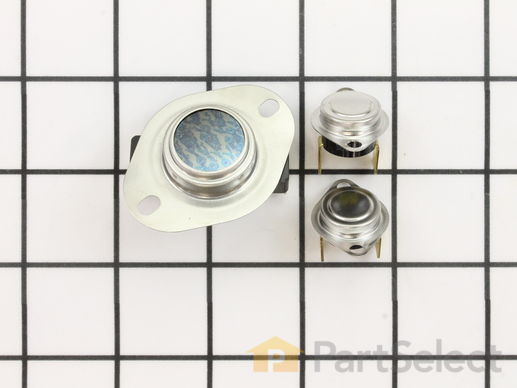
The high limit kit comes with three separate thermal fuses for dryers. One electric thermal fuse with a limit of 258, one gas high limit at 240, and one gas and electric high limit thermostat with a limit at 300. The thermal fuse kit shuts off the motor in the dryer when it begins to overheat. If the dryer will not heat, is overheated, shuts off too soon, or takes too long to dry then the thermal fuse might have exploded and need to be replaced. For replacement instructions refer to the diagram by manufacturer. For safety, unplug the dryer before installing the part.
How Buying OEM Parts Can Save You Time and Money

How Buying OEM Parts Can Save You Time and Money

Part Videos

Replacing your Norge Dryer High Limit Kit

Replacing your Norge Dryer High Limit Kit
Troubleshooting
This part fixes the following symptoms:
Too hot | Won’t Start | Will Not Start
This part works with the following products:
Dryer.
This part works with the following products:
Norge, Magic Chef, Maytag, Crosley.
Part# LA-1053 replaces these:
AP4242472, 3344, LA-1053, 53-0143, 53-0261, 53-1133, 53-1526, K35-601, LA-1053, LA-1053VP, LA1053
Back to Top
Customer Reviews
Average Rating:
★★★★★
★★★★★
46 Reviews
4.8
Filter By Rating:
  • 5 Stars
    43
  • 4 Stars
    1
  • 3 Stars
    0
  • 2 Stars
    0
  • 1 Star
    2
Sort by:
  • 1
  • 2
  • 3
Sorry, we couldn't find any existing reviews that matched. Try using some different or simpler keywords.
  • 1
  • 2
  • 3
Customer Repair Stories
 Average Repair Rating: 3.5 / 5.0, 95 reviews. What's this?
Sort by:
  • 1
  • 2
  • 3
Sorry, we couldn't find any existing installation instruction that matched.
My dryer would not work and the light would not come on.
I unplugged the dryer from the outlet and opened the top of the dryer with a puddy knife .I marked both wires "T" for the one on top and "B" for the one on the bottom. I removed the screw that holds the bracket in place that the High Limit Kit fuse is attached to and removed both wires with a pair of pliers. I made sure that the new fuse was turned the same way as the old fuse. There is some writing on one side and it should be pointing to the back of the dryer. I put the fuse in the bracket and placed the bracket back in the slotted holder placed the screw back in the bracket holder tighten it up hooked the wires up as labeled and closed the top. I plugged the dryer up opened the door and the light came on. After I turned it on it worked then it tripped the breaker. I reset the breaker turned it on again and it worked I haven't had a problem since. Make sure that you use the fuse with the pink dot on it for a electric dryer.
  • Willie from CORDOVA, TN
  • Difficulty Level:
    Very Easy
  • Total Repair Time:
    15 - 30 mins
  • Tools:
    Nutdriver, Pliers
1 person found this instruction helpful.
Was this instruction helpful to you?
Thank you for voting!
Overheating
Others have shared as well as I can
Other Parts Used:
High Limit Kit Heating Element Kit - 240V 4750W
  • Joseph from TARBORO, NC
  • Difficulty Level:
    Really Easy
  • Total Repair Time:
    30 - 60 mins
  • Tools:
    Pliers, Screw drivers
1 person found this instruction helpful.
Was this instruction helpful to you?
Thank you for voting!
dryer stopped running, no power
I watched the video tape
  • larry from OLNEY, TX
  • Difficulty Level:
    Easy
  • Total Repair Time:
    30 - 60 mins
  • Tools:
    Nutdriver, Pliers
2 of 2 people found this instruction helpful.
Was this instruction helpful to you?
Thank you for voting!
dryer stopped working--completely dead and would not turn on
I suspected the high limit fuse. I unplugged the machine, lifted the top, found the high-limit fuse (about the size of four dimes glued together) just to the right of the heating coil. I pulled the two wires off and taped them together. Plugged the machine back in and it worked perfectly. I made sure the heating coils started to glow red. When the part arrived, I replaced the old unit with the new, plugged the two wires back on, and I was done. Just for additional information, when I touched the heating coil during the repair, it broke. After 16 years, the heating coils get brittle, so I also replaced the heating coil and it's thermostat just above it (about the size of 6 quarters glued together). I hope this gets me another 16 years.
  • Anthony from Limon, CO
  • Difficulty Level:
    Really Easy
  • Total Repair Time:
    15 - 30 mins
  • Tools:
    Nutdriver
1 person found this instruction helpful.
Was this instruction helpful to you?
Thank you for voting!
Dryer would not start.
Just as described in the installation video provided by Partselect. I replaced the Thermal Fuse and the High Limit Thermostat. The most time was spent replacing the fuse due to it's location.
  • Wilfred from FAYETTEVILLE, GA
  • Difficulty Level:
    Really Easy
  • Total Repair Time:
    1- 2 hours
1 person found this instruction helpful.
Was this instruction helpful to you?
Thank you for voting!
elec.dryer would not start
i followed part select instructions that probable cause was either thermal fuse or high limit thermostat.put ohm meter across both & saw thermal fuse(has pink dot on it) part 53-1182 was open.ordered thermal fuse replacement kit. part#LA-1053. the problem i had was after reaching down the side of heating housing removing the bracket with the thermal fuse,replacing & reconnecting it i had a hard time reinstalling the bracket,very tight space & i don't have very big hands.finally got the fuse in it's hole in the bracket & slid & jammed the bracket into the side of the mounting housing & it stayed secure.dryer started
  • Russell from LEESBURG, FL
  • Difficulty Level:
    A Bit Difficult
  • Total Repair Time:
    30 - 60 mins
  • Tools:
    Nutdriver, Pliers
2 of 2 people found this instruction helpful.
Was this instruction helpful to you?
Thank you for voting!
Wouldn't start
followed video except for the second fuse deeper down it was easier to take a piece of string and loop it around the top of the holder so it would not rotate toward the bottom due to the size of the hole for the fuse. hold string loop until bottom of bracket is in place and press top into place as you remove looped string...
Other Parts Used:
High Limit Kit Multi Rib Belt - 92-1/4"
  • John from MURPHY, NC
  • Difficulty Level:
    A Bit Difficult
  • Total Repair Time:
    30 - 60 mins
  • Tools:
    Nutdriver
1 person found this instruction helpful.
Was this instruction helpful to you?
Thank you for voting!
Wouldn't start
Followed instructions for testing, starting with door switch, then push to start switch, then thermal fuse. Thermal fuse was bad. Replaced thermal fuse. Back in business.
  • Christopher from WYLIE, TX
  • Difficulty Level:
    Really Easy
  • Total Repair Time:
    30 - 60 mins
  • Tools:
    Screw drivers, Socket set
1 person found this instruction helpful.
Was this instruction helpful to you?
Thank you for voting!
Dryer was overheating
I first unplugged the dryer. I had to move the dryer forward a little. Then I used a screwdriver to pry up the top of the dryer from the front. I positioned the top all the way back until it rested on the front of the cabinet. Make sure it's far enough back so it doesn't accidentally close on you while you are working on it. I located the high limit thermostat right above the heating coils. I unplugged the two wires going to it. I used a nut driver to remove the screw that was holding it to a bracket. I then I removed the two screws that held it to another bracket. I installed the new thermostat to the bracket and then reinstalled it to the bracket above the coils. I plugged the two wires back in and closed the lid. Make sure the dryer vent is still attached if you had to move it. The dryer works fine now and doesn't overheat.
  • Jerry R. from FALLS CHURCH, VA
  • Difficulty Level:
    Very Easy
  • Total Repair Time:
    Less than 15 mins
  • Tools:
    Nutdriver, Pliers, Screw drivers
2 of 2 people found this instruction helpful.
Was this instruction helpful to you?
Thank you for voting!
Dryer would not start
Used key tip to open dryer lid. Used an ohm meter to check door siwtch and fuses; found thermal limit fuse open. Took photo of wiring for reference. Disconnected heat element and fuses. Removed temp sensor from above element and removed screw retaining heater. Needle nose pliers used to remove clip which retains thermal fuse. Replaced thermal fuse with matching color coded dot (purple) and reinstalled clip. Check the seating of clip and fuse, this is an important safety feature. Put element back in place and checked that retaining screw properly secured clip/fuse. Replaced temp sensor with new unit and reinstalled over heater. Connected wiring and used ohm meter to check for shorts to chasis. Verified all connections secure and no loose wire clips. Closed lid, plugged unit into AC and runs perfect. This is a good time to check all lint traps, housing, and duct work for excess lint. Clogged ducts can cause fire an run unit longer than needed to dry clothes. Partselect.com is by far the best repair parts site.
  • PAUL from HUDSON, NH
  • Difficulty Level:
    Easy
  • Total Repair Time:
    15 - 30 mins
  • Tools:
    Nutdriver, Pliers
0 of 1 people found this instruction helpful.
Was this instruction helpful to you?
Thank you for voting!
  • 1
  • 2
  • 3
Questions and Answers

Ask our experts a question about this part and we'll get back to you as soon as possible!

22 questions answered by our experts.
Sort by:
  • 1
  • 2
  • 3
Sorry, we couldn't find any existing answers that matched.Try using some different or simpler keywords, or submit your new question by using the "Ask a Question" button above!
Gerry
September 1, 2017
I believe the high limit switch has tripped and the dryer will not run.. your switches have two listed. a package of three that will shut off and needs to be replaced and a package of one that will shut down and come back as the dryer cools down. do they work in my dryer and if sow which one should i ger?
For model number PYE2200AYW
PartSelect logo
Hi Gerry, Thank you for your inquiry. The thermostats that are listed under your model number are designed to work with your appliance. There is a high limit kit listed under your model number, part number PS2162282. The high limit kit comes with three separate thermal fuses for dryers. One electric thermal fuse with a limit of 258, one gas high limit at 240, and one gas and electric high limit thermostat with a limit at 300. The thermal fuse kit shuts off the motor in the dryer when it begins to overheat. If the dryer will not heat, is overheated, shuts off too soon, or takes too long to dry then the thermal fuse might have exploded and need to be replaced. For replacement instructions refer to the diagram by manufacturer. For safety, unplug the dryer before installing the part. I hope this helps. Thank you and have a great day!

12 people found this helpful.

Was this helpful?
Thank you for voting!
John
May 1, 2019
The high limit kit comes with three separate thermal fuses for dryers. One electric thermal fuse with a limit of 258, one gas high limit at 240, and one gas and electric high limit thermostat with a limit at 300. The two smaller thermal fuses has a marker on them. One with a yellow dot and the other with a pink dot. Which one goes with the larger thermal fuse in my electric dryer.
For model number pye2300ayw
PartSelect logo
Hello John, Thank you for the question. The one with the Pink Dot is for the electric dryer. Hope this helps!

7 people found this helpful.

Was this helpful?
Thank you for voting!
Gerry
September 1, 2017
Original question:I believe the high limit switch has tripped and the dryer will not run.. your switches have two listed. a package of three that will shut off and needs to be replaced and a package of one that will shut down and come back as the dryer cools down. do they work in my dryer and if sow which one should i get? the response repeated what the item said and did not mention the question of the limit switch for for additional or alternate item pn11742806 that will reset?
For model number PYE2200AYW
PartSelect logo
Hi Gerry, Thank you for getting back to us. Please accept our apologies that your previous question was misunderstood. These parts are listed under your model number and are designed to work with your appliance. To verify which part is causing the issue, you will need to check the continuity of each part with a multimeter. I hope this helps with the repair.

5 people found this helpful.

Was this helpful?
Thank you for voting!
Ibarionex
February 4, 2018
The thermal high limit component that is being sold here has two connectors while the original one on my dryer has four. Yet, your site indicates that this is the correct part. Could you clarify.
For model number PYG10000AWW
PartSelect logo
Hello, thank you for your question. Yes, per the manufacturer, this is the correct part for your appliance. The part has been changed from the original and should come with instructions for the install of the new parts. Good luck with your repair!

4 people found this helpful.

Was this helpful?
Thank you for voting!
Amit
February 6, 2018
I have verified the thermal fuse is the issue causing the dryer not to start. Do i need the whole high limit kit, or can i just replace the thermal fuse?
For model number PYE2300AYW
PartSelect logo
Hi Amit, Thank you for your question. You would have to buy the kit to get the fuse as that is the only way the part is sold. I hope that helps. Good luck with your repair.

4 people found this helpful.

Was this helpful?
Thank you for voting!
Michael
November 4, 2017
Dryer will not tumble
PartSelect logo
Hi Michael, Thank you for the question.I suggest checking the drum belt or the pulleys. If you wish to resubmit a new question with the model number of the appliance we will be able to verify the correct belt. Look forward to hearing from you!

3 people found this helpful.

Was this helpful?
Thank you for voting!
Nathan
November 22, 2017
Hi, i have a Maytag dryer model number pye2300ayw. My dryer does nothing when i press the start button. I'm suspecting blown fuse, high limit switch kit, etc, but i after closer inspection i could hear a faint hum when i pressed the button. Does this mean it's got to be something else?
For model number PYE2300AYW
PartSelect logo
Hi Nathan, Thank you for contacting us. There are some parts that you will need to check to see which one is causing the issue. You will need to check the high limit thermostats, the belt, the door catch, the timer resistor assembly, the door switch, the timer assembly and the door switch. I hope this helps. Thank you and have a great day!

3 people found this helpful.

Was this helpful?
Thank you for voting!
Boyd
January 29, 2018
I suspect the thermal switch is bad. When i was looking at it, i noticed i could push in the back side of the switch. Is that normal ?
For model number PYET344AYW
PartSelect logo
Hi Boyd, Thank you for your question. To verify if the switch is bad, you will need to test it with a multimeter. Disconnect the power source to your dryer before you conduct this or any other test. Either unplug the unit from the wall outlet, remove the appropriate fuse from the fuse box, or flip the appropriate breaker in the circuit breaker panel. Your dryer uses multiple thermostats to regulate its internal temperature. The cycle selected determines which thermostat is used. A cycling thermostat can be found somewhere in the path of air that is leaving the drum. It could be found on the blower wheel housing or inside the venting/exhaust system. Dryer thermostats are usually oval shaped and about an inch and a half in length. Also, there should be two wires leading to each thermostat. Label these wires before you remove them so that you are able to correctly reconnect them later. The wires leading to the thermostat are connected using metal slip on connectors. Remove the wires by pulling on the connectors, and not the wires themselves. It may be a good idea to use a pair of needle nosed pliers to help you. Set your multimeter to the R X 1 setting. Take each of your meter's probes and touch one to each terminal. You are testing for continuity, and you should receive a reading of either zero or infinity. At room temperature, testing the thermostat should produce a reading of zero. But if a thermostat is tested when it is heated to its limit, a reading of infinity should be produced. We strongly recommend that you test your thermostat at room temperature. If the test you conduct with your thermostat does not produce these results, then you should replace the component. I hope this helps. Thank you and have a great day!

3 people found this helpful.

Was this helpful?
Thank you for voting!
Jaime
January 28, 2019
I have a german dryer "asko" and no parts exist for this model. I have talked to the asko parts distributor for north america, no parts. Can i replace the thermostat(125f-31f) and thermal fuse (140f-35f) with american parts. How much can i vary from these temperatures and differentials. As i understand it the thermostat can vary from 125-94, 31 being the differential and the same goes for the fuse. Where can i find them where the specs are shown. Most of the sites on show the thermastat specs but not the fuse. Can anyone help. If you want to reply my email is jsanchez1dad@yahoo.Com thanks
For model number TLS752 XX LRR
PartSelect logo
Hello Jaime, Thank you for contacting us. I am sorry however I am not able to find any concrete information to advise whether or not you are able to interchange the parts, as often different countries have different safety standards. I suggest reaching out to a local technician or Asko directly. Good luck with your repair. Have a wonderful day!

2 people found this helpful.

Was this helpful?
Thank you for voting!
Philip
October 23, 2017
My Amana dryer initial start will heat then after 5 minutes stop heating. what would be the problem. Thank you.
For model number NGD7200TW
PartSelect logo
Hi Philip, Thank you for your question. There are a couple of parts that you could check. Your radient flame sensor, your thermistor, thermostats, and your ignitor. You can test all of these parts with a multi meter. Good luck with your repair.

2 people found this helpful.

Was this helpful?
Thank you for voting!
  • 1
  • 2
  • 3
Model Cross Reference
This part works with the following models:
PartSelect Number: PS2162282
Manufacturer Part Number: LA-1053
Brand
Model Number
Description
Norge
7215A REV E
Dryer - Norge Dryer Model 7215A REV E (7215AREVE) Parts
Norge
7215A REV F
Dryer - Norge Dryer Model 7215A REV F (7215AREVF) Parts
Norge
7215A REV G
Dryer - Norge Dryer Model 7215A REV G (7215AREVG) Parts
Norge
7216A REV E
Dryer - Norge Dryer Model 7216A REV E (7216AREVE) Parts
Norge
7216A REV F
Dryer - Norge Dryer Model 7216A REV F (7216AREVF) Parts
Norge
7375A REV E
Dryer - Norge Dryer Model 7375A REV E (7375AREVE) Parts
Norge
7375A REV F
Dryer - Norge Dryer Model 7375A REV F (7375AREVF) Parts
Norge
7430A REV A
Dryer - Norge Dryer Model 7430A REV A (7430AREVA) Parts
Norge
7430A REV B
Dryer - Norge Dryer Model 7430A REV B (7430AREVB) Parts
Norge
7430A REV C
Dryer - Norge Dryer Model 7430A REV C (7430AREVC) Parts
Norge
7430A REV D
Dryer - Norge Dryer Model 7430A REV D (7430AREVD) Parts
Norge
7433A REV A
Dryer - Norge Dryer Model 7433A REV A (7433AREVA) Parts
Norge
7435A REV A
Dryer - Norge Dryer Model 7435A REV A (7435AREVA) Parts
Norge
7435A REV B
Dryer - Norge Dryer Model 7435A REV B (7435AREVB) Parts
Norge
7435A REV C
Dryer - Norge Dryer Model 7435A REV C (7435AREVC) Parts
Norge
7435A REV D
Dryer - Norge Dryer Model 7435A REV D (7435AREVD) Parts
Norge
7435A REV F
Dryer - Norge Dryer Model 7435A REV F (7435AREVF) Parts
Norge
7435A REV G
Dryer - Norge Dryer Model 7435A REV G (7435AREVG) Parts
Norge
7435A REV H
Dryer - Norge Dryer Model 7435A REV H (7435AREVH) Parts
Norge
7440A REV A
Dryer - Norge Dryer Model 7440A REV A (7440AREVA) Parts
Norge
7440A REV B
Dryer - Norge Dryer Model 7440A REV B (7440AREVB) Parts
Norge
7440A REV C
Dryer - Norge Dryer Model 7440A REV C (7440AREVC) Parts
Norge
7440A REV D
Dryer - Norge Dryer Model 7440A REV D (7440AREVD) Parts
Norge
7539A REV A
Dryer - Norge Dryer Model 7539A REV A (7539AREVA) Parts
Norge
7539A REV B
Dryer - Norge Dryer Model 7539A REV B (7539AREVB) Parts
Norge
7540A REV A
Dryer - Norge Dryer Model 7540A REV A (7540AREVA) Parts
Norge
7540A REV B
Dryer - Norge Dryer Model 7540A REV B (7540AREVB) Parts
Norge
7540A REV C
Dryer - Norge Dryer Model 7540A REV C (7540AREVC) Parts
Norge
7540A REV D
Dryer - Norge Dryer Model 7540A REV D (7540AREVD) Parts
Norge
7543A REV A
Dryer - Norge Dryer Model 7543A REV A (7543AREVA) Parts
Customer Service Representative

Get in touch, we're here to help!

Daily 8am - 9pm EST

Contact Customer Service