This wheel has a deep D-shaped shaft receptacle. The spring clamp is not included with this part.
How Buying OEM Parts Can Save You Time and Money
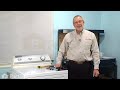
Part Videos
Replacing your Maytag Dryer Blower Wheel
Troubleshooting
This part fixes the following symptoms:
Noisy
This part works with the following products:
Dryer.
This part works with the following products:
Maytag, Magic Chef, Crosley, Admiral.
Part# W11497304 replaces these:
AP6994155, 31001317
Customer Reviews
Average Rating:
★★★★★
★★★★★
8 Reviews
3.5
Filter By Rating:
5 Stars
4
4 Stars
1
3 Stars
0
2 Stars
1
1 Star
2
Sort by:
< Prev
1
Next >
Search filter:
Clear Filter
Your search term must have 3 or more characters.
Keep searches simple. Use keywords, e.g. "leaking", "pump", "broken" or "fit".
Sorry, we couldn't find any existing reviews that matched. Try using some different or simpler keywords.
★★★★★
★★★★★
Frank L - May 24, 2023
Verified Purchase
Exact fit
Exact fit for broken blower wheel. Quality part! Dryer works a lot better now
★★★★★
★★★★★
Robert E - March 1, 2022
Verified Purchase
Easy repair, great part, works fine
The part was in great condition and came fast. My appliances repaired and working fine!
★★★★★
★★★★★
Magnus W - February 11, 2019
Verified Purchase
Not the greatest fit
The hole where the axis from the motor goes into the blower wheel was a little bit too small. I had to use a rubber mallet and whack the wheel hard many many times before I finally got it on to the axis. I had to whack it so hard I was afraid the wheel or the motor would break. If I ever need to remove the wheel that will not be possible without breaking it. I replaced this wheel once before and at that time the wheel, which was purchased from a different vendor at a lower cost, did fit perfectly.
★★★★★
★★★★★
Kerwyn J - January 1, 2019
Verified Purchase
Very easy repair. Works great
Thankfully I found this web site and was able to diagnose and repair my own dryer. The how to video was excellent. It was well made and easy to follow. My machine works great again and I saved a lot of money. The part came very quickly, more so than expected. I will definitely keep you in mind if and when my other appliances go bad. I recommend you strongly if your reading this to get your parts from this company.
★★★★★
★★★★★
Eric H - September 17, 2018
Verified Purchase
Disappointed
The hole was toi small for the shaft on the motor, so I had to alter it. During the process, the smaller tangs broke off. Once I was able to get the blower on, it sat crooked and rubbed on the metal housing, causing a very load noise.
★★★★★
★★★★★
David P - September 15, 2018
Verified Purchase
Part worked great!
Had to wait a few days more to get the part, but it was Labor Day weekend. A quarter of the center clip broke off, but I was able to get the part on and the dryer is working again.
★★★★★
★★★★★
James R - February 9, 2018
Verified Purchase
Fan doesn’t fit the motor shaft.
The part received did not fit the motor shaft. After about an hour of filing out the fan it fit. Rest assured I have bought my last part from you..
★★★★★
★★★★★
John A. D - February 9, 2018
Verified Purchase
Ok so far
Went on shaft with quite a bit of resistance. I’m hoping that it won’t crack across the back like the last one. I guess time will tell. Fine at the moment.
< Prev
1
Next >
Customer Repair Stories
Average Repair Rating: 3.1 / 5.0, 19 reviews.
What's this?
Sort by:
< Prev
1
2
Next >
Search filter:
Clear Filter
Your search term must have 3 or more characters.
Keep searches simple. Use keywords, e.g. "leaking", "pump", "broken" or "fit".
Sorry, we couldn't find any existing installation instruction that matched.
Blower wheel was loose on the motor shaft
This should have been a very simple repair...replace the blower wheel.
However the replacement blower wheel was WAY too tight on the motor shaft. I was able to open the flat of the blower wheel hole with a 1/4 inch wood chisel..it went on with hammering and and a deep well socket.
I believe the replacement wheel was
... Read more meant for the replacement motor. The older style motor is no longer available, and I had no intentions of replacing it.
This was a way more involved repair than it should have been...After doing the repair, I noticed several reviews on this wheel stating the same problem.
Read less
Guy from SOLON, OH
Difficulty Level:
Very Difficult
Total Repair Time:
More than 2 hours
Tools:
Pliers, Screw drivers, Socket set, Wrench set
1 personfound this instruction helpful.
Was this instruction helpful to you?
Thank you for voting!
Blower fan wheel failed because of age and heat.
First off, the hub is a tight fit. If the fan barely fits the shaft, but doesn't go on all the way, do not try to enlarge the hub. Lightly lubricated the motor shaft and the inside of the new factory correct fan wheel with a small amount of very soapy water or similar lube. Then placed a socket against the face of plastic hub and LIG
... Read moreHTLY tapped fan wheel into place until fully seated. Install the old retaining clip. That's it.
Read less
Bill from REDMOND, WA
Difficulty Level:
Easy
Total Repair Time:
Less than 15 mins
Tools:
Nutdriver, Socket set
1 personfound this instruction helpful.
Was this instruction helpful to you?
Thank you for voting!
Dryer making loud noises and then quit drying.
My wife noticed a loud racket coming from the dryer. I took a look at it by opening the door and spinning the drum by hand and sure enough, the grinding, clunking noise continued. After a day of drying clothes, the noise got worse and then my wife said the clothes weren't getting dry at all. She could see the heating element glowing bu
... Read moret the clothes would not dry. Sure enough, this was the case. While the dryer was turning, the outlet hose was still cold but the heater element was on. I went to the PartSelect site, entered the model number and looked at the common problems associated with noise. It said that the blower wheel was the second most likely issue. It also showed how to open the dryer and look for problem areas. First, unplug the dryer! Then, I took a putty knife (screwdriver would work - flathead) and pryed open the lid at each corner and opened the top. I then tilted the lid back against the wall to support the lid. There are two screws that hold the front panel of the dryer to the sides. They are on the inside of the cabinet up high near the top. I took these screws out and the front comes off by pulling the front panel away then up. There are three wires attached to a sensor on the front panel. I took a picture of these for reference and disconnected these wires to totally remove the panel. With the front panel off, I could see large clumps of lint trapped at the base of the filter screen. Now is a good time to vacuum this clean. Inside the cabinet at the bottom right, you can see the blower wheel. It was totally broken off the shaft that turned it. You can still spin the drum and see the shaft turn but the broken blower wheel would "clunk" around causing the noise. There are a small handfull of screws that hold the faceplate of the blower assembly on. Take these off and you will have full access to the blower wheel. DOn't worry about the wires on the sensor attached to the faceplate. If you want to take these off their clips, take a sharpie and write the color of wire each clip takes on the front of the faceplate for reference. The blower wheel is held on to the shaft by a circlip that is easily pushed off with a screwdriver or pliers and also a spring clip that is taken off with pliers by gripping the tabs with the pliers and squeezing the clip open. Save these two parts because the replacement wheel does not come with these pieces. I ordered the blower wheel, it was here in two days and replaced the wheel. Note: The wheel will take some effort to fully seat it on the shaft. You can take a hair dryer and warm the center of the wheel where the shaft will go thru to make the install easier. Do not use a hammer to beat the wheel onto the shaft or you will be ordering another wheel. I put my left hand behind the blower as support and pushed the wheel onto the shaft with my right hand and using a towel to cover the wheel center as padding. Reinstall the spring clip over the wheel shaft support and then pry the circlip back on the end of the shaft with pliers, reinstall the blower faceplate, reconnect any wires, reinstall the dryer front panel by first leaning the panel out and dropping the front panel onto the cabinet tabs at the bottom and then closing the front panel and screw it back down with the two screws. Reattach the three wires, close the lid, plug it in and your back in business. It took me longer to write this than it did to repair it. Good luck!
Read less
Dean from Keller, TX
Difficulty Level:
Really Easy
Total Repair Time:
15 - 30 mins
Tools:
Nutdriver, Pliers
2 of 4 peoplefound this instruction helpful.
Was this instruction helpful to you?
Thank you for voting!
blower wheel broke and made a loud noise
Pulled the broken blower wheel off the motor rod and replaced the new blower wheel on it. Need to make sure to place a small amount of grease to the motor rod. This will help slide the blower wheel on the motor rod easier.
Jonathan from Powder Springs, GA
Difficulty Level:
Easy
Total Repair Time:
30 - 60 mins
Tools:
Pliers
4 of 5 peoplefound this instruction helpful.
Was this instruction helpful to you?
Thank you for voting!
Blower Wheel Cracked
Took the front off, took the shield off, replaced wheel and retainer clip. Replace wheel and reversed procedures. Easy as pie.
Leslie from Taylor, AR
Difficulty Level:
Really Easy
Total Repair Time:
Less than 15 mins
Tools:
Screw drivers, Socket set
2 of 3 peoplefound this instruction helpful.
Was this instruction helpful to you?
Thank you for voting!
Motor Bearing and Cracked Blower Wheel
1. Opened top and removed wire clamps from side and front for door switch. 2. Removed two screws and pulled front cover off. 3. Removed drive belt from tensioner pulley and moved to back of dryer. 4. Pulled drum off rear guide wheels and lifted drum out of dryer. 5. Unplugged motor electrical connector and removed idle
... Read morer wheel spring and idler assembly. 6. Removed screws holding blower wheel cover to case. 7. Removed snap ring and spring clamp from blower wheel and pulled blower wheel off motor shaft. 8. Popped rear motor clamp off with screwdriver. 9. Unscrewed screw holding rear motor support to dryer bottom and removed rear motor support. 10. Twisted motor assembly 1/8 turn to right and pulled motor rearward out of blower housing. 11. Removed blower rear snap ring from old motor and moved to new motor shaft. 12. Reversed procedures 1-10 to install motor, connector, idler, blower wheel, blower wheel cover, drum, belt, front cover and top cover.
Noise coming from dryer found blower wheel broken in half.
I pulled front off drier old wheel was easily removed because it was broke in half. New wheel fit tight and took a little effort to get new wheel installed. Installed retaining clamp to shaft and vacuumed out lint before putting front back on.
Lewis from Lawrenceburg, KY
Difficulty Level:
Really Easy
Total Repair Time:
30 - 60 mins
Tools:
Pliers, Screw drivers
2 of 3 peoplefound this instruction helpful.
Was this instruction helpful to you?
Thank you for voting!
broken blower fan
The new blower fan was made of molded plastic in which the hole internal diameter contained extra material
Terri from Ossian, IA
Difficulty Level:
Easy
Total Repair Time:
15 - 30 mins
Tools:
Pliers, Screw drivers
2 of 3 peoplefound this instruction helpful.
Was this instruction helpful to you?
Thank you for voting!
Making Loud Noise
First, used putty knife to open top of dryer, then removed front panel (nut driver removed hex head screws. Removed housing cover with support arm, again with nut driver. Cleaned lint from area removed two clamps holding broken part in place removed broken part, installed new blower wheel, which required a rubber mallet and the old part
... Read more to coax into place. Replaced clamps, replaced housing, replaced front panel and closed top - the dryer is now running more quietly than when it was new
Read less
Daniel from Charlotte, NC
Difficulty Level:
A Bit Difficult
Total Repair Time:
15 - 30 mins
Tools:
Nutdriver, Pliers
1 of 3 peoplefound this instruction helpful.
Was this instruction helpful to you?
Thank you for voting!
Blower wheel cracked in half
Turn circuit breaker off, unplug for added safety. Use a medium flat head screwdriver and lift the top up. Use a nut driver to remove two screws holding the front panel to the frame. Remove the front panel and begin to dismantle the blower wheel. Remove the outer clamp from hte motor shaft, then the U-clip (inexpensive plier that has
... Read moreto pins to open the U-clip.... tricky little bugger). Pull the blower wheel off and replace with the new wheel. Reverse the proedure and your ready to go.
Read less
Gregory from Cranston, RI
Difficulty Level:
Easy
Total Repair Time:
15 - 30 mins
Tools:
Nutdriver, Pliers, Screw drivers
2 of 3 peoplefound this instruction helpful.
Was this instruction helpful to you?
Thank you for voting!
< Prev
1
2
Next >
Questions and Answers
Ask our experts a question about this part and we'll get back to you as soon as possible!
2 questions answered by our experts.
Sort by:
< Prev
1
Next >
Search filter:
Clear Filter
Your search term must have 3 or more characters.
Keep searches simple. Use keywords, e.g. "leaking", "pump", "broken" or "fit".
Sorry, we couldn't find any existing answers that matched.Try using some different or simpler keywords, or submit your new question by using the "Ask a Question" button above!
Krawatte
August 20, 2021
What are the dimensions of this product?
For model number PYE4557AYW
Hello Krawatte, Thank you for writing. The dimensions are approximately "4 Deep x "9 diameter. Good luck with your repair.
Was this helpful?
Thank you for voting!
Kevin
December 6, 2022
The blower I have measures 8 inches. The one in your picture by the grid is showing it at 9".
For model number PYET244AYW
Hello Kevin, thank you for your question. Based on the model, this is the correct on at 9". However, as per the manufacturer ( for the same part number) they describe it as Dryer blower wheel, 3-1/8" deep, 8" in diameter, 7-1/8" hub diameter, 20 standard fins, ½" diameter motor shaft, 3/8" motor shaft diameter to flat side of shaft. Good luck with your repair.
Was this helpful?
Thank you for voting!
< Prev
1
Next >
✖
Ask a Question
Ask our experts a question on this part and we'll respond as soon as we can.