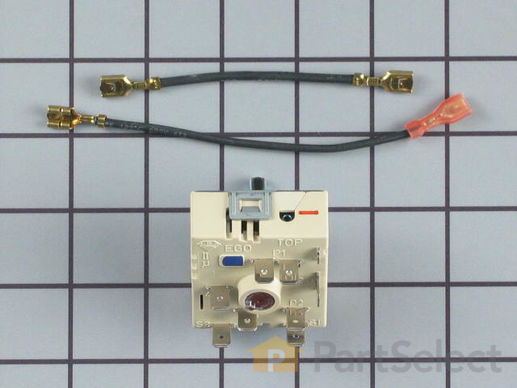
Part Location Diagram of 12002125 Whirlpool Dual Surface Burner Switch Kit
See part 10 in the diagram
( Grid squares measure 1x1 inch )
Customer Service Representative

Get in touch, we're here to help!

Daily 8am - 9pm EST

customerservice@partselect.com

Dual Surface Burner Switch Kit 12002125

 Fits your CCE3530B!
★★★★★
★★★★★
14 Reviews

Rated by 18 customers 

Easy 

1- 2 hours 

Ratings submitted by customers like you who bought this part.

$ 89.03
  In Stock
Get FREE EconoShip on orders over $100! T&C apply

Get this part fast! Average delivery time for in-stock parts via standard shipping: 1.8 days.

 Fits your CCE3530B!
PartSelect Number PS2003583
Manufacturer Part Number 12002125
Manufactured by Whirlpool
Product Description

Dual Surface Burner Switch Kit Specifications

This switch is used to operate the dual surface burner.
How Buying OEM Parts Can Save You Time and Money

How Buying OEM Parts Can Save You Time and Money

Troubleshooting
This part fixes the following symptoms:
Element will not heat | Will Not Start
This part works with the following products:
Cooktop, Range.
This part works with the following products:
Jenn-Air, Amana.
Part# 12002125 replaces these:
AP4008679, 1014250, 12002125, 12002052, 12002125, 71001612, 74007711, 74007715, 74007896, Y12002052, Y74007711
Back to Top
Customer Reviews
Average Rating:
★★★★★
★★★★★
14 Reviews
4.0
Filter By Rating:
  • 5 Stars
    6
  • 4 Stars
    4
  • 3 Stars
    3
  • 2 Stars
    0
  • 1 Star
    1
Sort by:
  • 1
  • 2
Sorry, we couldn't find any existing reviews that matched. Try using some different or simpler keywords.
  • 1
  • 2
Customer Repair Stories
 Average Repair Rating: 2.6 / 5.0, 18 reviews. What's this?
Sort by:
  • 1
  • 2
Sorry, we couldn't find any existing installation instruction that matched.
Engaging dual burner switch would blow breaker. All other elements worked fine.
Isolated circuit by disconnecting cooktop breaker.
Disconnected blower duct, raised cooktop above the countertop to access screws holding the glass surface.
Blocked in place--no need to completely remove cooktop.
Removed screws around top of pan with 1/4-inch nut driver--only need to remove any screws close to top of pan and glass surface.
Lifted off glass surface.
Dual burner switch bracket needs to be removed to access switch and to disconnect wire harness connections.
Note there was one screw holding bottom of bracket which was hidden by the wire harness.
I was concerned with connections from other reviews; however, in my case, the switch and connections were identical to the original--no problem.
Reinstalled bracket and glass cooktop--need to remember flange location (inside versus outside) to assure easy alignment of screws. Drop cooktop back into countertop and reconnect blower duct.
Powered back up and dual burner now fully functional.
  • Charled from MINNEAPOLIS, MN
  • Difficulty Level:
    A Bit Difficult
  • Total Repair Time:
    1- 2 hours
  • Tools:
    Nutdriver
2 of 2 people found this instruction helpful.
Was this instruction helpful to you?
Thank you for voting!
Dual surface switch replacement
My cook top has the red wire piggybacked along all the cook top switches. It was easy enough to reroute the red wire coming from the dual surface burner to pin 4 i believe on the new switch. Follow the previous thread and look at the instruction sheet online for this switch
  • Charles from SAN ANTONIO, TX
  • Difficulty Level:
    A Bit Difficult
  • Total Repair Time:
    1- 2 hours
  • Tools:
    Nutdriver, Pliers, Screw drivers
1 person found this instruction helpful.
Was this instruction helpful to you?
Thank you for voting!
Burners stayed hot and couldn’t be adjusted
Followed Igor’s instructions and it was very easy and straightforward. New switches work great.
  • roger from LITTLETON, NC
  • Difficulty Level:
    Very Easy
  • Total Repair Time:
    30 - 60 mins
  • Tools:
    Screw drivers
1 person found this instruction helpful.
Was this instruction helpful to you?
Thank you for voting!
The burner would turn on and not off. The temperature just kept accelerating.
Raised the unit and blocked it with 2 boards. TURN OFF THE POWER IF YOU WANT TO COMPLETE THIS REPAIR. Removed the philip head screws for removal of glass top. Remove the corner screws on switch end. Remove screws holding the switch. Remove screws holing the bracket for all switches. Lift and roll gently to get at wiring. Follow the directions for moving wires from old switch to new switch. MOVING WIRES IS THE MOST IMPORTANT STEP. Reverse your procedure to put back together and when finished remember to turn on the power.
  • Norbert from SPARTANBURG, SC
  • Difficulty Level:
    Very Easy
  • Total Repair Time:
    30 - 60 mins
  • Tools:
    Screw drivers
2 of 2 people found this instruction helpful.
Was this instruction helpful to you?
Thank you for voting!
Jenn-Air dual burner would not turn off
Followed the first persons instructions and they worked perfectly including using the jumper wire.
  • James from CENTENNIAL, CO
  • Difficulty Level:
    Really Easy
  • Total Repair Time:
    1- 2 hours
  • Tools:
    Nutdriver, Screw drivers, Socket set
2 of 2 people found this instruction helpful.
Was this instruction helpful to you?
Thank you for voting!
Burner switch was shorting circuit breaker
Removed glass top from stove by taking out hex screws which secured glass top to stove frame. There are two phillips head screws inside the exhaust as well. Removed two phillips head screws which hold the burner switch in place. With a sharpie pen I marked the color coded wires on the faulty switch. Removed wires from the faulty switch. Replaced new switch using the old switch as a guide to insure that wires were connected properly. Secured new switch and glass burner top reversing above procedure. Problem solved. Note: The white dot on the control knob did not line up properly with the off position. Black out white dot and make a new one in the proper spot on the knob.
  • Robert from Jacksonville, FL
  • Difficulty Level:
    Easy
  • Total Repair Time:
    30 - 60 mins
  • Tools:
    Nutdriver, Pliers
2 of 4 people found this instruction helpful.
Was this instruction helpful to you?
Thank you for voting!
The instructions were confusing concerning the attachment of the red wires
Trial and error and reading and rereading the instructions.The use of the jumper wire was not detailed enough. Caller a repair man.
  • Otto from Goldsboro, NC
  • Difficulty Level:
    Difficult
  • Total Repair Time:
    More than 2 hours
  • Tools:
    Nutdriver, Pliers, Screw drivers
4 of 10 people found this instruction helpful.
Was this instruction helpful to you?
Thank you for voting!
indicator ring worked intermittently, no heat
raising the cook top on to 2x2s, one on each end, allowed me to remove the 9 sheet metal screws that keep the glass top fastened to the box containing all of the heating elements and controls. After removing the control knobs and the glass top, everything was clearly visible. Removing the four screws that hold the control box frame in place allowed me to turn the switches upside down and photograph the placement of all of the wires on the pins. I then transferred the wires from the old switch to what I thought were the corresponding pins on the new switch(the replacement switch has more pins, and they are not located in exactly the same spots as the old switch). When I turned the power back on, the switch turned the burners on, I had heat but the indicator lights didn't work. I turned the breakers back off and rewired according to a previous commentors wiring directions(his model was not exactly the same as mine), the indicators worked but I was back to no heat. I called my son, who has his own commercial electric company,and he looked at my photos from before, the diagram that came with the new switch, and it took him about 15 minutes to reconnect the pins to different wires and when we turned the power back on---both indicators and heating elements worked. It was the dual switch and double indicator that made it more complex to figure out. Nice to have very smart kids.
  • Alan from Louisville, NE
  • Difficulty Level:
    Difficult
  • Total Repair Time:
    1- 2 hours
  • Tools:
    Nutdriver, Pliers
2 of 4 people found this instruction helpful.
Was this instruction helpful to you?
Thank you for voting!
replaced a broken dual burner switch
IMPORTANT WIRE CONNECTIONS: The manufacturer instructions describing where each wire connects is woefully incomplete. There are 6 or 7 wires to connect and only 2 are explained in the instructions. I took several photos of the original switch showing where each of the wires was connected before disconnecting and installing the new switch. If I hadn't taken the photos I would have been completely lost on where each wire connected.
  • chris from ann arbor, MI
  • Difficulty Level:
    A Bit Difficult
  • Total Repair Time:
    30 - 60 mins
  • Tools:
    Nutdriver, Pliers, Screw drivers, Socket set, Wrench set
3 of 6 people found this instruction helpful.
Was this instruction helpful to you?
Thank you for voting!
The repair itself was very easy. “How to connect” was very hard to get.


To get access to the switch, unscrew 2 screws from each side of front panel and then 4 screws from the bottom of it (open the door first). Have a box or a small table about 30” high to use it as support for the front panel.

The end result (colors for the Right Front- R.F.- burner) : Old label -> New label

1. Double RED: N -> P2 (incoming power, Line 1)
2. Single RED: N -> 2 (to Inner AND Outer heating elements common wire)
3. Single BLK: L1 -> P1 (incoming power, Line 2)
4. Single TAN: H1 -> 4 (to the Inner heating element)
5. Single YEL: H2-> 4a (to the Inner heating element)
6. Single BLK: P -> S2 (to the R.F. indicator control light)
7. Attach jumper black wire (included with new switch) from P1 (P1 has two connectors close together) to S1.

Done.
  • Igor from Campbell, CA
  • Difficulty Level:
    Really Easy
  • Total Repair Time:
    15 - 30 mins
  • Tools:
    Nutdriver, Pliers, Screw drivers
51 of 60 people found this instruction helpful.
Was this instruction helpful to you?
Thank you for voting!
  • 1
  • 2
Questions and Answers

Ask our experts a question about this part and we'll get back to you as soon as possible!

13 questions answered by our experts.
Sort by:
  • 1
  • 2
Sorry, we couldn't find any existing answers that matched.Try using some different or simpler keywords, or submit your new question by using the "Ask a Question" button above!
David
August 26, 2017
I have a Jenn-Air ceramic cooktop (downdraft). My dual burner switch malfunctioned and i order a new one but it is completely different. Part number 12002125. A bit confused about switching the wires. Read a few examples but my wires are different color than examples and instructions that came with switch are for a more qualified repairman. Help please. Thanks
PartSelect logo
Hello David, thank you for contacting us. We have a how to video on our youtube channel that will help guide you for the installation. You can click the link below, hope this helps! https://www.youtube.com/watch?v=0NQdnId6q2c

19 people found this helpful.

Was this helpful?
Thank you for voting!
Alice
October 9, 2017
The left hand big bottom burner gets extremely hot and will not turn down. What do i need to buy to make it work?
For model number Jed8430adb
PartSelect logo
Hi Alice, Thank you for your question. You will need to check your switch and your burner to see which one is malfunctioning. It could be either of those parts so it is best to test them before ordering. Good luck with your repair.

6 people found this helpful.

Was this helpful?
Thank you for voting!
Joe
August 6, 2018
My front right cooktop switch went! My repairmen is having a hard time fixing it! Tried once and blew the breaker! Got the part and is having a problem w the instructions? Help i need my stove
For model number JES9700AAB
PartSelect logo
Hi Joe, thank you for contacting us. It looks like we have answered a similar question before: We have a how to video on our youtube channel that will help guide you for the installation. You can click the link below, hope this helps! https://www.youtube.com/watch?v=0NQdnId6q2c. I hope that helps. Good luck with your repair.

2 people found this helpful.

Was this helpful?
Thank you for voting!
Bill
July 23, 2019
Is this switch for the one cooktop burner that has two burners, 1 that circles around a smaller central burner and the outer ring can be used or or turned off?
For model number Amana
PartSelect logo
Hello Bill, thank you for inquiring. It is, but we will need the model number for your cooktop to see if it is the correct replacement for it or not. We look forward to hearing back from you.

2 people found this helpful.

Was this helpful?
Thank you for voting!
Gerald
December 5, 2019
What is the part number for the dual burner switch
For model number CVE3401B
PartSelect logo
Hi Gerald, thank you for your question. The part number for this part you have questioned on is listed above in the part information: PS2003583. I hope that helps. Good luck with your repair.

1 person found this helpful.

Was this helpful?
Thank you for voting!
Nathan
August 26, 2021
I need a new dual infinite switch for my stove. Which is the right part number?
For model number JED8430
PartSelect logo
Hello Nathan, Thank you for contacting us. We have researched the model you have provided and have found the part you are looking for is PartSelect Number PS2003583. We hope this helps!

1 person found this helpful.

Was this helpful?
Thank you for voting!
Lubica
January 9, 2023
My double front burner is heating but can’t be regulated temperature
For model number JES8850AAS
PartSelect logo
Hi Lubica, thank you for asking. If the temperature on the dual front burner is not regulating, we suggest that you check the dual burner switch, part number PS2003583, as this could be the culprit. If you require assistance to place an order, please contact customer service. We hope that helps!

1 person found this helpful.

Was this helpful?
Thank you for voting!
YVES
September 5, 2023
The heat level on this Jenn-Air range Dual Surface Burner is only giving high heat, there is no medium or low level of heat, should I replace the control switch for that dual element (Right Front)?
For model number JES8850ACW
PartSelect logo
Hello Yves, thank you for contacting us. Yes, we recommend replacing the dual surface burner switch, part number PS2003583, to fix this issue. Good luck with your repair!

1 person found this helpful.

Was this helpful?
Thank you for voting!
Roddy
February 4, 2022
No directions for installation for part 12002125. Website you referenced on youtube is no longer available. I need an easily read drawing and/ or diagram showing where wires should be connected. There are 2 smaller gauge jumpers in the package, both black in color, one with an insulated 90 degree connector on one end, and one with an insulated straight connector on one end. Please advise. Thank You. Also, a drawing of the original switch alongside the replacement with color coded wires would be of tremendous help, if the wires could be identified as smooth, braided surface, etc., along with guidance if any wires need to be cut or otherwise modified. As you probably know, the configuration and labeling of the terminals on this replacement switch are very different from the original, due to a change in design. Your help will be greatly appreciated. Thank You in advance----Roddy Cooper
For model number JED8430ADB
PartSelect logo
Hello Roddy, thank you for writing. If you copy and paste https://www.youtube.com/watch?v=0NQdnId6q2c into a new browser, the video will play. It is not of the exact switch but it should be close enough for your repair. We hope this helps.

Was this helpful?
Thank you for voting!
Brian
August 23, 2022
HI, I am looking for a replacement switch for Jenn-Air dual-burner (front right) for model JED8430ADB. Could you please recommend a replacement infinite switch for it? The switch part number I found is 7403P812-60. The terminals are: (H1) 3, (L2) N(or H?), (H2) 4, (P) 5, (L1) 2. Thanks for your help.
For model number JennAir JED8430ADB
PartSelect logo
Hi Brian, Thank you for your question. The part number listed under your model number for the right front burner element is PS12070671. If you need help placing an order for it, customer service is open 7 days a week and anyone will be happy to assist you. Please feel free to give us a call. We look forward to hearing from you!

Was this helpful?
Thank you for voting!
Related Parts:
  • 1
  • 2
Model Cross Reference
This part works with the following models:
PartSelect Number: PS2003583
Manufacturer Part Number: 12002125
Brand
Model Number
Description
Amana
AKT3040E
Cooktop
Amana
AKT3040E-10
Range - Amana Range/Stove/Oven Model AKT3040E-10 (AKT3040E10, AKT3040E 10) Parts
Amana
AKT3040SS
Cooktop
Amana
AKT3040WW
Cooktop
Amana
AKT3040WW-10
Range - Amana Range/Stove/Oven Model AKT3040WW-10 (AKT3040WW10, AKT3040WW 10) Parts
Amana
AKT3650E
Cooktop
Amana
AKT3650E-10
Range - Amana Range/Stove/Oven Model AKT3650E-10 (AKT3650E10, AKT3650E 10) Parts
Amana
AKT3650SS
Cooktop
Amana
AKT3650SS-10
Range - Amana Range/Stove/Oven Model AKT3650SS-10 (AKT3650SS10, AKT3650SS 10) Parts
Amana
AKT3650WW
Cooktop
Amana
AKT3650WW-10
Range - Amana Range/Stove/Oven Model AKT3650WW-10 (AKT3650WW10, AKT3650WW 10) Parts
Jenn-Air
CCE3400B
Cooktop - Electric
Jenn-Air
CCE3400W
Cooktop - Electric
Jenn-Air
CCE3401B
Cooktop - Electric
Jenn-Air
CCE3401Q
Cooktop - Electric
Jenn-Air
CCE3401W
Cooktop - Electric
Jenn-Air
CCE3530B
Cooktop - Electric
Jenn-Air
CCE3530W
Cooktop - Electric
Jenn-Air
CCE3531B
Cooktop - Electric
Jenn-Air
CCE3531W
Cooktop - Electric
Jenn-Air
CCE9300BF
Cooktop - Electric
Jenn-Air
CCE9300BG
Cooktop - Electric
Jenn-Air
CCE9300GG
Cooktop - Electric
Jenn-Air
CCE9300JD
Cooktop - Electric
Jenn-Air
CCE9300PL
Cooktop - Electric
Jenn-Air
CCE9300SL
Cooktop - Electric
Jenn-Air
CCE9300SS
Cooktop - Electric
Jenn-Air
CCE9300TG
Cooktop - Electric
Jenn-Air
CVE3400B
Cooktop - Electric
Jenn-Air
CVE3400W
Cooktop - Electric
Customer Service Representative

Get in touch, we're here to help!

Daily 8am - 9pm EST

Contact Customer Service