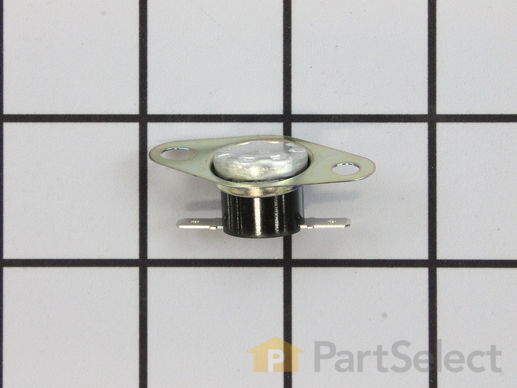
Part Location Diagram of WB27X10985 GE Oven Cavity Thermal Cut Out
See part 1433 in the diagram
( Grid squares measure 1x1 inch )
Customer Service Representative

Get in touch, we're here to help!

Daily 8am - 9pm EST

customerservice@partselect.com

Oven Cavity Thermal Cut Out WB27X10985

 Fits your JE1660WB004!
★★★★★
★★★★★
1 Review

Rated by 9 customers 

Really Easy 

15 - 30 mins 

Ratings submitted by customers like you who bought this part.

$ 12.76
  Special Order
Get FREE EconoShip on orders over $100! T&C apply
 Fits your JE1660WB004!
PartSelect Number PS1993849
Manufacturer Part Number WB27X10985
Manufactured by GE
Product Description

Oven Cavity Thermal Cut Out Specifications

Also known as a Sensor or Fuse. This part will trip once the inside of the cavity overheats and exceeds the recommended temperature.
How Buying OEM Parts Can Save You Time and Money

How Buying OEM Parts Can Save You Time and Money

Troubleshooting
This part fixes the following symptoms:
Won’t turn on
This part works with the following products:
Microwave.
This part works with the following products:
General Electric.
Part# WB27X10985 replaces these:
AP4341054, 1399513, WB24X0828, WB24X828, WB27X0828, WB27X10075, WB27X828
Back to Top
Customer Reviews
Average Rating:
★★★★★
★★★★★
1 Review
4.0
Filter By Rating:
  • 5 Stars
    0
  • 4 Stars
    1
  • 3 Stars
    0
  • 2 Stars
    0
  • 1 Star
    0
Sort by:
  • 1
Sorry, we couldn't find any existing reviews that matched. Try using some different or simpler keywords.
  • 1
Customer Repair Stories
 Average Repair Rating: 4.5 / 5.0, 9 reviews. What's this?
Sort by:
  • 1
Sorry, we couldn't find any existing installation instruction that matched.
No power, no lights, did not work
Relatively simple for skilled person.
  • Igor from Delray Beach, FL
  • Difficulty Level:
    Really Easy
  • Total Repair Time:
    30 - 60 mins
  • Tools:
    Pliers, Screw drivers, Socket set
1 person found this instruction helpful.
Was this instruction helpful to you?
Thank you for voting!
Microwave went dead/no display
Took the cabinet off the microwave and checked for a fuse. Found that it was good, then checked for the voltage path to the controls and found the cavity thermal cut out was not conducting. Using a voltage meter to check things. Unplug the microwave for several of the tests. You must know how to work with electricity to do this. Installed the new part and the microwave now works. As a hint to what had happened my wife had heated a large casserole then right after that went to heat a smaller dish. At that time the microwave was hot and did not restart.
  • Glenn from Sparta, WI
  • Difficulty Level:
    Really Easy
  • Total Repair Time:
    15 - 30 mins
  • Tools:
    Screw drivers
13 of 14 people found this instruction helpful.
Was this instruction helpful to you?
Thank you for voting!
microwave did not operate
this is not fair to the do it yourself person because I have been an electrican for forty one years I removed the cover spotted the burnt limit switch ordered the part replaced the part and checked operation of the microwave thanks for the painless task of locating and ordering of needed part
  • Kenneth from Giddings, TX
  • Difficulty Level:
    Really Easy
  • Total Repair Time:
    Less than 15 mins
  • Tools:
    Screw drivers
9 of 14 people found this instruction helpful.
Was this instruction helpful to you?
Thank you for voting!
Microwave display showed nothing, no power.
Per the troubleshooting diagram inside the microwave oven, I discovered the one of the TCO was open (using Ohmmeter). Found my microwave oven model on PartSelect and used the diagram to select the TCO needed and placed order. Part came in three days, installed new TCO, reconnected wires and the microwave oven was back working in 10 minutes.
  • Bruce from Sammamish, WA
  • Difficulty Level:
    Really Easy
  • Total Repair Time:
    15 - 30 mins
  • Tools:
    Screw drivers
11 of 13 people found this instruction helpful.
Was this instruction helpful to you?
Thank you for voting!
When running a burning plastic smell coming from the venting air.
Took the cover off (removed the five screws, two of which were security screws off the back) and found one connector on the thermal cut out with its shielding melted. Very easy swap out of the new cut out and we were up and running as if new.
  • Paul from Modesto, CA
  • Difficulty Level:
    Really Easy
  • Total Repair Time:
    Less than 15 mins
  • Tools:
    Screw drivers
10 of 14 people found this instruction helpful.
Was this instruction helpful to you?
Thank you for voting!
while cooking a big dish of food, the microwave just stopped and went black
Fortunately, my brother-in-law suggested it might be the "cut out" switch. After unplugging the microwave, I opened it up and identified one of two cut outs and removed the wires from each side of the cut out. To test if that was the problem, I connected the two wires together, bypassing the cut out. When I plugged the unit back into the wall socket, the lights came back on, and i ran the microwave for a few seconds. It verified that this was the problem. I ordered the part and when it arrived, I removed it with a philips screw driver and replaced it with the new one. I replaced the screw, buttoned the unit back up, plugged it in, and saved a few hundred bucks on a replacement microwave, and as important, saved our landfills and planet a tiny but.
  • Mark from South Jordan, UT
  • Difficulty Level:
    Really Easy
  • Total Repair Time:
    Less than 15 mins
  • Tools:
    Screw drivers
19 of 21 people found this instruction helpful.
Was this instruction helpful to you?
Thank you for voting!
Microwave Oven overheated
I thought I was setting the timer only on the microwave and accidently cooked an empty oven for 10 minutes. It was dead and I used the schematic and figured out the problem. Got the part and installed in 10 or less minutes. Oven is back in action.
  • David from Collegeville, PA
  • Difficulty Level:
    Really Easy
  • Total Repair Time:
    Less than 15 mins
  • Tools:
    Screw drivers
9 of 16 people found this instruction helpful.
Was this instruction helpful to you?
Thank you for voting!
Some smuck put a metal object in company microwave
found fuse blown and heat damage to TCO sensor.
Other Parts Used:
Oven Cavity Thermal Cut Out FUSE
  • Jacob from Brewster, NY
  • Difficulty Level:
    Really Easy
  • Total Repair Time:
    Less than 15 mins
  • Tools:
    Screw drivers
73 of 133 people found this instruction helpful.
Was this instruction helpful to you?
Thank you for voting!
Microwave dead--no LEDs lit on front panel
Removed microwave from enclosure and removed cover, hoping it was as simple as a blown fuse. Found extremely helpful diagnostic sheet thoughtfully provided by manufacturer in an envelope affixed to top of cavity. Fuse was fine, but tracing the power feed into the machine revealed that the oven cavity thermostat was open--no continuity across it, and the diagnostic sheet indicated that it was non-resettable. Verified the issue by temporarily by-passing the blown thermostat to ascertain that the front panel display got power. It took longer to get the screws for the cover and enclosure back on than it did to replace the thermostat, once I received the replacement part. Microwave works just fine now, thanks!
  • Steve from Redmond, WA
  • Difficulty Level:
    Easy
  • Total Repair Time:
    15 - 30 mins
  • Tools:
    Screw drivers
37 of 45 people found this instruction helpful.
Was this instruction helpful to you?
Thank you for voting!
  • 1
Questions and Answers

Ask our experts a question about this part and we'll get back to you as soon as possible!

3 questions answered by our experts.
Sort by:
  • 1
Sorry, we couldn't find any existing answers that matched.Try using some different or simpler keywords, or submit your new question by using the "Ask a Question" button above!
John
November 2, 2017
Where are the thermal cutouts located? How can you change them
For model number jvm3160
PartSelect logo
Hi John, Thank you for your inquiry. The fuse for your appliance should be located in the upper left hand section of the microwave. Before you begin any repair please unplug the appliance from the electrical outlet. To replace the thermal fuse, first open the microwave door and remove the screws securing the grill. Slide the grill to the left to release it. Next remove the screw on the left securing the control panel and loosen the screw behind the panel. Lift the panel up and move it forward to detach. Now remove the wires attached to the old thermal fuse. Unthread the mounting screw to release the fuse. Install the new fuse by aligning it on the base and secure it with the screws. Reattach the wires and install the control panel by securing with the screws. Insert the grill and slide it to the right to secure it and then reattach the screws. Close the door and plug the microwave back in. Your microwave should now work. I hope this helps. Thank you and have a great day!

4 people found this helpful.

Was this helpful?
Thank you for voting!
David
November 9, 2022
The microwave overheated and did not reset. Should I replace the thermal switch and the fuse as I will have the oven open or just replace the thermal switch?
For model number ZEM200SF06
PartSelect logo
Hello David, thank you for contacting us. The issue is most probably related to the thermal switch, part number PS1993849. It is a safety device that shuts off the microwave if it overheats. Please reach out to customer service if you need help placing an order. Glad to be of help!

1 person found this helpful.

Was this helpful?
Thank you for voting!
Randy
December 23, 2022
How do I locate the thermal fuse on my microwave
For model number Jes1334WD001
PartSelect logo
Hi Randy, thank you for reaching out. The thermal fuse, part number PS1993849, for your appliance is located in the upper left hand section of the microwave. We hope this information helps!

Was this helpful?
Thank you for voting!
  • 1
Model Cross Reference
This part works with the following models:
PartSelect Number: PS1993849
Manufacturer Part Number: WB27X10985
Brand
Model Number
Description
General Electric
JE1223L01
Microwave - Counter Top
General Electric
JE1233L01
Microwave - Counter Top
General Electric
JE1234LWH01
Microwave - Counter Top
General Electric
JE1240L
Microwave - Countertop Microwave
General Electric
JE1240L01
Microwave - Counter Top
General Electric
JE1250WY01
Microwave - Counter Top
General Electric
JE1530GW01
Microwave - Counter Top
General Electric
JE1530GW02
Microwave - Counter Top
General Electric
JE1540AW01
Microwave - Counter Top
General Electric
JE1540AW02
Microwave - Counter Top
General Electric
JE1540AW03
Microwave - Counter Top
General Electric
JE1540GW01
Microwave - Counter Top
General Electric
JE1540GW02
Microwave - Counter Top
General Electric
JE1540GW03
Microwave - Counter Top
General Electric
JE1540WW01
Microwave - Counter Top
General Electric
JE1540WW02
Microwave - Counter Top
General Electric
JE1540WW03
Microwave - Counter Top
General Electric
JE1550GW01
Microwave - Counter Top
General Electric
JE1550GW02
Microwave - Counter Top
General Electric
JE1550GY01
Microwave - Counter Top
General Electric
JE1550WY01
Microwave - Counter Top
General Electric
JE1640AB002
Microwave - Counter Top
General Electric
JE1640AB003
Microwave - Counter Top
General Electric
JE1640AB01
Microwave - Counter Top
General Electric
JE1640GA01
Microwave - Counter Top
General Electric
JE1640GA02
Microwave - Counter Top
General Electric
JE1640GB002
Microwave - Counter Top
General Electric
JE1640GB003
Microwave - Counter Top
General Electric
JE1640GB01
Microwave - Counter Top
General Electric
JE1640WA01
Microwave - Counter Top
Customer Service Representative

Get in touch, we're here to help!

Daily 8am - 9pm EST

Contact Customer Service