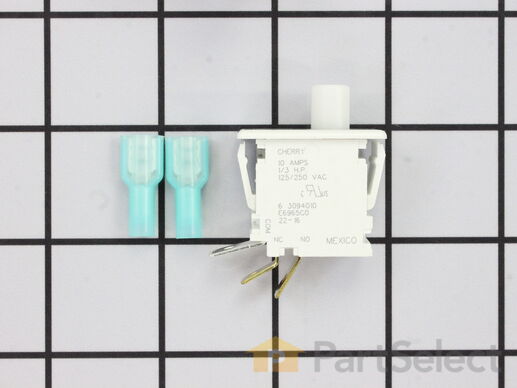
Part Location Diagram of W10169313 Whirlpool Door Switch Kit
See part 5 in the diagram
Replacing your Maytag Dryer Door Switch Kit
( Grid squares measure 1x1 inch )
Customer Service Representative

Get in touch, we're here to help!

Daily 8am - 9pm EST

customerservice@partselect.com

Door Switch Kit W10169313

 Fits your TEA400!
★★★★★
★★★★★
19 Reviews

Rated by 27 customers 

Really Easy 

15 - 30 mins 

Ratings submitted by customers like you who bought this part.

$ 29.94
  In Stock
Get FREE EconoShip on orders over $100! T&C apply

Get this part fast! Average delivery time for in-stock parts via standard shipping: 1.8 days.

 Fits your TEA400!
PartSelect Number PS1964648
Manufacturer Part Number W10169313
Manufactured by Whirlpool
Product Description

Door Switch Kit Specifications

This part replaces two terminal switches in a dryer and prevents the dryer from running when the door is open. This includes two connectors. If your dryer will not shut off, start, or does not tumble, replacing the door switch can solve this appliance problem. The tools needed for replacement are a screw driver and wire strippers. Make sure to attach the two wires to the right two poles of the new switch, to do this you can check the resistance of the switch. Unplug the dryer before installing this part, also refer to the diagram provided by the manufacturer.
How Buying OEM Parts Can Save You Time and Money

How Buying OEM Parts Can Save You Time and Money

Part Videos

Replacing your Maytag Dryer Door Switch Kit

Replacing your Maytag Dryer Door Switch Kit
Troubleshooting
This part fixes the following symptoms:
Won’t Start | Noisy
This part works with the following products:
Dryer, Washer, Washer Dryer Combo, Refrigerator.
This part works with the following products:
Maytag, Speed Queen, Amana, Crosley.
Part# W10169313 replaces these:
AP4319999, 1378530, 3-4575, 3-4576, 3-5753, 3-5754, 304575, 304576, 305753, 305754, 33001508, 33001509, 5-4570, 504570, 56052, 57012, 62872, R0602515, W10169313, W10169313VP , WPY304575, Y304575, Y304576, Y305753, Y305754, Y504570, Y62872 Show less
Back to Top
Customer Reviews
Average Rating:
★★★★★
★★★★★
19 Reviews
4.6
Filter By Rating:
  • 5 Stars
    16
  • 4 Stars
    1
  • 3 Stars
    1
  • 2 Stars
    0
  • 1 Star
    1
Sort by:
  • 1
  • 2
Sorry, we couldn't find any existing reviews that matched. Try using some different or simpler keywords.
  • 1
  • 2
Customer Repair Stories
 Average Repair Rating: 3.9 / 5.0, 27 reviews. What's this?
Sort by:
  • 1
  • 2
  • 3
Sorry, we couldn't find any existing installation instruction that matched.
Won't Tumble
Removed lower front panel.

Removed door assembly* making note of the wire positions on the door switch
* When removing the door assembly DO NOT LET IT DROP DOWN! Doing so will destroy the door switch. Swing the door assembly upward from the bottom toward you as high as it will go then pull it free.

Removed the drum and belt assembly.

Removed the idler pulley and idler pully spring.

Vacuumed up the interior dryer floor and blew out the motor w/ comp air. Also cleaned the ribbed motor pulley with a nylon brush and brake cleaner sprayed on a shop towel.

Removed the drum tires and cleaned their shafts and internal bearing sleeves with brake cleaner sprayed on a shop towel.

Reinstalled the drum tires after lubricating their shafts with a very light coat of general purpose grease.

Replaced the idler pulley and idler pulley spring after cleaning and lubing shaft and pulley bearing as done on the drum tires.

Reinstalled the drum with the new belt (ribbed side down) roughly in place.

Reinstalled the front door assembly after reconnecting it's wiring making sure to insert it's top locking tabs with the bottom of the door held up high then swung down into place

Tensioned the belt by positioning the flat side of the belt that comes down the right side of the drum over the idler pulley flat side down and then the ribbed side of the belt over the motor shaft. You will have to move the idler pulley arm to apply full tension against the spring in order to have the slack to get it around the motor shaft.

Reinstalled the lower front panel.

Checked dryer operation OK.

This repair was rated a bit difficult because I didn't know the trick for removing/installing the door assembly and destroyed the switch. Furthermore, putting the belt back on is a somewhat difficult challenge because you have to do it mostly by feel
Other Parts Used:
Idler Pulley Wheel with Bearing Idler Pulley Spring Door Switch Kit
  • Stephen from LEANDER, TX
  • Difficulty Level:
    A Bit Difficult
  • Total Repair Time:
    30 - 60 mins
  • Tools:
    Nutdriver, Pliers, Screw drivers, Socket set, Wrench set
1 person found this instruction helpful.
Was this instruction helpful to you?
Thank you for voting!
Door switch broke
Just follow the video. The hardest part is getting the top to disengage from the clips.
  • Howard from NEW ROCHELLE, NY
  • Difficulty Level:
    Easy
  • Total Repair Time:
    15 - 30 mins
1 person found this instruction helpful.
Was this instruction helpful to you?
Thank you for voting!
Dryer would not stay running
Using instructions from your website, I was able to remove access covers from my driver & find the pieces that needed to be replaced. It was a simple repair job & now my dryer is working properly again.
Other Parts Used:
Limit Thermostat High Limit Thermal Fuse Door Switch Kit
  • Peter from NEWMARKET, NH
  • Difficulty Level:
    Really Easy
  • Total Repair Time:
    30 - 60 mins
  • Tools:
    Nutdriver, Screw drivers
1 person found this instruction helpful.
Was this instruction helpful to you?
Thank you for voting!
no power, not turn on
I bought all the recommended parts for this trouble, but it turned out to be caused by burt wire on terminal block causing separation from block as all latches, motor, breakers, elements, switches and thermal sensors tested positive continuity, I finally decided to look in rear panel where incoming power meets terminus to motor, etc. and wires were burnt at ends and post on block was separated from base. I got on phone immediately to customer service to order part shown on their very helpful schematic diagram seen on partselect website. The part was unfortunately discontinued but may be available from other sources. She explained how to search based on part # and the words " terminal block" which directed me to a supplier in MI. Repair completed once appropriate part was received. Thanks again for the direction given even though part was not purchased in the end. Will certainly return to partselect in the future if any issues come up in future. Very helpful site for the DIY'er!!
Other Parts Used:
Thermal Fuse (Limit: 183) Push-to-Start Switch with Bracket Door Latch Kit Door Switch Kit
  • John from ROUND ROCK, TX
  • Difficulty Level:
    Easy
  • Total Repair Time:
    30 - 60 mins
  • Tools:
    Pliers, Screw drivers, Socket set
1 person found this instruction helpful.
Was this instruction helpful to you?
Thank you for voting!
The dryer door would not cut the machine off when it was opened.
Installed the new part. Worked great!
  • JEAN from KINSTON, NC
  • Difficulty Level:
    Very Easy
  • Total Repair Time:
    Less than 15 mins
  • Tools:
    Screw drivers
1 person found this instruction helpful.
Was this instruction helpful to you?
Thank you for voting!
The door switch had broken, and high limit switch wasn’t the problem at all I didn’t realize that
I removed the dryer front and replaced the door switch.
Next I replaced the drum glide reassembled the dryer.
Other Parts Used:
High Limit Thermal Fuse Drum Glide Door Switch Kit
  • Larry from Saint Joe, IN
  • Difficulty Level:
    Easy
  • Total Repair Time:
    30 - 60 mins
  • Tools:
    Nutdriver, Screw drivers
1 person found this instruction helpful.
Was this instruction helpful to you?
Thank you for voting!
The door switch was defected
The door switch was easy to replace. It is located in the right bottom of the door and I popped out with my fingers. Follow the wire connectors from the old switch and remounted back in.
  • Pete from ANAHEIM, CA
  • Difficulty Level:
    Really Easy
  • Total Repair Time:
    Less than 15 mins
1 person found this instruction helpful.
Was this instruction helpful to you?
Thank you for voting!
Washer control unit went out
Removed two front covers, the one with the dials and one between the washer drier which is at an angle. It was mostly plug and play. The tough part was not knowing the large dials do not pull off like the small dials. You need to pop off the end caps to expose the nuts that bolt the dials to their control boxes. Then remove the right screw on the the top front panel and slide the plastic edge to the right and the metal panel will come off exposing the left retaining screw.
Other Parts Used:
Washer Timer Door Switch Kit
  • Bernie from CHICAGO, IL
  • Difficulty Level:
    Really Easy
  • Total Repair Time:
    1- 2 hours
  • Tools:
    Nutdriver, Screw drivers, Socket set
4 of 4 people found this instruction helpful.
Was this instruction helpful to you?
Thank you for voting!
Will not start all lights on,makes a ping sound on the control panel when you push the start button
Replaced thermal fuse and replaced door switch
Other Parts Used:
Thermal Fuse (Limit: 183) Door Switch Kit
  • james from CAMBRIDGE, MN
  • Difficulty Level:
    Really Easy
  • Total Repair Time:
    Less than 15 mins
  • Tools:
    Nutdriver
6 of 6 people found this instruction helpful.
Was this instruction helpful to you?
Thank you for voting!
Dryer No longer shuts off When Door Opened
All you need for a Maytag is a snub nose Philips screw driver. The screws on the front panel are at the bottom angled down, so a regular length Phillip's won't work. Just unscrew the 2 screws, then lift the panel up and out. Careful not to pull out too far, there are 2 wires attached to the switch. The replacement switch is NOT an exact copy of the old one. My Maytag is over 30 years old and it only had 2 prongs on the switch. The new one has 3. Don't let that throw you. It is the same size. Just attach, 1 wire to the bronze connector & the other to the silver. Push the switch into the door opening, re-attach the door. Total time 20 minutes. Saved well over $100 in a service call. Anyone with an IQ above freezing can do it.
  • Conrad from CHESAPEAKE, VA
  • Difficulty Level:
    Really Easy
  • Total Repair Time:
    15 - 30 mins
  • Tools:
    Screw drivers
3 of 3 people found this instruction helpful.
Was this instruction helpful to you?
Thank you for voting!
  • 1
  • 2
  • 3
Questions and Answers

Ask our experts a question about this part and we'll get back to you as soon as possible!

24 questions answered by our experts.
Sort by:
  • 1
  • 2
  • 3
Sorry, we couldn't find any existing answers that matched.Try using some different or simpler keywords, or submit your new question by using the "Ask a Question" button above!
M
November 27, 2017
My dryer won't stop running when the door is opened. Do i need the door switch kit? Also do you have the lint screen? Mine has a crack which i have taped up. Thank you!
For model number NDG2330AWW
PartSelect logo
Hi M, Thank you for your question. It does sound like it is your door switch that is the issue. You can test it with a multi meter to make sure. I have linked the filter information down below for you. Good luck with your repair.

5 people found this helpful.

Was this helpful?
Thank you for voting!
Related Parts:
Jim
August 13, 2017
Do i have to remove front panel to check switch?
PartSelect logo
Hi Jim, Yes, you would have to remove the front panel of your machine to be able to get to your switch. If you would like, refer to the installation video on this part. It will show you exactly what you will need to do to get to your switch. Good luck with your repair!

4 people found this helpful.

Was this helpful?
Thank you for voting!
Ray
December 28, 2017
If the door switch has 3 connectors, what connector goes to what terminal, nc or no or com?
For model number DG410 dryer
PartSelect logo
Hi Ray, Thank you for your question. For information on how to install the door switch, there is a video listed with the part on our website that you may reference. I hope this helps. Thank you and have a great day!

2 people found this helpful.

Was this helpful?
Thank you for voting!
Mj
January 20, 2018
If the interior dryer light still works would that mean it’s probbaly not this part?
For model number MDE3757AYW
PartSelect logo
Hello MJ, Thank you for your inquiry. This part prevents the dryer from running when the door is open, so it could still be this part even if the light still works. You can test the switch with a multimeter to see if it has continuity. Hope this helps!

2 people found this helpful.

Was this helpful?
Thank you for voting!
Marcia
August 12, 2019
I've used my dryer without the timer functioning for awhile now. It shuts off only when i open the door and the timer itself doesn't move. I thought it was the timer but it may be the door switch. Can you give me some direction? Thank you.
For model number Maytag DG412 Series 07
PartSelect logo
Hi Marica, thank you for your question. Looking at your model information there are a few parts that you should take out and test to see which one is giving you the issue. The first parts to check in this case would be all of your thermostats and thermal fuses. You can test those parts with a multi meter and they should be reading 0 ohms to be working correctly. If those parts are fine, you should then go on to testing your heating element as well. You can also test that with a multi meter and it should be reading between 0 - 50 ohms. Something else you should also check would be your filter and ducts. Make sure there is absolutely no blockage that would restrict air flow in your appliance. If those parts are find then you may want to look at your door switch or the timer itself being the issue. I hope that helps. Good luck with your repair.

2 people found this helpful.

Was this helpful?
Thank you for voting!
Jay
October 1, 2017
Dryer will stop running when the door opens but the timer still clicking. When i close the door and push start bottom it will continue running and not stop. This is coin operated dryer that won't stop running unless the door is open. Timer is clicking all the time. Is this part broken or is the timer?
For model number MDE16CSAYA
PartSelect logo
Hello Jay, thank you for contacting us. It sounds like a faulty timer. You will want to replace this part. Good luck with the repair!

1 person found this helpful.

Was this helpful?
Thank you for voting!
Related Parts:
Gene
April 25, 2019
I replaced door switch but power shuts off when door is closed. (no power to control pad or screen).
For model number MDE7500AYW
PartSelect logo
Hello Gene, thank you for inquiring. For this symptom besides the Door Switch Kit part PS1964648, you will want to replace either the Door Catch Kit part PS2162263, the Cycling Thermostat - Limit part PS11743793, or the High Limit Thermostat part PS11740647. We hope this helps.

1 person found this helpful.

Was this helpful?
Thank you for voting!
Gene
April 26, 2019
I replaced the door switch but it didn't solve the problem. When the door is open the interior light and touch pad lights up normally. When i close the door everything shuts off as if i unplugged the dryer.
For model number MDE7500AYW
PartSelect logo
Hi Gene, thank you for your question. It sounds like you may want to check your fuse to see if it is working correctly. Otherwise it may be your control board itself that is the issue. Good luck with your repair.

1 person found this helpful.

Was this helpful?
Thank you for voting!
Alan
May 8, 2019
Can't find a dryer door switch. Not a button. It is flat, similar to a light switch
For model number Stack washer/dryer LTE6234DQ1
PartSelect logo
Hello Alan, thank you for inquiring. For your model the Door Switch is part PS11741453.

1 person found this helpful.

Was this helpful?
Thank you for voting!
Julio
July 12, 2021
Hi. The dryer door switch has two parts, a metal male pin that gets in the female switch parts. Is this part the one that I need for the dryer? Thanks.
For model number SDG109WF
PartSelect logo
Hello Julio, Thank you for contacting us. We have researched the model you have provided and have found the part you are looking for is PartSelect Number PS1964648. We hope this helps!

1 person found this helpful.

Was this helpful?
Thank you for voting!
  • 1
  • 2
  • 3
Model Cross Reference
This part works with the following models:
PartSelect Number: PS1964648
Manufacturer Part Number: W10169313
Brand
Model Number
Description
Amana
7493-LEM437
Dryer - DRYER
Speed Queen
ADE30RGS171TW01
Dryer - DRYER
Speed Queen
ADE3LRGS171TW01
Dryer - DRYER
Speed Queen
ADE41FSS171TN01
Dryer - DRYER
Speed Queen
ADE4BFGS171TW01
Dryer - DRYER
Speed Queen
ADE4BRGS171TW01
Dryer - DRYER
Admiral
ADE7005AKW
Dryer - Residential
Admiral
ADE7005AYW
Dryer - Residential
Admiral
ADE9005AGW
Dryer - Residential
Speed Queen
ADG30RGS111TW01
Dryer - DRYER
Speed Queen
ADG3LRGS111TW01
Dryer - DRYER
Speed Queen
ADG41FSS111TN01
Dryer - DRYER
Speed Queen
ADG4BFGS111TW01
Dryer - DRYER
Speed Queen
ADG4BRGS111TW01
Dryer - DRYER
Admiral
ADG7005AWW
Dryer - Residential
Speed Queen
AE3213
Dryer - Residential
Speed Queen
AE3413
Dryer - Residential, Electric
Speed Queen
AE4113
Dryer - Residential
Speed Queen
AE4213
Dryer - Residential
Speed Queen
AE4413
Dryer - Residential, Electric
Speed Queen
AE5113
Dryer - Residential
Speed Queen
AE5213
Dryer - Residential
Speed Queen
AE5413
Dryer - Residential, Electric
Speed Queen
AE7133
Dryer - Residential
Speed Queen
AE7233
Dryer - Residential
Speed Queen
AE9133
Dryer - Residential
Speed Queen
AE9233
Dryer - Residential
Speed Queen
AE9433
Dryer - Residential, Electric
Speed Queen
AEE933
Dryer - Residential, Electric
Speed Queen
AEE953
Dryer - Residential, Electric
Customer Service Representative

Get in touch, we're here to help!

Daily 8am - 9pm EST

Contact Customer Service