The heating element nut is used to connect the heating element to the dishwasher tub. If water is leaking from underneath your dishwasher, you may need to tighten or replace the heating element nut. Replacing the nut is an easy job, does not require any specialty tools, and should not take you more than 10 minutes. For our step by step guide, click the video below. The brass nut measures 7 inches in length x 1 inch in width x 5 inches in height, and fits most dishwashers. To see if this part is compatible with your dishwasher, check the list of compatible brands below.
How Buying OEM Parts Can Save You Time and Money
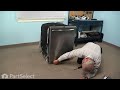
Part Videos
Replacing your Frigidaire Dishwasher Heating Element Brass Nut
Keep searches simple. Use keywords, e.g. "leaking", "pump", "broken" or "fit".
Sorry, we couldn't find any existing reviews that matched. Try using some different or simpler keywords.
★★★★★
★★★★★
Daniel H - April 29, 2020
Verified Purchase
Easy repair
Part fit perfectly!
★★★★★
★★★★★
Henry R - February 12, 2019
Verified Purchase
Easy Fix
My dishwasher was leaking and I thought it might be a huge problem. I discovered it was coming out at the heating element nuts. A little investigation lead me to find that perhaps all I needed to do was replace the brass nuts. Once I got the new ones it took me less than a half hour for the replacement. A few bucks, a little time and No more leak!
★★★★★
★★★★★
Jose L M - February 12, 2019
Verified Purchase
EASY REPAIR WITH YOUR VIDEO
IS THE PART I WAS LOOKING FOR. I CHANGED BOTH IN THE DISHWASHER. EVERYTHING WAS OK
★★★★★
★★★★★
Robert J - February 1, 2019
Verified Purchase
Exactly what I needed
Both nuts cracked on my girlfriend's dishwasher element, causing water leak. Dishwasher was installed in an island, so leak was not apparent for quite some time. Ended up ruining a large part of the wood work, and led to mold! Had to basically have the island rebuilt, and all due to a couple cracked nuts!! Wish there were plastic type replacements for this model.
★★★★★
★★★★★
Sonja U - August 7, 2018
Verified Purchase
Easy repair correct part!
Part arrived quickly . It was correct part and my dishwasher is no longer leaking. Thanks
★★★★★
★★★★★
Curtis F - June 4, 2018
Verified Purchase
R/P parts as advertised
Satisfied customer
★★★★★
★★★★★
Larry N - June 1, 2018
Verified Purchase
Easy repair
Worked great
★★★★★
★★★★★
Michael B - May 24, 2018
Verified Purchase
Perfect fit - Fixed the leak immediately!
Bought two just in case the other one split. Worked like a charm.
< Prev
1
Next >
Customer Repair Stories
Average Repair Rating: 4.3 / 5.0, 21 reviews.
What's this?
Sort by:
< Prev
1
2
3
Next >
Search filter:
Clear Filter
Your search term must have 3 or more characters.
Keep searches simple. Use keywords, e.g. "leaking", "pump", "broken" or "fit".
Sorry, we couldn't find any existing installation instruction that matched.
Brass nut split down its side , why ???????
Removed bottom cover , PLACED TAPE ON SHARP EDGES OF ALL METAL!!!!!!! Pulled electrical connections off with long reach pliers , removed old split nut ,it was loose !!!!!! . Placed new nut into deep socket , started by hand until sung ,then attached small short 1/4 ratchet to socket and took two (2) turns . Reattached wires with long pl
... Read moreiers, Tested on short cycle and nooooo,leaks !!!!!!!! SAVED HUNDREDS OF $$$$$$$. Replaced lower cover .ITS NOT ROCKET SCIENCES. GET AFTER IT !!!!! Bill.
Read less
Bill from PORT ORCHARD, WA
Difficulty Level:
Really Easy
Total Repair Time:
Less than 15 mins
Tools:
Pliers, Screw drivers, Socket set
1 personfound this instruction helpful.
Was this instruction helpful to you?
Thank you for voting!
the nut holding on the element would not tighten. leaked at the location where the nut was located
Removed the cover at the front bottom to gain access to the nuts holding on the element. Turned off dishwasher breaker. Removed the wires connected to the element. With a 1/2" wrench, removed the element mounting screws. Removed the bottom rack. Removed the lower spray arm. Removed the element from 2 clips.
... Read morer />Removed the element. Put the new element in place. Clipped it in. Put new screws on and tightened up with a wrench. Not too much but enough to squash the washers to make a tight seal. Replaced wires. Replaced spray arm and bottom rack. Turned on the breaker. Ran it through a cycle to check for leaks. Replaced bottom cover.
I just did the repair just like the video suggests to fix it. I disconnected the power cord, shut off and took apart the water inlet line, and drain line. Unscrewed the top of the washer from the cabinet and pulled out the dishwasher. Tilted the washer to better get to the bottom and took off the connecting wires (red and white.) Unscrewe
... Read mored the brass nuts holding the heating element and removed the element from the machine. Took out the bottom sprayer arm. Replaced the element, replaced the brass nuts and connected the wires back up. Put the sprayer arm back in. Pushed the machine back into place and re-secured the top to the cabinet. Hooked all water, drain, and power lines back up and all was good again.
Water was leaking through the heating element Accra point.
Isolated the leak and found the nut had split thereby allowing a loose seal and water penetration. Ordered 2 nuts just in case the other goes and the installation was easy. Unplug the unit, remove baseplate, remove screws under the countertop, and slide the unit out a bit. Use needlenode pliers to remove terminal connection and replaced n
... Read moreut. Reverse it for assembly. 3 minutes tops $6 later it is done. Easy money saved by a DIY.
Read less
daniel from OXFORD, MS
Difficulty Level:
Very Easy
Total Repair Time:
Less than 15 mins
Tools:
Pliers, Screw drivers
2 of 2 peoplefound this instruction helpful.
Was this instruction helpful to you?
Thank you for voting!
Water leaking from under dishwasher
Removed lower trim covers (2 Phillips screws) disconnected power supply at breaker box. Removed wire from heating element, removed (broken) brass nut, unclipped heating element and removed. Removed flat washers and replaced with new grommets. Kind of tricky getting them in there. Also had to lube them with silicone to get the element back
... Read more through. Installed new brass nuts and installed wire connectors. Reset breaker and started diswasher to verify repair. No leaks, working just fine, reinstalled lower trim covers
dishwasher was leaking at heating element connections
Both heating element brass nuts had a split in them. They had fallen off the heating element and were hanging on the electrical wires. I removed the wires from the heating element and removed the brass nuts from the wires. I then screwed the new nuts on the heating element and reattached the wires. problem solved. I want to thank you for
... Read morehaving the parts I needed as Sears had discontinued them for this Kenmore appliance.
Read less
John from Metairie, LA
Difficulty Level:
Really Easy
Total Repair Time:
Less than 15 mins
Tools:
Wrench set
0 of 1 peoplefound this instruction helpful.
Was this instruction helpful to you?
Thank you for voting!
Heating Element Seal and Nut
Never worked on a dishwasher before but quickly learned that on this particular one, it's only this thin little brass nut that tightens down the element from the underside of the washer. If not tight enough, water drips right down onto the electrical connections. In this case water began to drip and the heat from the electrical current
... Read morebegan melting a clear rubber shield thing. Luckily I was home during the cycle and figured out the problem. Great website that seems to have all necessary parts for my washer. Quick shipment!
Read less
Bryan from Charlotte, NC
Difficulty Level:
Really Easy
Total Repair Time:
Less than 15 mins
1 of 2 peoplefound this instruction helpful.
Was this instruction helpful to you?
Thank you for voting!
Brass nuts holding heating element in place had split
All you have to do power down the unit, then disconnect the power connections at the element and remove the old nuts and replace them with the new ones and tighten. Don't tighten too much, the element has a rubber seal that just needs the nut to snug it up.
Jonathan from New Hope, PA
Difficulty Level:
Really Easy
Total Repair Time:
Less than 15 mins
Tools:
Pliers, Wrench (Adjustable)
2 of 4 peoplefound this instruction helpful.
Was this instruction helpful to you?
Thank you for voting!
heater element burnt out (black spot)
Make sure power is off. Remove metal toe kick with fillips screw driver. Reach under dishwasher with 1/2" open end wrench and completly unscrew brass nuts from element ends. Then open door and pull element ends straight up. Note: As you pull element ends up (inside washer) you are also forcing the element end wire connectors to come
... Read more off underneath. The electricial connectors are very hard to get off any other way.
Ask our experts a question about this part and we'll get back to you as soon as possible!
2 questions answered by our experts.
Sort by:
< Prev
1
Next >
Search filter:
Clear Filter
Your search term must have 3 or more characters.
Keep searches simple. Use keywords, e.g. "leaking", "pump", "broken" or "fit".
Sorry, we couldn't find any existing answers that matched.Try using some different or simpler keywords, or submit your new question by using the "Ask a Question" button above!
Leighton
October 5, 2017
I saw a video on replacing heating element brass nut but thinking about replacing the grommet at same time. Is there a video on that replacement available for that job
For model number FDBB944CB0
Hi Leighton,
Thank you for your inquiry. I am not showing a video listed with the grommet on our website, but a customer has left a comment as to how they have installed the part. "Removed lower trim covers (2 Phillips screws) disconnected power supply at breaker box. Removed wire from heating element, removed (broken) brass nut, unclipped heating element and removed. Removed flat washers and replaced with new grommets. Kind of tricky getting them in there. Also had to lube them with silicone to get the element back through. Installed new brass nuts and installed wire connectors. Reset breaker and started dishwasher to verify repair. No leaks, working just fine, reinstalled lower trim covers" I hope this helps. Thank you and have a great day!
4 people found this helpful.
Was this helpful?
Thank you for voting!
Karen
December 3, 2018
One question if this brass nut keeps breaking why keep using it. We paid 129.00 dollars to fix it but our repair man only had one nut both were broken. We replaced one and dishwasher is working fine no leaks how come we are replacing second nut ourselves
Hello Karen, Thank you for the question. We believe this is a concern you need to address with the manufacturer. We are a company that simply sells replacement parts. We do not manufacture any units, provide technical support, authorize substitutes, or fulfill warranty claims. Please make contact with your manufacturer directly. Hope this helps!
1 person found this helpful.
Was this helpful?
Thank you for voting!
< Prev
1
Next >
✖
Ask a Question
Ask our experts a question on this part and we'll respond as soon as we can.