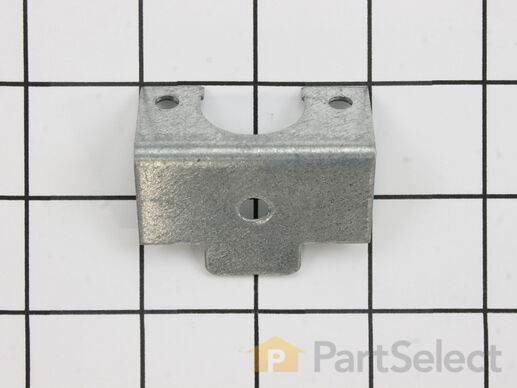
Dryer Drum Bearing Bracket 131724301
Fits your WER211CES0!
$
10.64
In Stock
Get this part fast! Average delivery time for in-stock parts via standard shipping: 1.8 days.
Fits your WER211CES0!
PartSelect Number PS12579101
Manufacturer Part Number 131724301
Manufactured by
Frigidaire

Check if this fits your product and find model diagrams
Need help finding your model number?
Product Description
Dryer Drum Bearing Bracket Specifications
This drum bearing bracket is for dryers. Drum bearing bracket holds and supports the drum bearing

How Buying OEM Parts Can Save You Time and Money
Troubleshooting
This part fixes the following symptoms:
Noisy
This part works with the following products:
Dryer, Washer Dryer Combo.
This part works with the following products:
Frigidaire, Kenmore, Gibson, Kelvinator.
Part# 131724301 replaces these:
AP6337356, 08015463, 131724300, 3204251, 3281023, 5303281023, 8015463, Q000094707, Q000094708, Q000630226, Q630226, Q94708, WQ630226, WQ94707, WQ94708
Customer Reviews
Filter By Rating:
- < Prev
- 1
- Next >
Sort by:
Search filter:
Clear Filter
Your search term must have 3 or more characters.
Keep searches simple. Use keywords, e.g. "leaking", "pump", "broken" or "fit".
Sorry, we couldn't find any existing reviews that matched. Try using some different or simpler keywords.
Lewis B - March 15, 2020
Verified Purchase
Dryer drum, bearing clip
I When I ordered the heating element from Part Select It came within a few days, but the bracket I ordered came four days later and actually a day later than FedEx had shown. I realized that I had ordered the wrong part and ordered the correct part with a two delivery. On Thursday FedEx showed the part would arrive the following Monday. I ordered the part from another source and received it on Friday. The Part Select clip actually arrived on Sunday.
The heating element from Part Select was perfect in every way, but not being able to assemble the dryer without the clip resulted in Me finding a better source for parts.
Nicholas M - February 28, 2018
Verified Purchase
Easy repair
Exact replacement, works as designed
- < Prev
- 1
- Next >
Customer Repair Stories
Average Repair Rating: 2.7 / 5.0, 18 reviews.
What's this?
- < Prev
- 1
- 2
- Next >
Sort by:
Search filter:
Clear Filter
Your search term must have 3 or more characters.
Keep searches simple. Use keywords, e.g. "leaking", "pump", "broken" or "fit".
Sorry, we couldn't find any existing installation instruction that matched.
Noisy.
Had scape upper felt off of the drum edge but had to use a hacksaw to cut off the three plastic plates that were riveted to the upper felt replacement part. The old part number was131469100.
Other Parts Used:
-
David from EDGEWOOD, NM
-
Difficulty Level:Easy
-
Total Repair Time:More than 2 hours
-
Tools:Screw drivers
2 of 2 people
found this instruction helpful.
Was this instruction helpful to you?
Thank you for voting!
DRYER MADE A LOT OF NOISE
Took the top dryer cabinet apart to replace all the above parts plus the dryer belt. Because of its age decide to replace all the parts from the above list.
Three major problems: none of the video reviews showed this type of dryer. Some parts were practically impossible to get back together. Difficult getting the top square. The top of the cabinet picture did not indicate how the top was to be installed.
After 23 hours finally got it back together. Then it would not start. Discovered a wire had come loose. The dryer works fine now.
Other Parts Used:
-
Jerry from ROCKWALL, TX
-
Difficulty Level:Very Difficult
-
Total Repair Time:More than 2 hours
-
Tools:Nutdriver, Pliers, Screw drivers, Socket set, Wrench (Adjustable)
1 person
found this instruction helpful.
Was this instruction helpful to you?
Thank you for voting!
Dryer heater broken
Removed top cover.
Lowered control assembly.
Removed front door assembly.
Removed drum.
Removed heater assembly.
Removed support bearing and bracket using existing bonding ball.
Re-assembled in reverse order.
Lowered control assembly.
Removed front door assembly.
Removed drum.
Removed heater assembly.
Removed support bearing and bracket using existing bonding ball.
Re-assembled in reverse order.
Other Parts Used:
-
Johnny from PINEBLUFF, NC
-
Difficulty Level:Really Easy
-
Total Repair Time:30 - 60 mins
-
Tools:Screw drivers
3 of 3 people
found this instruction helpful.
Was this instruction helpful to you?
Thank you for voting!
No heat, element bad
With the excellent replacement parts sold by this site, it went like silk. The dryer is not only working great, but actually quieter.
Other Parts Used:
-
John from O FALLON, IL
-
Difficulty Level:Really Easy
-
Total Repair Time:30 - 60 mins
-
Tools:Pliers, Screw drivers
2 of 2 people
found this instruction helpful.
Was this instruction helpful to you?
Thank you for voting!
Squeaking noise as the drum turned
I love technology. First thing I did was google on "U-tube", "How to repair a squeaking dryer". Several videos out there so I just found the one I needed and watched. The repair itself went easy. A word of advice would be to be careful of sharp edges and to remember to unplug the machine prior to repair. While the drum is out, go ahead and get your shop vac and clean the inside of the unit out. Also, not only put grease on the new plastic holder, but put some on the shaft of the idler puller. I also used an awl to line up the holes on the front panel when re-installing the screws. One video I watched showed reaching in through the front to take the drum belt off the pulley, where another showed removing the inspection plate on the back. This made it much easier.
Other Parts Used:
-
Doug from Silver City, NM
-
Difficulty Level:Easy
-
Total Repair Time:15 - 30 mins
-
Tools:Nutdriver, Screw drivers
0 of 1 people
found this instruction helpful.
Was this instruction helpful to you?
Thank you for voting!
Bearing Bracket Worn Out
Took off front panel, removed drum and replaced parts listed. A bit tricky to keep small parts in place. However, masking tape helped. Best of all was the online diagram of how the parts were assembled. In addition, taking step by step phone pixs aided in replacing parts since there was some down time between diagnosis and installation.
Other Parts Used:
-
David from Fairdale, KY
-
Difficulty Level:A Bit Difficult
-
Total Repair Time:30 - 60 mins
-
Tools:Nutdriver, Screw drivers
7 of 8 people
found this instruction helpful.
Was this instruction helpful to you?
Thank you for voting!
Dryer bearing failure
From previous responses on this site. I just followed their lead. If I had not found these folks, and the responses, it would have been a nightmare. It looked like and I thought the dryer came apart from the back! But in reality it comes apart from the front!! Absolutely fantastic site and help. Fast shipping, I ordered on Wednesday before Labor Day, didn't expect the parts until the following Wednesday, but received the parts on Saturday morning, and had the dryer back running by Sunday AM. Never even ran out of clean clothes!!!!!
Other Parts Used:
-
Douglas Green from Kansas City, MO
-
Difficulty Level:Easy
-
Total Repair Time:More than 2 hours
-
Tools:Pliers, Screw drivers, Socket set
7 of 12 people
found this instruction helpful.
Was this instruction helpful to you?
Thank you for voting!
bearing bad and shaft broken
replaced bearing and shaft new belt and everything works just fine
Other Parts Used:
-
Randall from New Roads, LA
-
Difficulty Level:Easy
-
Total Repair Time:30 - 60 mins
-
Tools:Screw drivers
3 of 5 people
found this instruction helpful.
Was this instruction helpful to you?
Thank you for voting!
we heard the most deafening screech! when we investigated we found that the plastic part that the shaft rested in was worn, unevenly and the shaft end was scored. (we live in a house with 8 people so a fast fix was needed) I looked up the part on a sears site. when I checked the part avalibility I f
we removed the top of the dryer which was clipped on. then removed the front, including the door, being careful to unhook the electrical elements. then we removed the screws that attached the dryer drum to the back of the shaft. then we took the shaft out of the bracket. then we removed the plate from the back of the dryer that held the ball, the bearing and the bracket together. then we waited for parts and thanked God that the weather was fair so we could hang our clean clothes out!!! the parts came ahead of the rain so it was reverse order. then try the dryer!!!fantastic!! to qoute my kids "you rock"
Other Parts Used:
-
Barbara from Bartow, WV
-
Difficulty Level:Difficult
-
Total Repair Time:30 - 60 mins
-
Tools:Screw drivers, Wrench set
0 of 2 people
found this instruction helpful.
Was this instruction helpful to you?
Thank you for voting!
Screeching noise when drying
Rear plastic drum support bearing got worn making the shaft come in contact with the metal bearing bracket. That contact created a groove overtime and eventually snapped the shaft tip off.
Cut power off. Remove all the screws from the front panel. (where the controls are) working from the bottom to the top. Insert putty knife between the dryer and the control panel and push down to release. Carefully disconnect the wire harness.
You will find 2 screws at the bottom and 4 on top holding the dryer door. Remove and expose the drum.
Remove the drive belt
Remove the drum.
You need a 5/16 nut drive to remove the bearing bracket and an extra set of hands to hold the support from the back.
Re-install the parts. I used bearing grease to make it run smoother
Attach the new shaft to the drum and reinstall the drum (its best done with help)
Re install everything back again. And you are done
Other Parts Used:
-
David from Rockville, MD
-
Difficulty Level:Easy
-
Total Repair Time:15 - 30 mins
-
Tools:Screw drivers
6 of 7 people
found this instruction helpful.
Was this instruction helpful to you?
Thank you for voting!
- < Prev
- 1
- 2
- Next >
Questions and Answers
Ask our experts a question about this part and we'll get back to you as soon as possible!
- < Prev
- 1
- Next >
Sort by:
Search filter:
Clear Filter
Your search term must have 3 or more characters.
Keep searches simple. Use keywords, e.g. "leaking", "pump", "broken" or "fit".
Sorry, we couldn't find any existing answers that matched.Try using some different or simpler keywords, or submit your new question by using the "Ask a Question" button above!
Nelson
August 6, 2019
I'm looking to purchase for my Kenmore stack washer/dryer
Dryer drum belt
Dryer idler pulley
Drum bearing
Items stating "no longer available". does it mean temporarily out of stock or do you no longer sell it?
For model number 417.94802301
Hello Nelson, thank you for your question. Any items that indicate they are no longer available mean the manufacturer doesn't make them anymore and there are no replacements available. I hope this helps!
1 person found this helpful.
Was this helpful?
Thank you for voting!
- < Prev
- 1
- Next >
✖
Ask a Question
Ask our experts a question on this part and we'll respond as soon as we can.
Something went wrong. Please try again later.
Your Question Has Been Submitted!
Our experts will send you an email as soon as your question has been answered.
You May Also Need?
Model Cross Reference
This part works with the following models:
PartSelect Number: PS12579101
Manufacturer Part Number: 131724301
Brand
Model Number
Description