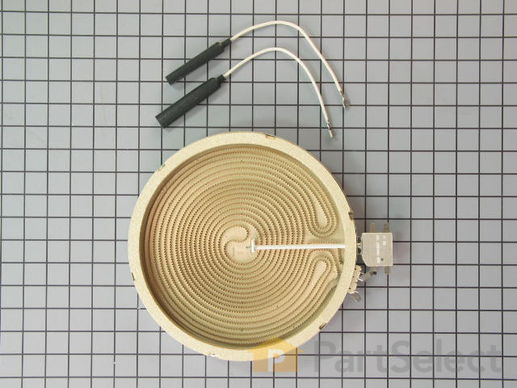
Part Location Diagram of W10823694 Whirlpool Dual Burner Element with Limiter
See part 14 in the diagram
( Grid squares measure 1x1 inch )
Customer Service Representative

Get in touch, we're here to help!

Daily 8am - 9pm EST

customerservice@partselect.com

Dual Burner Element with Limiter W10823694

 Fits your KECC560BBL2!
★★★★★
★★★★★
1 Review

Rated by 4 customers 

A Bit Difficult 

1- 2 hours 

Ratings submitted by customers like you who bought this part.

$ 212.59
  In Stock
Get FREE EconoShip on orders over $100! T&C apply

Get this part fast! Average delivery time for in-stock parts via standard shipping: 1.8 days.

 Fits your KECC560BBL2!
PartSelect Number PS11764904
Manufacturer Part Number W10823694
Manufactured by Whirlpool
Troubleshooting
This part fixes the following symptoms:
Element will not heat
This part works with the following products:
Cooktop, Range.
This part works with the following products:
KitchenAid, Jenn-Air, Whirlpool, Amana.
Part# W10823694 replaces these:
AP6030924, 0312941, 10008402, 10008405, 12001280, 3187188, 3189899, 4454592, 71001618, 71002168, 8185649, 9753474, WP8185649, Y0312941
Back to Top
Customer Reviews
Average Rating:
★★★★★
★★★★★
1 Review
5.0
Filter By Rating:
  • 5 Stars
    1
  • 4 Stars
    0
  • 3 Stars
    0
  • 2 Stars
    0
  • 1 Star
    0
Sort by:
  • 1
Sorry, we couldn't find any existing reviews that matched. Try using some different or simpler keywords.
  • 1
Customer Repair Stories
 Average Repair Rating: 2.4 / 5.0, 4 reviews. What's this?
Sort by:
  • 1
Sorry, we couldn't find any existing installation instruction that matched.
The inside coil on the dual burner was not working
This is a slide-in range, so I:
1. Turned off the circuit breaker for the range. The range is hard-wired, so can't just be unplugged. I determined the clock on the range went off.
2. Removed 4 screws holding the front control panel to the cooktop. Removed 2 screws from each side panel into the cooktop. Removed 4 screws from the rear panel holding the cooktop.
3. With my assistant (my wife) lifted the cooktop and tilted it so that I could access the underside.
4. Used an iPad to take photos from several angles of the wire connections from each burner control. Printed the one showing the connections on the dual burner control.
5. Removed the 4 screws holding the sheet metal support for the dual burner and one of the other burners. Released the spring steel retainers holding the dual burner. Removed the burner.
6. Used the iPad again to take photos of the connections to the dual burner, and printed it.
7. Removed all the wire connections to the burner. Checked continuity from the center (common) terminal to each of the other terminals. Determined that in fact the inside coil was open (burned out).
8. Removed the two screws holding the spring clip retainers on the old burner. Matched the old and new burners to determine where the spring clips should go. Drilled 2 small holes in the base of the new burner and screwed the clips from the old burner on the new one.
9. Now the tricky part: The new burner didn't have the exact same limiter and heat sensor probe as the old one. After several false starts, we were able to barely make out the terminal letter/number designations on the control and match them to the same letter/numbers on the new burner. It required a magnifier and a strong flashlight to read these engraved markings.
10. Made the connections on the burner. I used a pair of long-nosed pliers to carefully pull the connections off the spade terminals, and attch them on the new burner.
11. Mounted the burner to the sheet metal support using the spring clips previously installed.
12. Re-attached the 4 screws holding the burner support to the cooktop.
13. Carefully replaced the cooktop onto the range, paying special attention to not pinching any of the wires, and making sure all the wires, from all the burners were still connected.
14. Replaced all 12 screws holding the cooktop to the range.
15. Turned on the power, and checked all burners, including the new one, to see if they were opetating properly. YAY! They all worked!

It must be noted that we had to call a repairman to troubleshoot our installation the first time. We had reversed two of the wires to the new burner, because of the difference between the old and the new limiter connections. The engraved markings in the porcelain were very difficult to see. The instructions that came with the new burner never addressed this issue, and instead had very confusing (and worthless) instructions about replacing the limiter from the old burner to the new on. (This was not possible, anyway).

After the repairman left, we discovered the front burner that had been working, no longer was. With our newfound experience, we repeated the previous steps to take the range apart and discovered one of the wires had become disconnected from that burner. We re-connected it, re-attached the cooktop, and everything worked.

One telltale indicator that we had mixed up the connections on the burner, was the red "hot' warning light on the range top came on as soon as we restored power, even though no burners had been on. I should mention that the dual burner "worked" a couple of times even with the reversed connections, but then failed to work any more.
  • Art from CINCINNATI, OH
  • Difficulty Level:
    A Bit Difficult
  • Total Repair Time:
    More than 2 hours
  • Tools:
    Nutdriver
3 of 3 people found this instruction helpful.
Was this instruction helpful to you?
Thank you for voting!
outer ring of dual radiant burner doesn't work
Thanks for the previous viewer's tip, disconnect power, pushed the cook top out of the counter and used a wood block for the support. Unscrew the smooth top from the burner, remove old and plug in the new one. Connect power, test OK. Put everything back.
  • Qiong from Mckinney, TX
  • Difficulty Level:
    Easy
  • Total Repair Time:
    30 - 60 mins
  • Tools:
    Nutdriver, Socket set
1 of 5 people found this instruction helpful.
Was this instruction helpful to you?
Thank you for voting!
Element not heating
This was a countertop mounted cooktop. The hardest part of the repair was getting the cooktop out of the hole and separating the glass top from the burner box. It is highly recomended that you have two people to seperate the top from the burner box. Be sure you turn off the breaker to the cooktop first before you do any work. One time saver is once you have the top sperated from the box use 2- 10"-12" pieces of 1x2 or 2x4 to prop the top open. This will eleminate the need to disconnect the power leads (be sure the breaker is OFF). If you are not electrically inclined mark the color of the wires to the corrosponding terminals on the new element BEFORE you remove them from the old element. The element that I replaced was the dual heat element. I ended up having to change 2 of the terminal ends on the wiring harness becacuse they were too small for the new element. Carefully remove the wires from the old elenent using needle nose pliers and remove the old element by removing the 2 screws that hold the element to the hold down clips, then loosen the clip mounting screws & remove the element. Change terminals if needed & reassmble in reverse order. Once I got it reassembled with a couple of the top mounting screws in, I turned on the breaker and tested for proper operation. Breaker OFF, finish reassembly and remount. You may want to consider replacing foam gasket before remounting. Good luck... R. Moore
  • Richard from Weatherford, TX
  • Difficulty Level:
    A Bit Difficult
  • Total Repair Time:
    1- 2 hours
  • Tools:
    Nutdriver, Pliers
8 of 9 people found this instruction helpful.
Was this instruction helpful to you?
Thank you for voting!
Outer Element stopped working
Opened the Cooktop. Hardest part was removing the cooktop.
The heating element was broken, very hard to see.

Remove 2 clips and install in new element. Great oppurtunity to clean the unit.
  • Ashok from Los Altos Hills, CA
  • Difficulty Level:
    A Bit Difficult
  • Total Repair Time:
    30 - 60 mins
  • Tools:
    Nutdriver, Screw drivers
5 of 8 people found this instruction helpful.
Was this instruction helpful to you?
Thank you for voting!
  • 1
Questions and Answers

Ask our experts a question about this part and we'll get back to you as soon as possible!

6 questions answered by our experts.
Sort by:
  • 1
Sorry, we couldn't find any existing answers that matched.Try using some different or simpler keywords, or submit your new question by using the "Ask a Question" button above!
Dale
November 8, 2018
5 burner Jenn-Air cooktop, right rear, 8"dia. Dual burner element, is this the correct part # ?
For model number CCE3531B
PartSelect logo
Hi Dale, thank you for your question. Unfortunately no. This part is the largest burner on your appliance. The 8" burner is part 6 on the diagram. Unfortunately that part has been discontinued by the manufacturer and the manufacturer has not provided an authorized substitute. The only other thing that I could think of would be to contact your manufacturer and see if they have another part from a different model that will work with yours. If they do have another part that will work, get the part number so that you can search it on our website to see the cost of the part. I hope that helps. Good luck with your repair.

2 people found this helpful.

Was this helpful?
Thank you for voting!
Related Parts:
Henry
November 26, 2018
The model number listed above looks correct or it could be rc8540xbb4 (its hard to determine if the #6 is a 6 or a 5). The serial number of the unit is x65201024. I have a Whirlpool electric built in ceramic cooktop.The front left burner/element (dual size) and the rear right burner/element (dual size) will not turn off automatically when the control knob is correctly turned to the off position. I have to tap on the burner knob for it to shutoff. What are my repair options for this issue? Are there parts available to make the repairs?
For model number RC8640XBB4
PartSelect logo
Hello Henry, thank you for your question. If the burners will not shut off on their own, and taping the knob will shut it off, the burner switch will need to be replaced. The switch is used on both dual elements, and the part number is PS11740884. Please enter the part number into the site for current price and availability. Good luck with your repair!

1 person found this helpful.

Was this helpful?
Thank you for voting!
Kate
June 20, 2019
Why does only part of the element work?
PartSelect logo
Hi Kate, thank you for your question. There are a couple of parts that could cause this issue specifically. You will need a multi meter to be able to test the parts. The first part you will want to check is your radiant element. It should be reading between 0 - 120 ohms to be working correctly. The other part to check would be your infinite (or surface burner) switch. When you remove that part from the appliance, connect each probe from your multi meter to the prongs and then turn the switch to an on position. If you get no continuity then the switch is the issue. I hope that helps. Good luck with your repair.

1 person found this helpful.

Was this helpful?
Thank you for voting!
David
August 28, 2019
I have the Jenn-Air model CCE3531B, where the back left burner is the dual element. Is this the correct replacement?
For model number CCE3531B
PartSelect logo
Hi David, Thank you for your question. Yes, this would be the left rear element. I hope this helps. Thank you and have a great day!

Was this helpful?
Thank you for voting!
Jim
November 20, 2019
Are the limiter jumper wires required looks like they are because 2 terminal connections looks like they're switched in the limiter schematic.
For model number rc8640xbb4
PartSelect logo
Hi Jim, thank you for your question. You should already have these wires in your appliance from your old burner. You would only need to replace them if you do not have them. I hope that helps. Good luck with your repair.

Was this helpful?
Thank you for voting!
Max
January 17, 2018
My range has large burner with a smaller center burner - can be used seperately. The small section burner is no longer working. The range is a glass top. Smooth top. Can this part be replaced?
For model number KERC507EWH1
PartSelect logo
Hi Max, Thank you for your question. Yes it can, you would have to replace your entire burner. Here are the part numbers for your burners based on location on your stove: Left Rear: PS2342231, Right Front: PS11745233*, Right Rear: PS11745113*, Left Front: PS11764904. * Unfortunately the right burners have been discontinued by the manufacturer. I hope that helps. Good luck with your repair.

Was this helpful?
Thank you for voting!
Related Parts:
  • 1
Model Cross Reference
This part works with the following models:
PartSelect Number: PS11764904
Manufacturer Part Number: W10823694
Brand
Model Number
Description
Amana
AK2H30HR
Cooktop
Amana
AK2H30HRW
Cooktop
Amana
AK2H35HR
Cooktop - Electric
Amana
AK2H35HRW
Cooktop
Amana
AK3H30HRW
Cooktop
Amana
ARH660HR
Range
Amana
CAK2H30HR
Cooktop
Amana
CARH660HR
Range
Jenn-Air
CCE3400B
Cooktop - Electric
Jenn-Air
CCE3400W
Cooktop - Electric
Jenn-Air
CCE3401B
Cooktop - Electric
Jenn-Air
CCE3401Q
Cooktop - Electric
Jenn-Air
CCE3401W
Cooktop - Electric
Jenn-Air
CCE3530B
Cooktop - Electric
Jenn-Air
CCE3530W
Cooktop - Electric
Jenn-Air
CCE3531B
Cooktop - Electric
Jenn-Air
CCE3531W
Cooktop - Electric
Amana
FST130-2D
Cooktop
Amana
FST136-2D
Cooktop
Whirlpool
GJ8640XBB0
Cooktop - Built-in, Electric
Whirlpool
GJ8640XBQ0
Cooktop - Built-in, Electric
Whirlpool
GJ8646XDB0
Cooktop - Built-in, Electric
Whirlpool
GJ8646XDQ0
Cooktop - Built-in, Electric
Whirlpool
GJ8646XDZ0
Cooktop - Built-in, Electric
Jenn-Air
JEC8430ADB
Cooktop
Jenn-Air
JEC8430ADF
Cooktop
Jenn-Air
JEC8430ADN
Cooktop
Jenn-Air
JEC8430ADS
Cooktop
Jenn-Air
JEC8430ADW
Cooktop
Jenn-Air
JEC8536ADB
Cooktop
Customer Service Representative

Get in touch, we're here to help!

Daily 8am - 9pm EST

Contact Customer Service