We're sorry, but our Q&A experts are temporarily unavailable.
Please check back later if you still haven't found the answer you need.
4 questions answered by our experts.
< Prev
1
Next >
Sort by:
Search filter:
Clear Filter
Your search term must have 3 or more characters.
Keep searches simple. Use keywords, e.g. "leaking", "pump", "broken" or "fit".
Sorry, we couldn't find any existing answers that matched.Try using some different or simpler keywords, or submit your new question by using the "Ask a Question" button above!
George
September 22, 2017
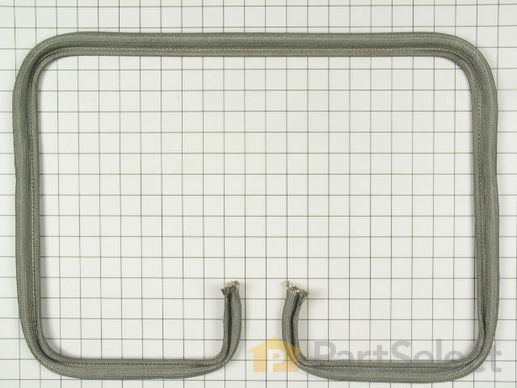
How do i install oven door seal part number eap11757564
Hi George,
Thank you for your inquiry. I have found a customer comment on how they installed the part, "The oven seal replacement was very straight forward. Two screws held the door to the arms coming from the oven. I slid the door up off the arm and moved it to a workbench. This whole process should take about 15 minutes, a little longer if your unit is older and you want to clean as you go. Mine was fairly dirty and I gave it a cleaning as I removed parts. Unscrew all screws on the outer frame of the door, including two small ones on the side. Remove the outer frame and then the glass front and set them aside. A few more screws to remove the glass from the inner door, and even more on the remaining part of the door. You should also remove the screws holding the tiny brackets as well to release the portion that holds the oven seal in place. This is very straightforward, just keep pulling screws out until you can remove the old seal.
Once the old seal is out, insert the new one using the wire embedded in the seal as your guide...the gap in the seal goes to the bottom. Put everything back together and re-install the door. My door hinges were spring loaded and took a little effort to move them down so the door can be slipped on. This is a two person job since the hinges do not lock in place, they spring right back up flush with the oven and you cannot install the door. Re-install the two set screws holding the door to the hinges and you are done!
With the new seal in place, it felt a little puffy and the door did not seem to close as flush as it used to. This makes sense since the seal is new. I kept the door locked (like you would to use the oven cleaning cycle). I even kept it partially locked during cooking.
Frankly, the hardest part was the cleanup of nasty grease and dirt that built up over the past decade or so.
Best of luck!" I hope this helps. Thank you and have a great day!
16 people found this helpful.
Was this helpful?
Thank you for voting!
Marcia
February 15, 2022
How do you get the gasket back in the Groove
For model number D146
Hello Marcia, Thank you for the question. We have attached a How to Video on installing Oven Door Seals that may help. Thank you for your inquiry, good luck with this repair!
3 people found this helpful.
Was this helpful?
Thank you for voting!
Joseph
April 2, 2022
I want to replace my oven door seal. Is the model W2750B as shown on your website the same as W2750 which I own?
Thank you
For model number W2750
Hi Joseph,
Thank you for your question. The parts should be similar. If you could resubmit your question with your model number and information on the part you need, we would be happy to help you. We are open 7 days a week. We look forward to hearing from you!
1 person found this helpful.
Was this helpful?
Thank you for voting!
Trish
December 14, 2022
Will this seal work to keep the oven door shut tight when baking
For model number CRE305
Hello Trish, thank you for reaching out. This seal is not listed as compatible with your model. The oven door seal compatible with your model is part number PS2079285. If you require assistance to place an order, please contact customer service. We hope that helps!
Average Repair Rating: 2.9 / 5.0, 13 reviews.
What's this?
< Prev
1
2
Next >
Sort by:
Search filter:
Clear Filter
Your search term must have 3 or more characters.
Keep searches simple. Use keywords, e.g. "leaking", "pump", "broken" or "fit".
Sorry, we couldn't find any existing installation instruction that matched.
The oven door seal was ripped and was leaking.
The oven seal replacement was very straight forward. Two screws held the door to the arms coming from the oven. I slid the door up off the arm and moved it to a workbench. This whole process should take about 15 minutes, a little longer if your unit is older and you want to clean as you go. Mine was fairly dirty and I gave it a cleaning as I removed parts. Unscrew all screws on the outer frame of the door, including two small ones on the side. Remove the outer frame and then the glass front and set them aside. A few more screws to remove the glass from the inner door, and even more on the remaining part of the door. You should also remove the screws holding the tiny brackets as well to release the portion that holds the oven seal in place. This is very straightforward, just keep pulling screws out until you can remove the old seal.
Once the old seal is out, insert the new one using the wire embedded in the seal as your guide...the gap in the seal goes to the bottom. Put everything back together and re-install the door. My door hinges were spring loaded and took a little effort to move them down so the door can be slipped on. This is a two person job since the hinges do not lock in place, they spring right back up flush with the oven and you cannot install the door. Re-install the two set screws holding the door to the hinges and you are done!
With the new seal in place, it felt a little puffy and the door did not seem to close as flush as it used to. This makes sense since the seal is new. I kept the door locked (like you would to use the oven cleaning cycle). I even kept it partially locked during cooking.
Frankly, the hardest part was the cleanup of nasty grease and dirt that built up over the past decade or so.
Best of luck!
Paul from Mickleton, NJ
Difficulty Level:
Easy
Total Repair Time:
15 - 30 mins
Tools:
Screw drivers
85 of 90 peoplefound this instruction helpful.
Was this instruction helpful to you?
Thank you for voting!
Oven door seal needed replacement, filters replaced
First we removed the door from the stove. Removed all the screws and removed the damaged seal. We replaced the seal and re-assembled the door.
take door off. remove screws holding door together, take door apart. remove worn seal. install new seal. reposition insulation and door window at the appropriate location. begin re-assembling door in reverse order making sure that apprpriate pressure is applied to keep the seal in place. re-attach door to hinges. project worked out well. new seal looks great. would have been a costly repair if I called a professional. I'm handy, but things like this are often hard the first time. you have to take your time and be cognizant of putting it back together the way you took it apart.
Eli from Richboro, PA
Difficulty Level:
A Bit Difficult
Total Repair Time:
1- 2 hours
Tools:
Nutdriver, Screw drivers
11 of 14 peoplefound this instruction helpful.
Was this instruction helpful to you?
Thank you for voting!
The outer glass panel of the interior glass assembly shattered when the oven was preheated to 400 deg.
We made the mistake of taking the door apart before we received the replacement parts. After waiting several days, which was fine, the parts arrived. Then we had to figure out how it went back together. My wife and I did it and enjoyed working on it. However....after getting it partly reassembled, we (I) found four extra screws. We took it apart again and then put it back together. Turning the door over we found that the glass assembly had slipped. This meant that we had to take it apart again. This went on two more times LOL. Then the gasket gave us a couple of small fits as well. All in all it was a neat experience. I do suggest, unless you are experienced in appliance repair, to NOT disassemble the door until the parts arrive.
The comments from others on the website were a great help.
Oven door gasket frayed and worn allowing leakage.
Followed the instructions given by Paul from Mickleton, NJ. Very simple, no problem. Using two small blocks of wood to hold spring loaded hinges out while I replaced the door on the hinges was a big help. Thanks for the excellent delivery time. Great service.
George from Mobile, AL
Difficulty Level:
Really Easy
Total Repair Time:
15 - 30 mins
Tools:
Screw drivers
8 of 12 peoplefound this instruction helpful.
Was this instruction helpful to you?
Thank you for voting!
The oven door seal was frayed, due to using oven cleaner.
First I removed 7 screws, using a Philips head screwdriver, to allow access to the inside of the oven door. I then removed several more screws to separate the panel holding the seal so that I could remove it and replace it with the new seal. Once the seal was in place I re-inserted all the screws to the panel and door to complete the repair. The knobs just slipped on to replace the ones that broke and fell off.
The oven that was in out newly purchased house was a JennAir and over 20yrs old. Worked ok, but as with any heating element, the performance wanes over time. I decided to replace the baking and broiling element...and the oven door seal while I was at it. Everything went well, it was a simply remove/replace. Then I bumped the oven door where it was leaning up against the fridge waiting to be reinstalled. Down it fell on the tile floor. SMASH! Tempered glass EVERYWHERE. Got online with PartSelect and ordered a replacement (very reasonable price). It arrived in 2 days...just like the elements. Replacement was easy. Thanks to PartSelect for having the parts in stock and delivering them in record time!
Seal was badly damaged on door of 24 year old range.
Removed two screws near the hinges and removed door and laid it on counter. As we removed screws from each part of the door, we stacked the parts in the order removed. Tossed screws into a shallow pan for safekeeping. Removed old seal and put new one in its place. Reassembled parts in reverse order as I cleaned each one. Put door back on the hinges and the job was done. Would have been a much quicker job, but door had 24 years of dribbles down in it, and needed a good cleaning.
We ordered a new element also, as the old one had blown up. Very gratifying to know there were still parts for my favorite old range.
Gwen from Memphis, TX
Difficulty Level:
Easy
Total Repair Time:
30 - 60 mins
Tools:
Screw drivers
3 of 3 peoplefound this instruction helpful.
Was this instruction helpful to you?
Thank you for voting!
Replace oven door gasket
Much to my horror, what was described as a simple, 15-minute replacement, took 3 days! In order to replace the oven door gasket, I had to disassemble the entire door. Every photo I saw of the gasket showed it as a flexible part: gently pull out the old one and push in the new. What I received in my order had a frame. In order to replace it, I needed to unscrew the door parts. Unfortunately, I made a few rookie errors, primarily because I kept thinking the next screw would release the gasket frame. So I neglected to keep track of the screws I removed, and I didn’t take any photos! I must have used half a roll of masking tape to keep parts together; I did not have 5 hands! When I released everything and nestled in the frame, I had even more trouble replacing all the screws I took out. The majority of holes did not line up. So I just did the best I could, put in as many screws as I could. But after three days of working, I finally finished. It all held together, and the door did what it was designed to do. Really a repair horror. And I am not an incompetent novice!
30 year old stove, w/ completely worn out oven door gasket. Replace grease filter.
First Inserted 2x4x 36" length of wood behind the spring loaded door hinges to ease removing the oven door as I worked alone (this was recommended in a previous post and was essential when working alone, TY). Removed 2 retaining screws on the interior side of the door at the hinge locations. Slid the door up an off the hinges, moved door to a cloth pad protected work bench. Took the door and glass panels apart removing all the related screws, retaining clips; taking note of screws, retaining clip and panel locations for reassembly. Removed the insulation, removed the glass window pack, and removed of all rust fragments (dust) between the 2 glass window panels. The glass window pack metal molding retainer, on the oven interior side of the glass window had completely rusted away. Removed the existing oven door gasket. Cleaned the glass door window pack, and interior side of the oven door surface. Installed the new gasket, which fit very well. Tightened the loose door handle screws. Reassembled in reverse order all door components noted above, and replaced the door onto the hinges, fastened the 2 door hinge screws, removed the 2x4x36" wedge holding the hinges in the open position, and closed the door. Job complete. Thanks to previously posted directions as a good guide. Hope this helps as well.
Fortunate to have the replacement parts available. Wish a replacement door window pack was available, as the double glass, metal edge seal is deteriorating, and the metal molding retainer that held the glass in place is completely rusted away on the oven side of the existing window pack. Plan to find heat resistant caulk to seal the glass in the door, in lieu of the metal molding glass retainer.
Keep searches simple. Use keywords, e.g. "leaking", "pump", "broken" or "fit".
Sorry, we couldn't find any existing reviews that matched. Try using some different or simpler keywords.
★★★★★
★★★★★
Joseph S - October 6, 2022
Verified Purchase
Door Seal worked great
PartSelect helped me to find the part and verify that it would work. Thank goodness for the reviews and posts that told me what to expect and how to replace the part. The only difficulty was some of the screws were really frozen in. Therefore I had to get a special reverse bit (from Ace) to drill out the existing screws and replace them with new screws. So be aware that you might have to get these additional parts to complete the job. There are a lot of screws, but I only had two frozen. But the frozen screws will unexpectantly lengthen the job, unless you are aware.
PartSelect turned out to be more than a parts warehouse. It is a repair coach. Saved me a new stove.
★★★★★
★★★★★
Mike O - June 29, 2019
Verified Purchase
Replacing an oven door seal on a Jenn Air range model S120
The part arrived in good shape. However, the S120 requires you to disassemble the oven door to install the door seal. Be careful when removing the oven door as I popped the door spring off on one side. Replacing the door spring was harder than installing the door seal.
★★★★★
★★★★★
Joyce P - January 21, 2019
Verified Purchase
Easy to install and looks great. Made the app and look brand new.
The part came as described. Was easy to install. The part came on time and great quality.
★★★★★
★★★★★
Richard R - September 4, 2018
Verified Purchase
Repair great. Instructions not so great
Part worked perfectly. Installation instructions are not detailed enough
★★★★★
★★★★★
Odis S - January 24, 2018
Verified Purchase
THE RIGHT SEAL
great fit and yes my stove is back working, hope the door seal will last another 30 years THANK YOU
< Prev
1
Next >
Model Cross Reference
This part works with the following models:
PartSelect Number: PS11757564
Manufacturer Part Number: WPY702338
The Fix App makes it easy to manage all your stuff in one place. Just snap a photo and we'll find and store your user manuals, receipts, and product information in one easy-to-find place!
"Like magic. I took a picture of the model number on my refrigerator, and the app identified it right away … Very convenient. I'm impressed." ★★★★★ - Clever Jeff