This OEM high-limit thermostat kit includes the thermal cut-off fuse and the high-limit thermostat. The purpose of this part is to cut-off power to the dryer when it overheats. Common indications that this part requires replacement are if your dryer will not start, it is overheating, or no heat is coming from the dryer at all. Please note that the manufacturer has made updates to this part so it may look different from the original.
Keep searches simple. Use keywords, e.g. "leaking", "pump", "broken" or "fit".
Sorry, we couldn't find any existing reviews that matched. Try using some different or simpler keywords.
★★★★★
★★★★★
David H - September 15, 2023
Verified Purchase
Easy repair
The part pictured looked as though there was only one part. In my dryer there were 2 sensors close to each other. To my relief both parts were in this package. Thank you for the videos and symptom descriptions to narrow troubleshooting.
★★★★★
★★★★★
James O - August 25, 2021
Verified Purchase
Symptom: Had heat but would not dry
After some research, the "Had heat but would not dry" was listed as the most common failure for this dryer and so got this part (which is actually two parts in the bag and replaced both) and it fixed it. The whole replacement took about 10-15 minutes but longer as I vacuumed all the dust out of the machine too. Fast and easy replacement. Very pleased.
★★★★★
★★★★★
Robert R - March 19, 2021
Verified Purchase
Great Service
Easy to look up parts, Easy to Order and arrived very quickly. Video of how to make repair is done very well for all parts along with trouble shooting information.
Ordered different parts for our dryer and stove. This review covers them all.
One part came in damaged, we called and a replacement was on its way.
Will do business with PartSelect if we need something else although we hope its awhile.
Bob Rayner
★★★★★
★★★★★
Stuart G - February 13, 2021
Verified Purchase
Did not need this part
The part was what was ordered and arrived quickly. However, it was not the part that I needed to fix the dryer. So we are saving it just in case we ever need it. Returning it would not be worth the effort and cost.
< Prev
1
Next >
Customer Repair Stories
Average Repair Rating: 3.3 / 5.0, 18 reviews.
What's this?
Sort by:
< Prev
1
2
Next >
Search filter:
Clear Filter
Your search term must have 3 or more characters.
Keep searches simple. Use keywords, e.g. "leaking", "pump", "broken" or "fit".
Sorry, we couldn't find any existing installation instruction that matched.
My dryer would get hot, but not stay hot enough to dry the average load
1st I unplugged the dryer. I reviewed the awesome blueprint that I printed out of my specific model , which is provided by this great website. I located each area that I would need to make the replacement of parts, by highlighting it on the blueprint. I removed the nut at the dryer light, inside the dryer. Removed the light cover &
... Read more replaced the bulb, put the cover back on, tighten the nut. I removed all the nuts from the back, remove the exhaust tube, removed the rear panel. I realized that the exhausted tube was kind of heavy. It was extremely clogged with lint so thick , I couldn't see through it & it was also holding water that weighed down the exhaust tube. So disgusting !! I immediately went to my HomeDepot to purchase a new 8' foiled exhaust tube & 2 elbow connectors. Installed it & reused the tightening clamps at each elbow . Wasn't expecting any of this in the plan. I realized that this was probably the culprit of the steamy dryer. I put the rear panel on, without installing the other two parts that I purchased. I put at load of wet laundry in the dry & ran it. The load was completely dry in the first cycle. Problem solved. I would like to say that this website gave me the resources, knowledge & confidence to believe that I could make the repair myself & that was the only reason I moved forward to complete the task. In a sense, this company has saved me,my family & our home from a potential fire. So people of the world please take the time to check your air flow visually inside the exhaust tube . Thank You PartSelect ??
Got heat only on start of cycle and no repeat of flame. Suspected coils on gas valve.
I used a multi meter to find coils failed in warmed temperature condition. I tested main switch for different cycle operation. Main switch was worn out inside and not making good contact for soft cycles. This dryer is 25 years old. I chose to replace all the sensors, fuses, ignitor, gas valve coils, cycle switch and thermostat.
... Read more This was cost effective for me, because now, I actually have a good dryer that might just last another 25 years. I might replace the drive belt soon. I'll order from Parts Select. This was easy and fun. Thanks!
The video on partselect was for an electric dryer, mine is gas. The video said to reach the thermal fuse to go in through the back of the dryer but to get to my thermal fuse we had to take the panel on the front lower section of the dryer off. Then after that was taken off, we had to take the big black housing off. The fuse was locate
... Read mored behind the big black plastic housing. Once located, it was easy .
Accessed and removed the rear panel. I replaced the three electrical components with a nut driver and reattached the rear panel. The fix worked, so I have not yet replaced the gas coil sensors at the front of the dryer. The dryer is 19 years old, so the electrical connectors were pretty tight. I used needle nose pliers to pull the con
... Read morenectors free and prevent any damage to the wires. Good Luck.
Gas would not turn on after around 10 minutes of "normal" operation.
I've nothing to add to the techniques already described in the other narratives except that the dryer operated normally at first, but then after around 10 minutes the flame no longer cycled. I suspected a bad high limit thermostat since the valves seemed to be working. I ordered the replacement coils only because they were listed as the
... Read more most common thing to fail. After replacing the T-Stat there was no change; I started checking things w/ a multimeter and found that all the T-Stats were closed. I should have done that at first. Anyway, since I had the new coils I decided to put them in. The dryer has workd perfectly ever since. Lesson to be learned: the coils may check ok when cold, but become inoperable after heating up a bit.
remove back of dryer and install part same as old part was installed
Geri from COUNTRYSIDE, IL
Difficulty Level:
Really Easy
Total Repair Time:
15 - 30 mins
Tools:
Screw drivers, Socket set
2 of 2 peoplefound this instruction helpful.
Was this instruction helpful to you?
Thank you for voting!
took to long to dry/ no heat
after reading your site reviews I bought all 3 thermostat's. It took about 30 minutes (with a coffee break) to change them all out and that saved me $400.00. I popped the lower front pannel off and all three thermostat's were accessable from there. i needed to remove the lent trap and tube which is held on by 2 screws to access the therma
... Read morel fuse and cycling thermostat. there was a lot of lint trapped in the tube. it was a few screws and some spade connectors. very easy repair. as I said above buy all 3 and it saved me $400.00.
Ask our experts a question about this part and we'll get back to you as soon as possible!
20 questions answered by our experts.
Sort by:
< Prev
1
2
Next >
Search filter:
Clear Filter
Your search term must have 3 or more characters.
Keep searches simple. Use keywords, e.g. "leaking", "pump", "broken" or "fit".
Sorry, we couldn't find any existing answers that matched.Try using some different or simpler keywords, or submit your new question by using the "Ask a Question" button above!
Carol
March 12, 2019
No heat comes on when using timed dry or air fluff. Heat works on and off on automatic dry setting, sometimes there is hot air and sometimes it's cold air so it takes a long time for clothes to dry because i never know when heat is working in dryer.
For model number MGDC200XW2
Hello Carol, thank you for contacting us. The Thermal Cut-Off Fuse part PS12070444 may fix this issue, but there are three more likely parts before it. Internal-Bias Thermostat part PS11741405, the Igniter Kit part PS334180, or the Radiant Flame Sensor part PS11741429, in that particular order. We hope this helps.
9 people found this helpful.
Was this helpful?
Thank you for voting!
RON
April 17, 2018
I have a Kenmore gas dryer. It starts to heat once you turn it on. At 60 minutes. Will heat for about 5 to 8 minutes. Then the heat will shut off and not come back on. Just tumble and no heat.
For model number 110.70022010
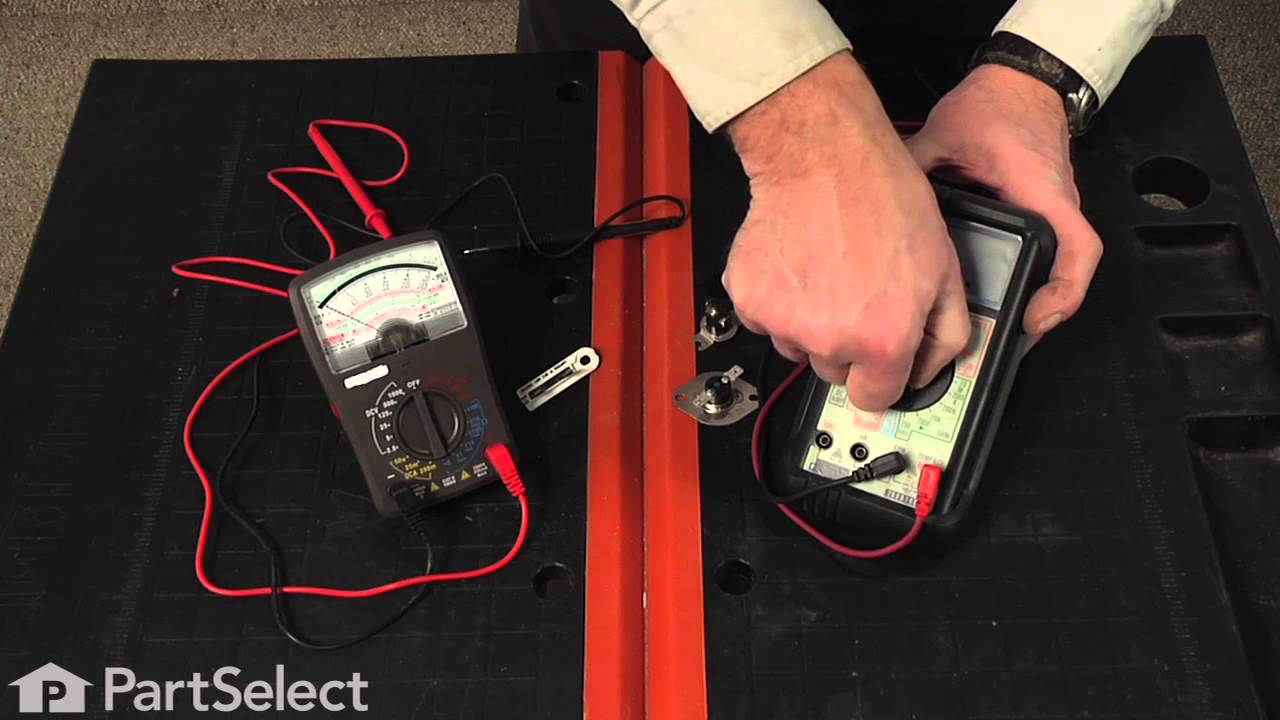
Hello Ron, thank you for your question. It sounds like you have an issue with a thermostat or the thermal fuse. I would recommend testing the following parts with an ohm meter. Thermal Fuse Part Number: WP3392519, Thermostat, Internal-Bias Part Number: WP3387134, and the High Limit Thermostat W11050897. Set your multimeter to the R X 1 setting. Take each of your meter's probes and touch one to each terminal. You are testing for continuity, and you should receive a reading of either zero or infinity. At room temperature, testing the thermostat should produce a reading of zero. But if a thermostat is tested when it is heated to its limit, a reading of infinity should be produced. We strongly recommend that you test your thermostat at room temperature. If the test you conduct with your thermostat does not produce these results, then you should replace the component. I hope this helps. Thank you and have a great day!
5 people found this helpful.
Was this helpful?
Thank you for voting!
Kevin
December 6, 2018
My dryer will stop running after a few minutes. The heat seems to work but when it stops running, it won’t turn back on until i let it sit for a while. I am not sure what might be needed to fix this. Maybe just the thermal fuse? Maybe something else?
For model number LGN2000JQ2
Hello Kevin, thank you for your question. It definitely sounds like a thermostat, or thermal fuse issue. I would recommend testing part number Part Number: WP3392519 Fuse and Part Number: WP8318268 internal bias thermostat first. You should see a reading of close to 0 ohms on a multimeter if the thermostat has continuity. I have included a video on how to test dryer parts with a multimeter, the principle is the same for the thermostat. If the thermostats are tested and are fine, we would recommend testing/replacing the igniter and gas coils. I hope this helps!
https://www.youtube.com/watch?v=JvI84Qa8Jc4
4 people found this helpful.
Was this helpful?
Thank you for voting!
Robert
January 18, 2019
Dryer will not start or run . Could it be this fuse
For model number LGR7646Eq3
Hello Robert, thank you for your question. There are a few parts we would recommend testing to determine what the issue is. The following parts can be tested with an ohm meter. Part Number: WP3392519 thermal fuse, Thermostat, Internal-Bias Part Number: WP3387134 and Door Switch - 3 Wire Part Number: WP3406107. If the thermostats are tested and are not found to be defective, check the flame sensor, igniter, gas coils and valve. I hope this helps!
4 people found this helpful.
Was this helpful?
Thank you for voting!
Tom
June 19, 2019
Your video says to test parts with a multi-tester. Is there a video that shows you how to use the multi-tester, do you do it with the appliance plugged in?
For model number mgd56ootq0
Hi Tom, thank you for your question. No the appliance has to be unplugged. We do have a link to a video that should help you here: https://www.youtube.com/watch?v=bWC44fHn0As. Good luck with your repair.
2 people found this helpful.
Was this helpful?
Thank you for voting!
Andre
July 29, 2019
My timer wouldn't advance i replaced the timer switch it worked fine for two days now can't plug dryer in or it pops breaker on perm press on low setting it starts then pops breaker i've replaced the breaker and still not working
For model number LGR3634EW0
Hi Andre, thank you for your question. When you are experiencing an issue like this there are a few parts that you will have to test to determine what is causing your issue. For all of these parts you can test them with a multi meter. First you will have to test your thermostats and thermal fuses to make sure they are all functioning correctly. After that you will want to test parts in this order, your m series coils, igniter itself, or your radiant flame sensor. You may also want to check your regulator just to make sure that part is functioning properly as well. Something else you should also check would be your filter and ducts. Make sure there is absolutely no blockage that would restrict air flow in your appliance. I hope that helps. Good luck with your repair.
Was this helpful?
Thank you for voting!
Brian
August 30, 2019
The igniter lights and Flame comes on for 10 seconds than shuts off and dryer continues to run. Sometime it shuts off and get e1 code. Any suggestions. All vents are clean. Etc.
For model number 11071084000
Hi Brian, thank you for your question. When you are experiencing an issue like this there are a few parts that you will have to test to determine what is causing your issue. For all of these parts you can test them with a multi meter. First you will have to test your thermostats and thermal fuses to make sure they are all functioning correctly. After that you will want to test parts in this order, your m series coils, igniter itself, or your radiant flame sensor. You may also want to check your regulator just to make sure that part is functioning properly as well. Something else you should also check would be your filter and ducts. Make sure there is absolutely no blockage that would restrict air flow in your appliance. I hope that helps. Good luck with your repair.
Was this helpful?
Thank you for voting!
James
September 5, 2019
My dryer wouldn't heat up. I tested the thermal fuse and it had power. I did find that one part that was up and to the right of the thermal fuse didn't get power. There are 2 parts with 2 plugs each and the part that didn't work was the upper part with 2 plugs. It was some kind or non reusable part. Can you tell me the name of this part.
For model number 11071202010
Hello James, Thank you for contacting us. I have researched the model you have provided and have found the part you are looking for is , Thank you for contacting us. I have researched the model you have provided and have found the part you are looking for is PartSelect Number PS11741460 for the one time use Thermal Fuse. It is a different fuse from the one in the Thermal Cut off kit. Hope this helps!
Dryer will heat and run cycle. It will not run again until it cools off... or you hand spin the drum and here a click and it will restart. also dryer is getting to be a little loud and squeaky.. any thoughts.. thanks tracie
For model number WGD6200SW1
Hi Tracie, it does sound like the thermal fuse needs to be replaced. Thank you for your question and good luck with your repair!
Was this helpful?
Thank you for voting!
Zeke
December 11, 2019
No heat on my dryer
For model number kenmore #110.74972300
Hello Zeke, thank you for your question. There are a few parts we would recommend testing first. The thermostats Dryer Thermal Fuse Part Number: WP3392519, Thermostat, Internal-Bias Part Number: WP8577274, Thermal Cut-Off Fuse Kit Part Number: W11050897 should be tested first, and if they are fine, the igniter, flame sensor and the coils should be tested next. I hope this helps!
Was this helpful?
Thank you for voting!
< Prev
1
2
Next >
✖
Ask a Question
Ask our experts a question on this part and we'll respond as soon as we can.