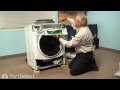
Also known as a door boot seal.This part is used to keep the clothes inside the tub during the wash cycle. The folds in the bellow allow the tub to move separately from the door during the spin cycle.
How Buying OEM Parts Can Save You Time and Money
Part Videos
Replacing your Kenmore Washer Front Load Washer Bellow - Gray
Keep searches simple. Use keywords, e.g. "leaking", "pump", "broken" or "fit".
Sorry, we couldn't find any existing reviews that matched. Try using some different or simpler keywords.
★★★★★
★★★★★
Cynthia P - February 4, 2023
Verified Purchase
Excellent! Any Woman could Do This!
I'm a single mom and do everything on my own. I received my product so quickly and was so excited because I didn't want to have to go to the laundromat to get our clothes clean. Once I was finally able to reach the bolts under the front of my machine (had to order a few tools off amazon to get it done, not big deal, all very inexpensive) the process was rather simple. I watched the extremely helpful YouTube video, pausing and playing, pausing and playing, several times. Task accomplished!! Have washed several loads since with zero leaks! Yay! Thank you PartSelect! You really saved me $$! And added another notch of confidence to my "Girl Power"!
★★★★★
★★★★★
Michael R - August 21, 2021
Verified Purchase
Worked great!
The correct part, received quickly. I liked up a you tube video, followed along, and had the replacement part installed in less than 2 hours. It has been several weeks now, and it is still working great, so I feel successful!
★★★★★
★★★★★
Dick A - November 17, 2020
Verified Purchase
great easy product
Much better than I expected
★★★★★
★★★★★
Moriarty M - August 6, 2020
Verified Purchase
Easier replacement than it first appears
I was not only able to replace a totally disgusting door seal and revive an inherited washer instead of replacing it, I also found that there was somehow a sock tangled up in the soap dispensing tubing and was able to remove it.
I saved a ton of cash AND prevented future problems in a single afternoon, 100% recommended.
(and I learned that replacing a spring-based seal CAN be done without specialty tools, after I found a video showing a "line up the wire and use pliers to pull the spring to the side" technique!)
★★★★★
★★★★★
Greg W. R - January 30, 2020
Verified Purchase
Quality Part and Good Instructions
The part was factory quality and fit perfect. I've been around the horn with appliances, but the instruction video was SUPERB! The instructor was pleasant, no attitude, and just a quiet this is how we do it. The tips and suggestions guided me and I had absolutely no hassles. Thank you for the excellent service. BTW, it was also a good time to clean out the stinky drain pump strainer.
★★★★★
★★★★★
Alyson E - September 23, 2019
Verified Purchase
Disappointed
Absolutely didn’t fix the problem we were hoping to solve: A constantly wet, permanently mildewed gasket. This new one fits just fine, and of course started out clean, but doesn’t drain AT ALL. So we we left we a small lake of water to drag all our clean clothes through on the way out of the water every time. And if we don’t sacrifice a towel to soak up all the water after every wash, guess what? Mildew. Problem. Not. Solved. Should have kept my money and kept the old gasket.
★★★★★
★★★★★
David T - June 4, 2019
Verified Purchase
Perfect fit
Nice part. Door seal area seems to be improved over the original. Installation video was spot on except the cabinet seal. Very, very difficult to work the wire band around the seal while trying to stretch the spring.
★★★★★
★★★★★
Timothy B - May 7, 2019
Verified Purchase
Part works great.
It was harder than expected to stretch onto its lip, but now my washer does not leak and does not stink.
★★★★★
★★★★★
Peter W - April 3, 2019
Verified Purchase
Relatively easy fix - good video to follow
The part (bellow) is good quality and arrived quickly. Installation, in fact, requires an inner clip and an outer clip. I ordered the inner clip when I ordered the bellow. (Had to call when the bellow arrived, to find out that this clip was being shipped separately several days later - a little frustrating).
I had incorrectly assumed that the other (smaller) outer clip would come with the bellow. It didn't, so, given the choice of further delay, I decided to reuse the old clip from the old, failed bellow. It worked ok but was hard to fit since the old clip spring was hardened from several years on the machine. Good practice would be to replace both clips along with a new bellow - would be helpful to know this when ordering.
★★★★★
★★★★★
Brian V - January 28, 2019
Verified Purchase
Easy repair
Quick fix
< Prev
1
2
Next >
Customer Repair Stories
Average Repair Rating: 2.7 / 5.0, 16 reviews.
What's this?
Sort by:
< Prev
1
2
Next >
Search filter:
Clear Filter
Your search term must have 3 or more characters.
Keep searches simple. Use keywords, e.g. "leaking", "pump", "broken" or "fit".
Sorry, we couldn't find any existing installation instruction that matched.
When washing there was a water leak
I simply followed the video instructions which was presented very clear and the video shots was on point
Much easier than I thought. Watched the video a few times.The front control panel gave me a little fight which the video edited that part out And the spring clamp reinstall took the most time.There must be a tool for that??
Watched your video worked great just like video showed
Terry from MCCOOK, NE
Difficulty Level:
Really Easy
Total Repair Time:
30 - 60 mins
Tools:
Nutdriver, Pliers, Screw drivers
2 of 2 peoplefound this instruction helpful.
Was this instruction helpful to you?
Thank you for voting!
Leaking
Followed the video except to use clamps to hold the Bellow To Front Panel Clamp in place while I worked the clamp around the from of the Bellow. I used a plastic pry tool in place of the suggested screw driver to pry the control panel off.
Easier if you block up front feet on 2x4 blocks. remove bottom front panel. Remove detergent dispenser tray. Remove top front panel. On door remove large round retainer clamp to bellows. (Pop off with screwdriver.) Remove door. Remove inner bellows clamp. Use phillips screwdriver to loosen it. If the input water filler hose is in
... Read more the way, pull it out, but don't forget to put it back on or a flood will ensue!! Replace by doing everything in reverse order.
Read less
Joseph from EAST SYRACUSE, NY
Difficulty Level:
Easy
Total Repair Time:
30 - 60 mins
Tools:
Nutdriver, Screw drivers
2 of 3 peoplefound this instruction helpful.
Was this instruction helpful to you?
Thank you for voting!
Leaking bellow on my front loader..
Followed the most helpful video.with some system differences. Had quite a bit of fitment challenge with the inner bellow sealing process...finally used dish soap to help 'stretch' the thing on.Works fine now thanks.
Used suggestions on list - water to lubricate bellows and an extra hand to secure the bellows. Biggest challenge was seating the bellow that attaches to the rim of the outer tub. After getting the bellow lip seated the rest was fairly easy including the bellow seat that secures to the outer door assembly. Unfortunately, it doesn't appear
... Read more that the bellow was the problem even though the symptoms - leaking under the door - was the same as noted on the list of problems. Had to order the dispenser-to-tub hose as that looks to be the problem (had to contort to follow the leak all the way up to the hose).
Read less
Randy from ELLENSBURG, WA
Difficulty Level:
A Bit Difficult
Total Repair Time:
1- 2 hours
Tools:
Screw drivers
1 personfound this instruction helpful.
Was this instruction helpful to you?
Thank you for voting!
Water leaking from front glass of washer
The removal of the bellows was easy and quick. The instructional video was really good. Only one problem with video. The step of removing the console from washer leaves out that there is a center screw in the center of console. I almost broke the console. It took took a long time in getting bellows on interior area due to tight finger sp
... Read moreace. Wire gasket fairly easy. The outer gasket after getting door and latch on. Whew! That was a bear. Video looked easy. I finally had to get help to get it on. The reason was that every time I thought I had it, the bellows would roll off will the wire gasket. A screw type as the inner area would make it so much easier. Shipping. Kudos to your company. I was expecting that I would be without washer for a week. I ordered on a Friday and it was here early Monday morning. That was amazing. By the way I did this except the outer wire gasket by myself. I finally had to get "husband" to help with that. Thanks Parts Select! If the need arises that I need another part. You will be my go to company.
Read less
Rene from Liberty, NC
Difficulty Level:
A Bit Difficult
Total Repair Time:
More than 2 hours
Tools:
Nutdriver, Screw drivers
0 of 1 peoplefound this instruction helpful.
Was this instruction helpful to you?
Thank you for voting!
My Epic Z is only three years old but started to leak at the bottom of the washer door for no obvious reason. Before replacing the bellow, I suggest you make sure the door latch is not loose and also make sure the star driver screws that secure the glass in the door are all snug (do not overtighten)
Since most people do not replace bellows for a living, I have great instructions for you to follow. I found the entire repair manual on the web.Just follow the repair instructions as written. Two other suggestions, use a very small amount of liquid diswasher soap to lubricate the bellow when fitting it over the washer drum assembly, makes
... Read more life a lot easier. Second, get a second pair of hands to help you hold the bellow in place as you mount it or you will find yourself "chasing your tail". Bellow replacement and tightening the door and latch fixed the problem. Mom was happy :)...PS the buying experience from PartSelect , part delivery, speed was perfect!
Read less
Robert from Charlotte, NC
Difficulty Level:
A Bit Difficult
Total Repair Time:
30 - 60 mins
Tools:
Nutdriver, Screw drivers
53 of 56 peoplefound this instruction helpful.
Was this instruction helpful to you?
Thank you for voting!
Water leak from bottom of door.
I discovered water leaking from the bottom of the door on our Kenmore front load washer. I did a little self diagnosis from the internet and found that this seems to be a common problem for front load Kenmore washers and that the ususal suspect is the large rubbery bellows. I examined the bellows on my washer and although I didn't find
... Read moreanything wrong with it, I couldn't find any other likely causes. I shopped around and found PartSelect to be the cheapest for the replacement part. Removal is easy by removing the lower front panel with three small screws on the bottom front, then remove the very top panel and then the top front control panel and finally the door panel. the bellows are actually held in place with a spring loop on the outer and a screw tightener on the inner, both are fairly easy to remove and the bellows comes right off. For installation my best advice is to lube the bellows with a small amount of dishwashing soap in the groove that fits on the washer tub. This will help it slide into place and enables a small amount of sliding fine tuning once it is on. From there it is just a reverse of the removal.
Read less
Marty from Belfair, WA
Difficulty Level:
Easy
Total Repair Time:
30 - 60 mins
Tools:
Nutdriver, Pliers, Screw drivers
200 of 221 peoplefound this instruction helpful.
Was this instruction helpful to you?
Thank you for voting!
< Prev
1
2
Next >
Questions and Answers
Ask our experts a question about this part and we'll get back to you as soon as possible!
16 questions answered by our experts.
Sort by:
< Prev
1
2
Next >
Search filter:
Clear Filter
Your search term must have 3 or more characters.
Keep searches simple. Use keywords, e.g. "leaking", "pump", "broken" or "fit".
Sorry, we couldn't find any existing answers that matched.Try using some different or simpler keywords, or submit your new question by using the "Ask a Question" button above!
Cassie
April 2, 2018
Hello, my washer is leaking from what appears the front and water is dripping down into the drawer below. We only notice this with heavier loads like towels. Is it likely the bellow is the concern given that it doesn't leak with lighter loads? Thanks for your advice!
For model number WFW8300SW04
Hello Cassie, thank you for your question. If there is any leak from the front of the door the bellow is the culprit. It may only happen on larger or heavier loads now, but will probably progress to leaking all the time. I would suggest replacing the Bellow - Gray WPW10111435. Good luck with your repair!
22 people found this helpful.
Was this helpful?
Thank you for voting!
Bill
December 3, 2017
Our machine is dripping water on the inside. When you remove the bottom panel there is a cement counterweight and the water is dripping down the back of the counter weight into the base of the machine. Is this the part that will solve that leak?
For model number WFW8300SW00
Hi Bill,
Thank you for your question. You would likely have to try and figure out where your leak is coming from. It could be coming from your bellow but it could also be coming from the tun gasket. I would suggest letting your appliance dry out a bit. Maybe open it up so that you can see the inside. Take a little bit of water, pour it over your bellow and see if there is a leak. If there is not, pour some of the water into your tub and spin it around for a minute or so. See if there is a leak. I hope that helps. Good luck with your repair.
My washer boot is black with mold. I saw the replacement part number: Wpw10111435; but i didn't see the number that is listed on my washer (8540903). The closest was 8540954. The serial number of mine is: Hlt1677748 (about 11 years old. I bought the floor model when i moved here.) please let me know if this indeed is the appropriate boot for my old washer. Many thanks. Kimme
For model number WFW8300SW00
Hi Kimme,
Thank you for contacting us. Based on the model number you provided, the bellow you have referenced in your question is the correct part for your appliance. I hope this helps. Thank you and have a great day!
3 people found this helpful.
Was this helpful?
Thank you for voting!
Alexander Pries
January 12, 2018
Hi there, we have a Kenmore front loading washer that leaks a small amount of water into the metal frame at the bottom. I removed the kickplate and noticed that the water is dripping from the backside of the bottom concrete counterweight. I also noticed that the water only seems to drip during the high spin portion of the washing cycle. During normal agitation, there seems to be no leakage or maybe just holdover drips from the high spin phase. Is replacement of the door bellow the most likely solution or could there be another faulty part? I ask because i had previously replaced the door bellow about six months ago and have noticed no leaks until recently. Thank you!
For model number Kenmore 110.47511702
Hello Alexander, Thank you for your inquiry. You can pull the bellow out and check for any rips or tears. Check the drain hoses and tub to pump hose as well. The other parts that could cause this issue are the drain pump, the water inlet valve and the tub assembly. Hope this helps!
3 people found this helpful.
Was this helpful?
Thank you for voting!
Kally
January 31, 2019
Hi i was wondering which gasket seal for the door replaces my model washing machine. Thank you
For model number MHWZ400TQ01
Hello Kally, thank you for your question! PartSelect Number PS11748353 is the correct part for your model. Good luck with your repair!
2 people found this helpful.
Was this helpful?
Thank you for voting!
Alix
August 26, 2019
Hi, I have the Whirlpool WFW8300SW00, is this bellow compatible with my washing machine? Thanks.
For model number WFW8300SW00
Hi Alix,
Thank you for your question. Yes, this would be the correct bellow for your washer. I hope this helps. Thank you and have a great day!
2 people found this helpful.
Was this helpful?
Thank you for voting!
Miriam
December 12, 2019
My washer is leaking from the bottom of the door and I'm assuming this is the part I would need to fix it? Will it fit my model. Serial # hlu429267.
For model number 11047532602
Hello Miriam, thank you for the question. With leaking at the door, in most cases the Front Load Washer Bellow - Gray, PartSelect Number PS11748353 will need to be replaced. Hope this helps!
1 person found this helpful.
Was this helpful?
Thank you for voting!
Jason
November 21, 2021
Hi, my washer leaks and the drips seem to come from the bottom from behind the front panel. I believe it's the boot but I was wondering why it leaks more when I run an empty load. When I do a clean the washer cycle and there are no clothes it leaks a large volume of water. Could this still be the boot leaking?
For model number WFW8300SW02
Hello Jason, thank you for your question. We have researched the model you have provided, and we would suggest the Washer Bellow, part number PS11748353 or the Water level Switch, part number PS11749322. To test the water level switch, unplug the washer and remove the switch. You can test it with a multimeter. Set your multimeter to the lowest ohms of resistance and test your switch. If it does not read any continuity, then your switch is indeed faulty. We hope this helps.
My washer leaks when on normal on any mode. It leaks in the front corners.And into the drawer. I have to put rags on the front corner to soak up water. I'm thinking that it is the seal of the washer? Could that be it.
For model number WFW8400TW02
Hi Chelsea, Thank you for the question. I suggest replacing or checking for damage on the Bellow, PartSelect Number PS11748353. It may have just come lose. At times it can get pinched or split and will need to be replaced. Hope this helps!
1 person found this helpful.
Was this helpful?
Thank you for voting!
Charles
January 30, 2023
The bellows on the front load washing machine is leaking. This is a stacked washer & dryer combo unit. Do I need to remove the dryer on top the washer to remove panels and access the bellows for replacement?
For model number WFW8300SW02
Hello Charles, Thank you for writing. Yes, the dryer will need to be removed to access the panels to remove then and replace the Bellow. We hope this information helps!
1 person found this helpful.
Was this helpful?
Thank you for voting!
< Prev
1
2
Next >
✖
Ask a Question
Ask our experts a question on this part and we'll respond as soon as we can.