This broil element is found on the roof of the oven. The broil element is at the top of the oven and supplies the heat to broiling. 14" x 15" with 1-3/8" inserts.
This part works with the following brands: Whirlpool, Roper, Admiral, Maytag, Hardwick, Jenn-Air, Estate, Magic Chef, Crosley, Inglis, Norge, Modern Maid, Amana, Kenmore, KitchenAid, Caloric.
How Buying OEM Parts Can Save You Time and Money
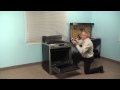
Part Videos
Replacing your KitchenAid Range Element, Broil
Troubleshooting
This part fixes the following symptoms:
Element will not heat | Little to no heat when broiling | Little to no heat when baking | Oven not heating evenly
This part works with the following products:
Range, Wall Oven, Microwave Oven Combo.
This part works with the following products:
KitchenAid, Crosley, General Electric, Maytag.
Part# WP9760774 replaces these:
AP6014070, 8301514, 9760774
Customer Reviews
Average Rating:
★★★★★
★★★★★
25 Reviews
4.6
Filter By Rating:
5 Stars
19
4 Stars
3
3 Stars
2
2 Stars
1
1 Star
0
Sort by:
< Prev
1
2
3
Next >
Search filter:
Clear Filter
Your search term must have 3 or more characters.
Keep searches simple. Use keywords, e.g. "leaking", "pump", "broken" or "fit".
Sorry, we couldn't find any existing reviews that matched. Try using some different or simpler keywords.
★★★★★
★★★★★
K Dennis M - December 23, 2023
Verified Purchase
perfect recommended part
I originally ordered the wrong item, which was returned for a full refund. PartSelect recommended this part, which I ordered and installed. I did not realize how bad the oven has gotten until the new element was installed. Now baked goods turn out as expected instead of overcooked on the outside or dry due to longer cook times with the broken element.well that usk
★★★★★
★★★★★
Thomas S - January 23, 2023
Verified Purchase
Followed the videos and fixed it
Easy fix. You just have to be limber.
★★★★★
★★★★★
Alex H - September 18, 2022
Verified Purchase
Broiler element
just right
★★★★★
★★★★★
Cory M - September 10, 2022
Verified Purchase
Easy repair!
Broiler element fit perfect and works great in our Kitchen Aid stove. Easy to just unscrew old part from inside oven and screw in the new part. My 18 year old son did it in about 5 minutes.
★★★★★
★★★★★
Nicholas K - February 24, 2022
Verified Purchase
Repair was relatively easy but accessibility difficult.
Back in working order
★★★★★
★★★★★
Peter P - February 6, 2022
Verified Purchase
great part worked as expected......sorta
the part was fine, however, not being an expert on oven repairs, i missed one problem. the outer element of the element I replaced was burned through. after replacing the whole unit the inner unit worked fine but the outer unit did not work at all. is there a reset to fix this problem? any help would be greatly appreciated.
★★★★★
★★★★★
Jack F - July 10, 2021
Verified Purchase
Great service and exactly what was required
The fact that I could have the part here before the repairman saved both time and money.
Good job.
★★★★★
★★★★★
Wayne B - June 1, 2021
Verified Purchase
Received very fast
Perfect condition and worked great
★★★★★
★★★★★
Juan M - December 7, 2020
Verified Purchase
Just in time
Event blue a few days prior to thanksgiving and parts select had the part and got it to me in time for dinner.
★★★★★
★★★★★
Eva F - September 17, 2020
Verified Purchase
Easy to install, working great
Arrived fast in great condition
< Prev
1
2
3
Next >
Customer Repair Stories
Average Repair Rating: 3.6 / 5.0, 14 reviews.
What's this?
Sort by:
< Prev
1
2
Next >
Search filter:
Clear Filter
Your search term must have 3 or more characters.
Keep searches simple. Use keywords, e.g. "leaking", "pump", "broken" or "fit".
Sorry, we couldn't find any existing installation instruction that matched.
burnt out element
good, used tie wire with a hooked end to fish one wire out of the back, to keep from removing the oven
Bruce from ELKTON, OR
Difficulty Level:
Easy
Total Repair Time:
30 - 60 mins
Tools:
Screw drivers
1 personfound this instruction helpful.
Was this instruction helpful to you?
Thank you for voting!
Oven upper heating element went out.
Turned the breaker off to the stove. Removed 4 screws holding the element in place. Disconnected the electric connection from element. I had to replace the screws which were corroded. Connect the new element electric connection. Replace the 4 screws. Turn on the power. Turn on oven to burn off the smell
... Read moreof the new element. You are done.
Read less
Lewis from WICHITA, KS
Difficulty Level:
Really Easy
Total Repair Time:
30 - 60 mins
Tools:
Screw drivers
1 personfound this instruction helpful.
Was this instruction helpful to you?
Thank you for voting!
Burned out broiler element
The Youtube videos for this particular repair, using part number PS11747304, indicated that the whole oven unit should be pulled out of the wall while working on it, and the electrical clips removed and re-attached from the back.
Because I was doing this as a one-man job, and didn't have anything to place the oven on while work
... Read moreing, I turned off the circuit breaker, and performed the entire element replacement from the front.
1. I was very careful after unscrewing the 4 mounting screws (two in the back, two on the top) to gently pull the attaching wires while still attached to the old element.
2. I had 4 mini vice-grips that I clamped (gently) on the insulation of the 4 wires before detaching them from old element. The vice grips prevented the wires from disappearing to whence they came.
3. After completing the old element removal, I replaced it with the new element, attaching each wire where they had been attached to old element, only then removing the corresponding vice grip.
4. With all 4 wires reattached, I carefully pushed the element ends back into the back of the oven... also avoiding the protruding temperature sensor. The element needed to be held in place by hand until the first overhead screw could be re-screwed.
5. The most difficult part of the procedure was actually getting the screws to line up with their holes in the oven body. .. Returning the screws in fact took about half the 30 minutes the whole job took, because their alignment wasn't "keyed" such that the holes easily just lined up. My order was "Top right" - "Back Left", "Top Left", "Back Right".
Once the 4 screws were all satisfactorily tightened back in place, I turned the breaker back on, and hit the pre-heat function on the oven... It smoked a very little (my hands may have been a bit oily) but that quickly dissipated, and the job was complete. I am very thankful that I didn't have a professional come out. My baker wife has used the oven 10-20 times since then, and it seems as good as new.
Read less
Brian from SEATTLE, WA
Difficulty Level:
Easy
Total Repair Time:
30 - 60 mins
Tools:
Screw drivers
6 of 7 peoplefound this instruction helpful.
Was this instruction helpful to you?
Thank you for voting!
Broiler quit broiling
Turned off circuit breaker to oven Removed oven door Removed screws of reflector plate and top and back of oven Gently pulled element out and down slightly Removed slide crimps on wires Replaced reflector plate on new element Connected slide crimps on wires Screwed reflector plate with new element to to
... Read morep and back of oven Done. Total time 22 minutes Tested and it’s perfect!
Remove the oven from the wall Remove the rear panel Remove the 2 bottom panels Lift and fold back the insulation Remove the element enclosure Replace the element Reverse the steps to assemble
* the oven would not preheat and the top elements were working
ROBERT from BISMARCK, ND
Difficulty Level:
A Bit Difficult
Total Repair Time:
1- 2 hours
Tools:
Nutdriver
2 of 2 peoplefound this instruction helpful.
Was this instruction helpful to you?
Thank you for voting!
The broiler unit needed to be replaced
I was stopped by the third screw on the roof of the oven, which was slightly rusted and would not budge in spite of using WD40! I had to enlist the aid of my son who arrived with better tools, including a SQUARE phillips head socket set. He also had to spend some time pinching and slightly reconfiguring one of the attachments in the bac
... Read morek which did not slide together naturally. So, for an 82 year old retired housewife this was not as simple as it looked, but it was a piece of cake for guys like Erik with the know-how and the proper tools!
Read less
Connie from SAN RAFAEL, CA
Difficulty Level:
A Bit Difficult
Total Repair Time:
15 - 30 mins
Tools:
Pliers, Screw drivers, Socket set
1 personfound this instruction helpful.
Was this instruction helpful to you?
Thank you for voting!
Heat element needed replacing
Repair was really simple. Saw that the outer shielding on the existing heat element had degraded and ordered a new element. Part was shipped to my house in two days. Actually took me longer to get the oven door off than to replace the element because the left bracket on the door was slightly bent. Element came out after removing 4 scre
... Read morews and disconnecting 4 wire terminals. I was able to do the repair inside the oven and did not have to pull it away from the wall as the wires were long enough to pull through. I used some painter's tape to tape down the disconnected wires so they would not fall back behind the oven. Then I used a needle-nosed pliers to slightly crimp the wire terminal to the heat element and screwed in the four screws. That was it! Never did this type of repair before and it was really easy. Also estimate that for my 20-25 minutes of work I probably saved over $200 in parts and labor if I hired someone to do it.
Read less
Michael from ARLINGTON HTS, IL
Difficulty Level:
Really Easy
Total Repair Time:
15 - 30 mins
Tools:
Pliers, Screw drivers
1 personfound this instruction helpful.
Was this instruction helpful to you?
Thank you for voting!
Broil element burned out/temp sensor questonable
I followed instructions from the videos provided on the Part Select site. As with many such appliances, parts are interchangeable between brands. this unit is a KitchenAid but Whirpool,Kenmore parts interchange...Access from the front is all that's needed however and the only tool required was a phllips head screw driver...the only nega
... Read moretive surprise (which the video warned about but I ignored) was the risk of the element leads drawing back through the holes, which 2 did. Save yourself that trouble by securing the wires to the back oven wall with a small strip of duct tape until you're ready to re-attach them to the new element. This necessitated removing the oven entirely for access to the back; the most time consuming aspect being removing/replacing what seemed like 20 odd screws holding the back cover in place! If not for that mistake, entire job would have been under 30 minutes. Well worth the effort and would do it again!
Removed oven door for easy access. Removed 4 phillip head screws that held broiler element from top of oven. pulled wires a couple of inches out from back of oven and used flat screw driver to help separate the wires connecting the broiler from the oven. Did the opposite to install the new element,. The best part of this operation
... Read morewas the fact that the part arrived from Part Select by Fed X the next day after ordering it all for a shipping cost of $8.75. Great Service Highly recommend Part Select.
Read less
Ronald from DAVIS, CA
Difficulty Level:
Really Easy
Total Repair Time:
30 - 60 mins
Tools:
Pliers, Screw drivers
4 of 4 peoplefound this instruction helpful.
Was this instruction helpful to you?
Thank you for voting!
Replace Broiler Element on a slide in range
Using the video from PartSelect I followed the steps shown. Sliding the range out was difficult so I tilted it forward resting the frame on a 5 gallon plastic bucket. I did have to crimp on a new terminal. The repair was straightforward.
Richard from EUGENE, OR
Difficulty Level:
A Bit Difficult
Total Repair Time:
15 - 30 mins
Tools:
Screw drivers
1 personfound this instruction helpful.
Was this instruction helpful to you?
Thank you for voting!
< Prev
1
2
Next >
Questions and Answers
Ask our experts a question about this part and we'll get back to you as soon as possible!
10 questions answered by our experts.
Sort by:
< Prev
1
Next >
Search filter:
Clear Filter
Your search term must have 3 or more characters.
Keep searches simple. Use keywords, e.g. "leaking", "pump", "broken" or "fit".
Sorry, we couldn't find any existing answers that matched.Try using some different or simpler keywords, or submit your new question by using the "Ask a Question" button above!
Yvonne
October 2, 2017
Range broil element has bent downwards on the front. It still glows but it looks like it melted somewhat and has slight bubbles on the front end, I tried to bent it back up as far as I could. Now to replace this element will the whole built in oven unit (electric oven on bottom and microwave attached on the top) have to be removed from the wall? Or can the broiler element be replaced from the inside of the oven? Please advise. Thank you.
For model number KEMS308SSS05
Hi Yvonne, Thank you for the question. Yes you have to remove the oven from the wall in order to access the wires and connections in the back. Hope this helps!
6 people found this helpful.
Was this helpful?
Thank you for voting!
Bruce
November 22, 2017
How do you connect the wires to the broiler heating element for a double wall oven inside a cabinet? Do you have to pull out the oven to access the back?
Hi Bruce,
Thank you for your question. There is a video listed with the broil element on our website that you may reference on how to install it. I hope this helps. Thank you and have a great day!
2 people found this helpful.
Was this helpful?
Thank you for voting!
Charles
January 15, 2020
Does the top oven of a double oven unit have to be removed from it’s insert, just as a free standing unit has to be pulled out from the wall?
For model number KEBS208SSS04
Hello and thank you for writing.
Yes, it does you are correct. For access to the wires of the element, you will need to pull the appliance out from the wall. We hope this helps. Please contact us anytime if you require further assistance.
2 people found this helpful.
Was this helpful?
Thank you for voting!
Ruth
May 31, 2019
The video you have provided for this part has the person take out the stove from the wall to do a few things in the back. How would it work for a wall oven.
For model number KEMS308SBL00
Hello Ruth, Thank you for the question. The wall oven will also need to be removed from the wall. Hope this helps!
1 person found this helpful.
Was this helpful?
Thank you for voting!
Charles Shackleford
March 2, 2020
Can this element be changed out from inside or will the oven have to be removed to get to the electric wires to connect the 4 connectors?
For model number KEBS208SSS04
Hello Charles, thank you for your question. Per the installation video on our site of that part you would have to access the back to remove the electric wires that connect to the unit. I hope this helps.
1 person found this helpful.
Was this helpful?
Thank you for voting!
Victor Agresti
December 10, 2021
When baking do both elements heat up,my oven takes forever to heat up coil never gets red
For model number KEBK171SSS4
Hi Victor,
Thank you for your question. When the bake cycle is in use for most electric ovens, both the bake and broil elements will regulate the temperature inside the oven. If the oven is not heating correctly the issue may be with the oven sensor. The oven temperature sensor is the part that monitors the oven temperature and signals the electronic control board to turn the elements on and off. Before removing this part from the oven and testing it with a multimeter for continuity, unplug the oven from the electrical outlet. To test the sensor, you will need to reference your owner’s manual to determine what the correct reading should be for your model, as this varies from model to model. To test it for continuity, use a multimeter on the Rx1 setting and touch the terminals with the probes. This test needs to be done with the sensor at room temperature to produce accurate results. If your test results do not meet the manufacturer’s guidelines, you need a replacement temperature sensor. If the sensor is fine, you will need to check the elements, the electronic control board and the wiring between the parts to see which one is causing the issue. We hope this helps! If you have any questions, please let us know.
Hi Rick,
Thank you for your question. If the broil element is sparking it will need to be replaced. The part number listed under your model number for the broil element is PS11747304. If you need help placing an order for it, customer service is open 7 days a week and anyone will be happy to assist you. Please feel free to give us a call. We look forward to hearing from you!
Was this helpful?
Thank you for voting!
Dale
December 6, 2022
Control panel works but broil element will not heat up. Has been replaced with new element - with no success. Bake element and internal temperature control both work. What else should I look at?
For model number YKESS908SS00
Hello Dale, thank you for the question. According to our research, the problem seems to be with the High-Limit Thermostat and you may need to replace it, the part number is PS11747248. If you need help placing an order for it, please feel free to give us a call. We look forward to hearing from you!
KitchenAid wall electric oven. Doesn't heat up, tested wire (4) to element they are all getting power. Did a continuity test and it beeped, and no visual damage to the outside of the coils. Guessing still could be a problem with element?
For model number KEB5107SSOO
Hi Rand, thank you for the question. Based on our understanding of the issue, we would recommend checking the temperature sensor, part number PS11748765, as it is most likely faulty and may need to be replaced. Please submit a new question if you have any follow-ups!
Hello Wickham,
Thank you for your question. First, you will need to Disconnect the two connectors on each side of element. Second, remove the screws that were too rusted by using a screwdriver with vise grips. Third, remove the old element, then insert the new element through the holes in rear of the oven. We hope this helps.
Was this helpful?
Thank you for voting!
< Prev
1
Next >
✖
Ask a Question
Ask our experts a question on this part and we'll respond as soon as we can.