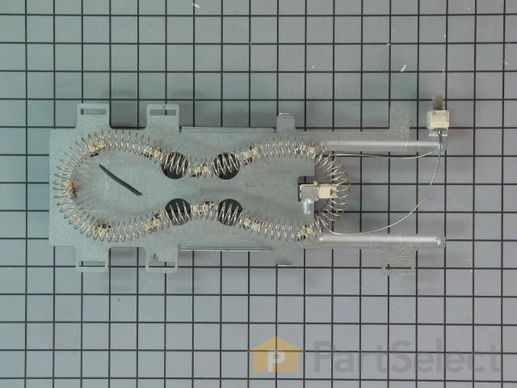
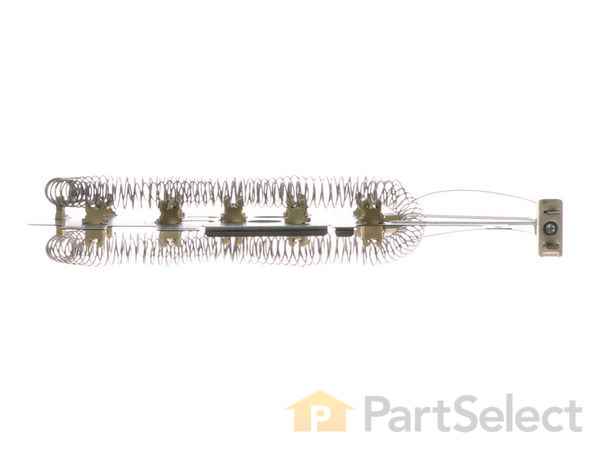
Part Location Diagram of WP8544771 Whirlpool Dryer Heater Element
See part 14 in the diagram
Replacing your Whirlpool Dryer Dryer Heater Element
( Grid squares measure 1x1 inch )
Customer Service Representative

Get in touch, we're here to help!

Daily 8am - 9pm EST

customerservice@partselect.com

Dryer Heater Element WP8544771

 Fits your YWED9600TW0!
★★★★★
★★★★★
46 Reviews

Rated by 17 customers 

Easy 

1- 2 hours 

Ratings submitted by customers like you who bought this part.

$ 131.52
  In Stock
Get FREE EconoShip on orders over $100! T&C apply

Get this part fast! Average delivery time for in-stock parts via standard shipping: 1.8 days.

 Fits your YWED9600TW0!
PartSelect Number PS11746337
Manufacturer Part Number WP8544771
Manufactured by Whirlpool
Part Videos

Replacing your Whirlpool Dryer Dryer Heater Element

Replacing your Whirlpool Dryer Dryer Heater Element
Troubleshooting
This part fixes the following symptoms:
Not Heating | Too hot
This part works with the following products:
Dryer.
This part works with the following products:
Whirlpool, Maytag, Kenmore, Amana.
Part# WP8544771 replaces these:
AP6013115, 8544771, W10836011, WP8544771VP
Back to Top
Customer Reviews
Average Rating:
★★★★★
★★★★★
46 Reviews
4.7
Filter By Rating:
  • 5 Stars
    38
  • 4 Stars
    6
  • 3 Stars
    1
  • 2 Stars
    0
  • 1 Star
    1
Sort by:
  • 1
  • 2
  • 3
Sorry, we couldn't find any existing reviews that matched. Try using some different or simpler keywords.
  • 1
  • 2
  • 3
Customer Repair Stories
 Average Repair Rating: 2.9 / 5.0, 17 reviews. What's this?
Sort by:
  • 1
  • 2
Sorry, we couldn't find any existing installation instruction that matched.
The dryer wasn't heating, everything else worked.
Use the adjustable wrench to remove the water line. Remove the dryer vent line. Take off the screws on the main back panel, the screws connecting the top. Place both off the side. Unscrew and remove the parts connecting to the heat line located on the left side. Remove the front unit screw attaching the heat line to the bottom of the dryer. Remove the four screws connecting the top and bottom of the heat line together. The two on the left side is a huge pain, make sure you have small hands to be able to reach on the side of the line. Pull the bottom of the heat line loose. The heating element is inside the line. Replace element and put everything back in the order it was removed.
  • Sharon from MILTON, FL
  • Difficulty Level:
    A Bit Difficult
  • Total Repair Time:
    1- 2 hours
  • Tools:
    Socket set, Wrench (Adjustable)
1 person found this instruction helpful.
Was this instruction helpful to you?
Thank you for voting!
Replace heating element and belt
Replaced heating element and went ahead and replaced the belt since the dryer was coming apart and belt taken off also. I used the parts select video and paused the video through each step to complete each step. There videos are great for this and as long as you pause and do each step per the video it is quite easy. I Highly recommend doing each step one at a time as I did not have a problem. Thanks for great repair videos.
Other Parts Used:
Dryer Heater Element Drive Belt
  • James from LAFAYETTE, TN
  • Difficulty Level:
    Easy
  • Total Repair Time:
    30 - 60 mins
  • Tools:
    Nutdriver, Socket set
2 of 2 people found this instruction helpful.
Was this instruction helpful to you?
Thank you for voting!
Dryer not heating
Confirmed I had incoming 240V, checked continuity on element switch confirmed bad. Ordered replacement part. U have to remove drum to replace element
  • James from GREENVILLE, NC
  • Difficulty Level:
    Really Easy
  • Total Repair Time:
    30 - 60 mins
  • Tools:
    Nutdriver
1 person found this instruction helpful.
Was this instruction helpful to you?
Thank you for voting!
No heat!!
Remove top, remove two front panels, remove rear panel to access drive motor release tensioner. Remove drum to access to heating element enclosure. Replace and reinstall after vacuuming all accumulated lent.
  • David from ORANGE, TX
  • Difficulty Level:
    Easy
  • Total Repair Time:
    30 - 60 mins
  • Tools:
    Nutdriver, Pliers, Screw drivers, Socket set
1 person found this instruction helpful.
Was this instruction helpful to you?
Thank you for voting!
No heat
I don't have instructions ,I watched the link provided by parts select. I just wanted to say I have never been a wiz at home repairs.it took so long because I am 62 with autheritis in my hands and the dryer had to be taken down to a motor and a base but I took the time to clean every inch of the dryer scary to see so much dryer lint inside the dryer.i am just going to say if I can do it anybody could fix their own dryer ,just take your time ,let your hands take a break. And keep the repair instructions close by
  • Rick from LANESVILLE, IN
  • Difficulty Level:
    Really Easy
  • Total Repair Time:
    30 - 60 mins
  • Tools:
    Nutdriver, Pliers, Screw drivers, Socket set
6 of 6 people found this instruction helpful.
Was this instruction helpful to you?
Thank you for voting!
Electric Heating Element went out.
I checked continuity of all electrical points. I took the top off, then the back, and front of the dryer off so it was easy to inspect the whole dryer. I was also able to clean unwanted dust, and lent with a shop vacuum by doing this.
Keep track of different screws, and mark each screw location with a permanent magic marker. Taking pictures with camera phone is very helpful. Pay attention to electrical connections as well, some of those will need to be dismantled.
Try not to take apart anything more than needed. Watching some online video's can be very helpful as well.
If uncomfortable doing this, call a service repair technician.
I'm a farm boy, and repairs usually come easy to me, but not always.
  • John from WELLS, MN
  • Difficulty Level:
    A Bit Difficult
  • Total Repair Time:
    1- 2 hours
  • Tools:
    Screw drivers, Socket set
2 of 2 people found this instruction helpful.
Was this instruction helpful to you?
Thank you for voting!
Dryer stopped heating
We have a very early model of the He3. We had to follow directions for the He2 model to replace the heater element and thermostat. Access is easy through the front panel, but removing and replacing the element required some force and maneuvering in a small area.

We replaced both the element and the thermostat since we had the entire part disconnected and removed. So far working great!
Other Parts Used:
High Limit Thermostat Dryer Heater Element Lint Filter
  • Linda from DANVILLE, CA
  • Difficulty Level:
    A Bit Difficult
  • Total Repair Time:
    1- 2 hours
  • Tools:
    Screw drivers, Socket set
1 of 2 people found this instruction helpful.
Was this instruction helpful to you?
Thank you for voting!
No heat in the dryer
Went to Kenmore website, got parts diagram, watched You Tube videos on dryer repair for this model, ordered parts. When parts arrived (in 4 days, great job!), re-watched You Tube videos, installed parts, dryer works great. Took longer than industry standards because I had to suction out/vacuum a great deal of lint/hair. as I went along.
Other Parts Used:
Thermostat, Internal-Bias Dryer Heater Element Thermal Cut-Off with High Limit Thermostat
  • Raymond from CAMERON, NC
  • Difficulty Level:
    A Bit Difficult
  • Total Repair Time:
    More than 2 hours
  • Tools:
    Nutdriver, Pliers, Screw drivers, Socket set
5 of 5 people found this instruction helpful.
Was this instruction helpful to you?
Thank you for voting!
Had to replace heating element broken coil
Remove bottom panel was able to remove the element from the bottom without taking off the whole front and removing the drum simply remove the panel remove the two wires connected to the coil unbolted the bracket that was held on by two small bolts then removed the 4 bolts holding the bracket together was able to remove the heating element and then put everything back together did not have to remove the drum the top or the back panel To complete the repair I am not an appliance repair technician just a homeowner but I was still able to repair this myself and it’s working just fine
  • Carter from NORFOLK, MA
  • Difficulty Level:
    Easy
  • Total Repair Time:
    30 - 60 mins
  • Tools:
    Pliers, Socket set
15 of 15 people found this instruction helpful.
Was this instruction helpful to you?
Thank you for voting!
Heater element died
Pretty easy repair and I am not very handy. I believe they engineer these machines so you hire someone to do the job. They could place that part in an area where it is easier to get to, like a door on the side or something
  • Jerry from AUBURN, NY
  • Difficulty Level:
    Really Easy
  • Total Repair Time:
    30 - 60 mins
  • Tools:
    Nutdriver
1 person found this instruction helpful.
Was this instruction helpful to you?
Thank you for voting!
  • 1
  • 2
Questions and Answers

Ask our experts a question about this part and we'll get back to you as soon as possible!

20 questions answered by our experts.
Sort by:
  • 1
  • 2
Sorry, we couldn't find any existing answers that matched.Try using some different or simpler keywords, or submit your new question by using the "Ask a Question" button above!
Kathy
October 11, 2017
Where is the heating element located.I have the back off.I see a silver pan on the left.It has 2 screws.After you take the screws out the pan wont come off.How do i take the pan off.
For model number WED7600XW0
PartSelect logo
Hi Kathy, Thank you for your question. Here is an installation video that will show you how to get to your element: https://youtu.be/YPpI266xawY . Good luck with your repair.

19 people found this helpful.

Was this helpful?
Thank you for voting!
Gene
November 8, 2018
Where is the heating element located on my dryer. Can you send instructions on how to get at it?
For model number MEDB8550WR0
PartSelect logo
Hi Gene, thank you for your question. We have an installation video above in the part information that will show you where the part is located and how to install it. Here is a direct link: https://youtu.be/YPpI266xawY. I hope that helps. Good luck with your repair.

6 people found this helpful.

Was this helpful?
Thank you for voting!
Bob Murphy
November 15, 2018
What would cause the heating element connection wire to overheat
For model number WED9600TAO
PartSelect logo
Hello Bob, thank you for your question. The heating element may have been allowed to get too hot before being cycled off. I would suggest testing the thermostats part number PS991443 and PS11746386, and PS11746740. It may have been a one off occurrence but testing the thermostat will tell you if one or more has failed. You should also clean the unit well, especially around the blower housing and heating element as a build up of lint can cause the unit to overheat. I hope this helps!

6 people found this helpful.

Was this helpful?
Thank you for voting!
Alma
February 12, 2019
I purchased the drive belt cause it was obvious that it needed. Replaced installed it thanks to the video here. It is running well but it does not heat. I just let run for 3 minutes and found out it does not heat. What do i do next? I have read that if it does not heat it could be the heating element but how can i be sure?
For model number 11087721700
PartSelect logo
Hello Alma, Thank you for your question. You can test the parts with a multimeter. If you are unfamiliar with how a multimeter functions, we have videos available to assist you.

3 people found this helpful.

Was this helpful?
Thank you for voting!
Kathy
October 11, 2017
Cabrio dryers element is not on the right side.There is no connections.There is connections on the left.Where is the element.
For model number WED7600XW0
PartSelect logo
Hi Kathy, Thank you for getting back to us. There is an installation video of the heating element listed with the part on our website that you may reference. From reviewing the video you will need to access the element from the front of the dryer. If the position of the element is reversed on your dryer the video is a good reference on how to install it. The video shows that the element is inside the housing and the video shows how to access the element inside the housing. I hope this helps. Thank you and have a great day!

3 people found this helpful.

Was this helpful?
Thank you for voting!
Ed
December 6, 2019
Where is the heating element located on the Maytag bravox xl electronic dryer.Part # is wp8544771
For model number MEDB725BWO
PartSelect logo
Hi Ed, to find this information we would need your full model number, this is usually a complete series of numbers and/or letters. We do however have a video you can view that may be helpful in finding this part on your model: https://www.youtube.com/watch?v=YPpI266xawY&feature=emb_title. Thank you for your question and good luck with your repair!

3 people found this helpful.

Was this helpful?
Thank you for voting!
Ed
December 6, 2019
Looking to find out where the heating element is located on my Maytag bravos xl electric dryer. Part # wp8544771. Serial #m33710047.
For model number MEDB725BWO
PartSelect logo
Hello Ed, Thank you for your question. It is located below the drum assembly inside of a heater box housing. You would still have to remove the front panel and drum in order to access the housing and heater. Hope this helps!

3 people found this helpful.

Was this helpful?
Thank you for voting!
Jerry
March 11, 2018
Where is element located. I have the cabrio. Controls are on top back.
For model number Wed7300xwo
PartSelect logo
Hello Jerry, Thank you for your inquiry. It is located below the drum assembly inside of a heater box housing. You would still have to remove the front panel and drum in order to access the housing and heater. Hope this helps!

3 people found this helpful.

Was this helpful?
Thank you for voting!
Kathy
October 11, 2017
Where is the element located on a Whirlpool cabrio dryer wed7600xw0
For model number wed7600xw0
PartSelect logo
Hi Kathy, Thank you for the question. Here is a link to a video on how to install this element and it will show the location. Hope this helps! https://www.youtube.com/watch?v=YPpI266xawY

3 people found this helpful.

Was this helpful?
Thank you for voting!
Alma
February 12, 2019
Thanks for the previous response to check the heating element with a multimeter. Where do i get this meter? I dont own one. In trying to save money by do it yourself but im not anymore. Please help.
For model number 11087721700
PartSelect logo
Hello Alma, Thank you for writing. You can obtain a multimeter from a local home supply store. It is actually a good invest as it is something you can find yourself in need of frequently as a home owner. Good luck with your repair!

2 people found this helpful.

Was this helpful?
Thank you for voting!
  • 1
  • 2
Model Cross Reference
This part works with the following models:
PartSelect Number: PS11746337
Manufacturer Part Number: WP8544771
Brand
Model Number
Description
Kenmore
11067032600
Dryer
Kenmore
11067032601
Dryer
Kenmore
11067042600
Dryer
Kenmore
11067042601
Dryer
Kenmore
11067052600
Dryer
Kenmore
11068062800
Dryer
Kenmore
11068062801
Dryer
Kenmore
11068072800
Dryer
Kenmore
11068072801
Dryer
Kenmore
11068082701
Dryer
Kenmore
11068087701
Dryer
Kenmore
11068092700
Dryer
Kenmore
11068092701
Dryer
Kenmore
11068097701
Dryer
Kenmore
11068102310
Dryer - 27" ELECTRIC DRYER
Kenmore
11068103310
Dryer - ELECTRIC DRYER
Kenmore
11086562500
Dryer
Kenmore
11086562501
Dryer
Kenmore
11086572500
Dryer
Kenmore
11086572501
Dryer
Kenmore
11086742700
Dryer
Kenmore
11086742701
Dryer
Kenmore
11086742702
Dryer
Kenmore
11086747700
Dryer
Kenmore
11086747701
Dryer
Kenmore
11086747702
Dryer
Kenmore
11086757701
Dryer
Kenmore
11086762700
Dryer
Kenmore
11086762701
Dryer
Kenmore
11087081601
Dryer
Customer Service Representative

Get in touch, we're here to help!

Daily 8am - 9pm EST

Contact Customer Service