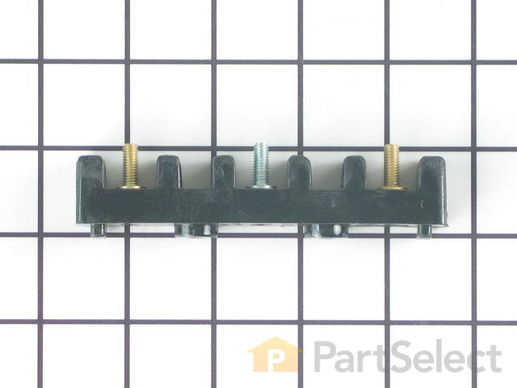
Part Location Diagram of WP8203546 Whirlpool Main Power Terminal Block
See part 33 in the diagram
Replacing your Whirlpool Range Main Power Terminal Block
( Grid squares measure 1x1 inch )
Customer Service Representative

Get in touch, we're here to help!

Daily 8am - 9pm EST

customerservice@partselect.com

Main Power Terminal Block WP8203546

Rated by 6 customers 

Really Easy 

15 - 30 mins 

Ratings submitted by customers like you who bought this part.

$ 24.59
  In Stock
Get FREE EconoShip on orders over $100! T&C apply

Get this part fast! Average delivery time for in-stock parts via standard shipping: 1.8 days.

PartSelect Number PS11745232
Manufacturer Part Number WP8203546
Manufactured by Whirlpool
Product Description

Main Power Terminal Block Specifications

Sold individually.
How Buying OEM Parts Can Save You Time and Money

How Buying OEM Parts Can Save You Time and Money

Part Videos

Replacing your Whirlpool Range Main Power Terminal Block

Replacing your Whirlpool Range Main Power Terminal Block
Troubleshooting
This part fixes the following symptoms:
Will Not Start
This part works with the following products:
Range, Wall Oven, Microwave Oven Combo, Cooktop.
This part works with the following products:
Whirlpool, KitchenAid, Amana, Roper.
Part# WP8203546 replaces these:
0042194, 0088776, 0091625, 0306378, 0310029, 07728300, 14200347, 14205049, 14210916, 14221418, 14253826, 14254043, 14266994, 241212, 258076, 3184673, 4157955, 4326821, 4332345, 4363438 , 4363823, 4371409, 4372627, 4449868, 5-70022, 51234P01, 570022, 661457, 7-2284, 702284, 8203546, 878191, 879428, 9757403, B50034-1, B5003401, CG980049, M4D41, R0167089, R0756503, R0762020, W10246624, Y0042194, Y0088776, Y0091625, Y0306378, Y0310029, Y07728300, Y702284 Show less
Back to Top
Customer Repair Stories
 Average Repair Rating: 4.2 / 5.0, 6 reviews. What's this?
Sort by:
  • 1
Sorry, we couldn't find any existing installation instruction that matched.
wire came loose and shorted out
Ordering the part online was easy. It arrived in a timely manner. I found a terrific video online showing how to install the terminal. It was so easy. Thank you for the great instructional video.
  • Elizabeth from HOUSTON, TX
  • Difficulty Level:
    Really Easy
  • Total Repair Time:
    30 - 60 mins
  • Tools:
    Pliers, Screw drivers
1 of 2 people found this instruction helpful.
Was this instruction helpful to you?
Thank you for voting!
I snapped a bolt on the main power terminal block when connecting the pigtail.
Removed the small metal panel covering the main power terminal in back of the electric range. Removed the nuts holding the red, white and black electrical wires from the range using the appropriate socket (there will be two nuts on each bolt end). Removed the two screws holding the main power terminal block with appropriate screw driver. Connect the new main power terminal block to the range using the two screws. Reconnect the red, black and white electrical wires coming from the range using one nut for each wire. IMPORTANT: do no over tighten the nuts because the bolts could snap. Reconnect the pigtail and secure the small metal panel covering the main power panel.
  • Frank from Palm Coast, FL
  • Difficulty Level:
    Easy
  • Total Repair Time:
    15 - 30 mins
  • Tools:
    Screw drivers, Socket set
3 of 8 people found this instruction helpful.
Was this instruction helpful to you?
Thank you for voting!
Block broke
Unplug power cord, remove wires from block. take 2 screws out. replace with new block about 15 mins. Done
  • Edward from Crimora, VA
  • Difficulty Level:
    Really Easy
  • Total Repair Time:
    15 - 30 mins
  • Tools:
    Screw drivers, Socket set
1 of 4 people found this instruction helpful.
Was this instruction helpful to you?
Thank you for voting!
lighting strike
replaced the suppressor and terminal block oven works
Other Parts Used:
Suppressor Main Power Terminal Block
  • Frank from Silverhill, AL
  • Difficulty Level:
    Easy
  • Total Repair Time:
    15 - 30 mins
  • Tools:
    Nutdriver, Screw drivers
12 of 21 people found this instruction helpful.
Was this instruction helpful to you?
Thank you for voting!
Incoming power hot lead broke loose from mounting block and short-circuited
First I turned off power at the service panel. Then, I pulled out the range and tried to remove the access panel. The screw which held the black lead from the incoming power to the range wiring terminal had broken loose from the mounting block. It had welded itself to the panel, so I had to pry it loose. I tried to reattach it to the mounting block, but the block was cracked.

I turned on power at the service panel and used my digital multimeter to test the AC voltage of the receptacle to make sure it fell within the correct limits.

When the new mounting block and power cord arrived, I removed the screw that held the broken mounting block to the back of the range. Then, I used a screwdriver to remove the leads that attached the old power cord to the broken mounting block and range wiring terminals. The screw and nuts which held the old black lead and range wiring terminal to the block were welded together. This was the most difficult part of the repair. I was able to back them off a little bit, but not enough to remove the range wiring terminal. While holding one end of the screw in the pliers, my Dad used the heavy duty cut off wheel on my Dremel tool to cut the screw in half and free the terminal.

Then, we reversed the process to attach the new wiring block to the back of the range, incoming power cord to wiring terminals and range wiring. We plugged it back in and had it working before my dinner party.
Other Parts Used:
Screw Main Power Terminal Block Hex Nut
  • Heather from Pittsburgh, PA
  • Difficulty Level:
    Easy
  • Total Repair Time:
    Less than 15 mins
  • Tools:
    Pliers, Screw drivers, Socket set
7 of 11 people found this instruction helpful.
Was this instruction helpful to you?
Thank you for voting!
Loose terminal caused block to overheat and break
Removed all terminals and block mounting screws. Repaired one burnt terminal and reassembled. Replacement part was an exact fit and reassembly whnet very well.
  • Dana from Black Mountain, NC
  • Difficulty Level:
    Really Easy
  • Total Repair Time:
    Less than 15 mins
  • Tools:
    Nutdriver, Screw drivers
6 of 10 people found this instruction helpful.
Was this instruction helpful to you?
Thank you for voting!
  • 1
Questions and Answers

Ask our experts a question about this part and we'll get back to you as soon as possible!

8 questions answered by our experts.
Sort by:
  • 1
Sorry, we couldn't find any existing answers that matched.Try using some different or simpler keywords, or submit your new question by using the "Ask a Question" button above!
Greg
September 4, 2019
Stove top burners work but oven will not work (broil or bake) the electric control is not working either
For model number ywfe371lvb0
PartSelect logo
Hello Greg, thank you for your question. That sounds like an issue with the electronic control board. PartSelect Number PS11755353 is the board in white, and PartSelect Number PS11755353 is the board in black. I hope this helps!

3 people found this helpful.

Was this helpful?
Thank you for voting!
Kristin
July 15, 2019
Oven will heat but not all the way (set for 350c but only goes to 240c). Broiler element does not come on but when tested has continuity. Has 21 ohms resistance.
For model number ZRT6510WW
PartSelect logo
Hi Kristin, Thank you for your question. If the oven is not heating correctly, then the issue is likely with the oven sensor, sometimes called the oven thermostat, and you will need to check it with a multimeter. When testing the sensor with a multimeter, the sensor should be tested at room temperature and it should be unplugged from the oven. You will need to measure the resistance between the two prongs at the end of the sensor connector. Replace the oven sensor if the reading is less than 900 Ohms or more than 1200 Ohms. I hope this helps. Thank you and have a great day!

2 people found this helpful.

Was this helpful?
Thank you for voting!
Barbara
September 20, 2017
The power is out on my oven, door is locked as i was self cleaning. There is power coming in from wall and we did replace thermosat already but still doesn't have power, cant open door. What does the main power terminal block do, could that be the problem
PartSelect logo
Hi Barbara, Thank you for your inquiry. When you use the self clean option, as a safety feature the oven door will remain closed until the oven has cooled. If the oven has cooled and the door is not opening you will need to unplug it or turn the circuit breaker off for a few minutes to see if that resets it. Then press on/off and the cancel button for 30 seconds to see if this resolves the issue. I hope this helps. Thank you and have a great day!

Was this helpful?
Thank you for voting!
Sharon
December 20, 2022
My range has the same issue, dual fuel, top works no oven. Not even the light. Control panel is totally dead.
For model number KSDG950ESS1
PartSelect logo
Hello Sharon, thank you for contacting us. We would recommend checking the main terminal block, part number PS11745232, and ensuring that the connections are not damaged. If this does not help, the issue is most probably related to the control board, part number PS12074609. Customer service is available 7 days a week if you require assistance placing an order. Thanks again for reaching out!

Was this helpful?
Thank you for voting!
Related Parts:
Barbara
May 22, 2023
Started getting electrical burnt smells few months ago while using the receptacle, then something blew & stopped working. All electrical incl heating elements, warmer, receptacle have no power. Oven & control seem ok. Cannot locate if/which is the right fuse if it's the problem.
For model number YKERA205PW
PartSelect logo
Hi Barbara, thank you for reaching out. Based on the description that you have provided, we would recommend checking the main power terminal block, part number PS11745232, to fix this issue. We hope this solves your problem!

Was this helpful?
Thank you for voting!
Steph
August 7, 2018
Im trying to figure out what part i need to buy . The power shut down to everything while cooking . Cant turn on any function. Is this what i need to try and fix this or do i need the mother board replacement part
For model number RF368LXKQ
PartSelect logo
Hi Steph, Thank you for your question. It could be this part. If you see any physical damage to it. However if you do not then it is likely your control board that is the issue. I hope that helps. Good luck with your repair.

Was this helpful?
Thank you for voting!
Matt
May 10, 2019
While using the "self cleaning" feature on this range/oven, and when the oven was very hot, there was a loud "pop" and flash of light from inside. Now neither the baking or broiling elements work. What part(s) do i need to replace?
For model number RF376PXYB1
PartSelect logo
Hello Matt, thank you for inquiring. You may need to replace either the Bake Element part PS11740695 and the Broil Element part PS11743368, the Oven Thermostat part PS11740811, or the Main Power Terminal Block part PS11745232. We hope this helps.

Was this helpful?
Thank you for voting!
Kristin
July 15, 2019
You said i could possibly need an oven sensor to fix my problem. Do you have these in stock and what is the part number? Thanks for the help.
For model number ZRT6510WW
PartSelect logo
Hello Kristin, thank you for inquiring. The replacement Oven Temperature Sensor for your model is part PS11757456. The current availability for it is listed to the right of the "Add to Cart" button in the part description. Good luck with your repair!

Was this helpful?
Thank you for voting!
  • 1
Model Cross Reference
This part works with the following models:
PartSelect Number: PS11745232
Manufacturer Part Number: WP8203546
Brand
Model Number
Description
Kenmore
20133
Range - Kenmore Range/Stove/Oven Model 20133(1988) Parts
Jenn-Air
20135
Range
Kenmore
20214
Range - Electric Range
Kenmore
20215
Range - Electric Range
Kenmore
20234
Range - Kenmore Range/Stove/Oven Model 20234(1988) Parts
Jenn-Air
20236
Range
Jenn-Air
20237
Range
Jenn-Air
20239
Range
Kenmore
21244
Range - Kenmore Range/Stove/Oven Model 21244(1988) Parts
Roper
2222A00
Range - Roper Range/Stove/Oven Model 2222A00 Parts
Roper
2222A2A
Range - Roper Range/Stove/Oven Model 2222A2A Parts
Roper
2222C00
Range - Roper Range/Stove/Oven Model 2222C00 Parts
Roper
2222C2A
Range - Roper Range/Stove/Oven Model 2222C2A Parts
Roper
2222H00
Range - Roper Range/Stove/Oven Model 2222H00 Parts
Roper
2222H2A
Range - Roper Range/Stove/Oven Model 2222H2A Parts
Roper
2222L00
Range - Roper Range/Stove/Oven Model 2222L00 Parts
Roper
2222L2A
Range - Roper Range/Stove/Oven Model 2222L2A Parts
Roper
2222W2A
Range - Roper Range/Stove/Oven Model 2222W2A Parts
Roper
2242A2A
Range - Roper Range/Stove/Oven Model 2242A2A Parts
Roper
2242C2A
Range - Roper Range/Stove/Oven Model 2242C2A Parts
Roper
2242H00
Range - Roper Range/Stove/Oven Model 2242H00 Parts
Roper
2242H2A
Range - Roper Range/Stove/Oven Model 2242H2A Parts
Roper
2242L00
Range - Roper Range/Stove/Oven Model 2242L00 Parts
Roper
2242L2A
Range - Roper Range/Stove/Oven Model 2242L2A Parts
Roper
2362X0A
Range - Roper Range/Stove/Oven Model 2362X0A Parts
Roper
2362X1A
Range - Roper Range/Stove/Oven Model 2362X1A Parts
Roper
2362X2A
Range - Roper Range/Stove/Oven Model 2362X2A Parts
Roper
2496*0
Range - Ranges, Electric*
Roper
2496*0A
Range - Ranges, Electric*
Roper
2496*1
Range - Ranges, Electric*
Customer Service Representative

Get in touch, we're here to help!

Daily 8am - 9pm EST

Contact Customer Service