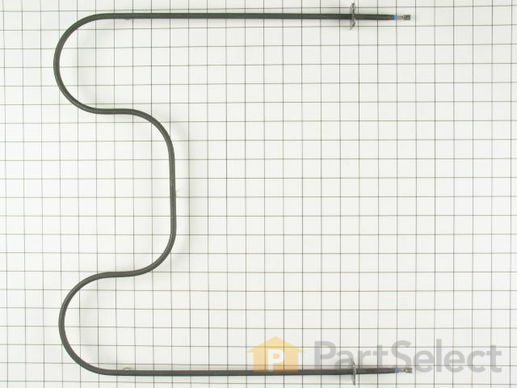
Part Location Diagram of WP74003020 Whirlpool Bake Element (19 Inch long x 19 Inch wide)
See part 3 in the diagram
( Grid squares measure 1x1 inch )
Customer Service Representative

Get in touch, we're here to help!

Daily 8am - 9pm EST

customerservice@partselect.com

Bake Element (19 Inch long x 19 Inch wide) WP74003020

★★★★★
★★★★★
5 Reviews

Rated by 25 customers 

Really Easy 

15 - 30 mins 

Ratings submitted by customers like you who bought this part.

$ 81.58
  In Stock
Get FREE EconoShip on orders over $100! T&C apply

Get this part fast! Average delivery time for in-stock parts via standard shipping: 1.8 days.

PartSelect Number PS11744015
Manufacturer Part Number WP74003020
Manufactured by Whirlpool
Product Description

Bake Element (19 Inch long x 19 Inch wide) Specifications

This electric oven bake element with female spade connections is 16 inches long and 19 inches wide. It has a terminal depth of three inches, making a total element length of nineteen inches.
How Buying OEM Parts Can Save You Time and Money

How Buying OEM Parts Can Save You Time and Money

Troubleshooting
This part fixes the following symptoms:
Little to no heat when baking | Element will not heat
This part works with the following products:
Wall Oven, Range.
This part works with the following products:
Maytag, Magic Chef, Whirlpool, Jenn-Air.
Part# WP74003020 replaces these:
AP6010825, 04000071, 74003020, 7406P078-60, 7406P093-60, 8189693, 880007, Y04000071
Back to Top
Customer Reviews
Average Rating:
★★★★★
★★★★★
5 Reviews
5.0
Filter By Rating:
  • 5 Stars
    5
  • 4 Stars
    0
  • 3 Stars
    0
  • 2 Stars
    0
  • 1 Star
    0
Sort by:
  • 1
Sorry, we couldn't find any existing reviews that matched. Try using some different or simpler keywords.
  • 1
Customer Repair Stories
 Average Repair Rating: 4.4 / 5.0, 25 reviews. What's this?
Sort by:
  • 1
  • 2
  • 3
Sorry, we couldn't find any existing installation instruction that matched.
Heating element burnt out
the heating element burnt out the Monday of Thanksgiving week. I received the part on Tues and we repaired the stove on Wednesday. Since this was the second time we had to replace the heating element, it was much easier the second time around. We removed the old element and installed the new one in less than 30 minutes. It was an easy fix. The new element evenly bakes the food now.
  • Jacqui from Mt. Sterling, KY
  • Difficulty Level:
    Easy
  • Total Repair Time:
    15 - 30 mins
  • Tools:
    Pliers, Screw drivers
0 of 1 people found this instruction helpful.
Was this instruction helpful to you?
Thank you for voting!
burned tube
I removed the two screws that attach the element to the back of the oven. Then I pulled the element out a few inches and disconnected each of the wires attached to the element.
These were easy to disconnect because they were quick-disconnect spade type connectors.
Note the easiest part was the ordering and delivered the very next day WOW
  • Salvador R from Castaic, CA
  • Difficulty Level:
    Really Easy
  • Total Repair Time:
    Less than 15 mins
  • Tools:
    Screw drivers
2 of 3 people found this instruction helpful.
Was this instruction helpful to you?
Thank you for voting!
Burnt out (broken) lower oven element
Removed screws on each end of element, pulled off spade connectors, did everything in reverse for new element.

The only notable fact was that the old element was hot, as in carrying AC current, despite the stove being off and it being broken, and I found out the usual way.
  • Eric from Rockville, MD
  • Difficulty Level:
    Easy
  • Total Repair Time:
    15 - 30 mins
  • Tools:
    Pliers, Screw drivers
1 of 3 people found this instruction helpful.
Was this instruction helpful to you?
Thank you for voting!
oven would not heat
Very simple process of diagnosing. Toughest part was finding the part. Part Select mad it very easy, inexpensive and great service and delivery right on time. What a great site. Will always come here first.
Other Parts Used:
Bake Element (19 Inch long x 19 Inch wide) Light Bulb - 40W
  • Greg from Plano, TX
  • Difficulty Level:
    Really Easy
  • Total Repair Time:
    30 - 60 mins
0 of 1 people found this instruction helpful.
Was this instruction helpful to you?
Thank you for voting!
I put a drip pan in the bottom of my oven. Big Mistake. Fire in ther bake element!
A web search led me to Parts Select. Two days later my bake element was installed and my oven was again in bake mode.I'm a 75 yr. old grandmother and installed it myself so that should tell one how easy it is.
  • Janelle from Osceola, MO
  • Difficulty Level:
    Really Easy
  • Total Repair Time:
    15 - 30 mins
  • Tools:
    Pliers, Screw drivers
1 of 2 people found this instruction helpful.
Was this instruction helpful to you?
Thank you for voting!
The old element snapped, crackled and popped after years of relentless use-and-abuse.
Here's the way to do it, according to the "Describe how you did the repair" prompt: "First I removed the two screws that hold the element in place. I then pulled the element out about 3 inches and disconnected the two wires..."

Right, however, I shoulda-woulda-coulda listened to my fellow DYI'ers on this site about c-a-r-e-f-u-l-l-y feeding the wiring out of the rear hole.

But, first, turn off the power. Secondly, make sure the power is off at the breaker. I did and that worked fine.

However, as I pulled the connecting end of the bake element out, bummer! The spade electrical fitting popped off and retreated into a sea of insulation! Future solution? Like The Man suggested, Carefully, gently pull the element out and grab the connecting wire, pull it out to get a little slack and attach a clothespin to the end, so it won't back out and disappear! Then, detach the broken element, reverse the steps with the new bad boy and start cookin'!

If you need to pull the stove out, as we did, to "get at" the back of the oven and the retreated wire, move the oven out on a parallel height platform or boards as it exits the opening. Note carefully as to how much slack there is on the electrical connection, typically armored cable or another, er, "homebrew" electrical solution.

Take your time, as the pie will wait.
  • Christopher from San Fransisco, CA
  • Difficulty Level:
    Really Easy
  • Total Repair Time:
    Less than 15 mins
  • Tools:
    Pliers, Screw drivers
5 of 6 people found this instruction helpful.
Was this instruction helpful to you?
Thank you for voting!
Baking element not heating
First off, because of weather delays, it took FedEx 8 days to deliver part, finally had to drive 3 miles out our road to meet driver.
The connectors were females on the new part as were the connectors in the range. Had to cut off oven connectors and replace with males. Fortunately, I had the connectors (not supplied) and knew how to attach them.
  • Dennis from Gay, WV
  • Difficulty Level:
    A Bit Difficult
  • Total Repair Time:
    15 - 30 mins
  • Tools:
    Pliers
0 of 1 people found this instruction helpful.
Was this instruction helpful to you?
Thank you for voting!
Bake element was burned out
Turned off power at breaker box. Removed two screws from the old bake element on rear of oven wall. Pulled out bake element from back of oven so wires were exposed (about 3-4 inches). By hand, removed the wire connector from each side of the element (wiggle it loose).

The part I purchased was exactly as described on the PartSelect website (i.e., it had the correct connections - female - on the bake element). The part arrived in 2 days in perfect condition. I definitely will use PartSelect again.
  • Philip from Plainview, NY
  • Difficulty Level:
    Really Easy
  • Total Repair Time:
    Less than 15 mins
  • Tools:
    Screw drivers
0 of 2 people found this instruction helpful.
Was this instruction helpful to you?
Thank you for voting!
my heating element in my oven caught fire and burnt up.
I ordered the only part that looked like it would fit. First I removed the two screws that hold the element in place. I then pulled the element out about 3 inches and disconnected the two wires. But the new replacement had the wrong ends to fit right. I was going to email you back to see if there were other options for me, when a friend came by and said he would just replace the oven connecting ends and then it would work. Luckily he had extra little ends at home, came over and replaced the ends, cutting the old ones off of the oven side. He wire stripped the wire, attached the new ends and crimped and then reattatched the whole heating element. Without his know-how, I would have had to have a repair man come and do the same thing for me, or go buy a new stove.....but it is simple when you know how!! It would have been helpful to me, to have the description of the ends of the new element I was buying..... whether it was male or female... but it is fixed now, thanks to my friend. A steak dinner was cheaper than a repair man!!!!
  • Carolyn from Los Alamos, NM
  • Difficulty Level:
    Really Easy
  • Total Repair Time:
    30 - 60 mins
  • Tools:
    Screw drivers
0 of 1 people found this instruction helpful.
Was this instruction helpful to you?
Thank you for voting!
Bake element melted in two---first time I'd seen that.
After removing two screws, I pulled the bake element free from the oven's female electrical connections---only to find the new element had female connectors, too. Nevertheless, I cut the male connectors off the old bake element and used them as a splice (of sorts). Then installing the new bake element was a piece of cake, which I can make now thanks to PartSelect.com.
  • Jonathan from Corona Dell Mar, CA
  • Difficulty Level:
    Easy
  • Total Repair Time:
    15 - 30 mins
  • Tools:
    Pliers, Screw drivers
0 of 1 people found this instruction helpful.
Was this instruction helpful to you?
Thank you for voting!
  • 1
  • 2
  • 3
Questions and Answers

Ask our experts a question about this part and we'll get back to you as soon as possible!

3 questions answered by our experts.
Sort by:
  • 1
Sorry, we couldn't find any existing answers that matched.Try using some different or simpler keywords, or submit your new question by using the "Ask a Question" button above!
David
August 26, 2019
What is the wattage range and voltage range on this baking element?
For model number 74003020
PartSelect logo
Hi David, Thank you for your question. The bake element has 2800 watts and 240 volts. I hope this helps. Thank you and have a great day!

Was this helpful?
Thank you for voting!
Nancy
October 3, 2019
Hi there, just resubmitting this not sure if i sent you the right email, but i do not have the mdoel # for my Magic Chef stove, bought in 2004, and needs a new oven element, which looks the exact to the one on line here, please advise if i can order this one? Thank you
PartSelect logo
Hello Nancy, Thank you for the question. Here is a link to help you locate the model number sticker on the appliance.Once you have located the model number please feel free to resubmit the question and we will be happy to help you. Look forward to hearing from you! https://www.partselect.com/Find-Your-Range-Model-Number.aspx

Was this helpful?
Thank you for voting!
Gary
November 23, 2019
Element not getting hot in oven if i remove element can i check with a ohm meter
For model number Bake element waytag 74003020
PartSelect logo
Hello Gary and thanks for writing. Yes, you can check the element for continuity with an ohmmeter. Hold one probe on each of the termianls, the needle should move and show between 1 and 50 ohm of resistance. If you have resistance your element is good. We hope this helps. Please contact us anytime.

Was this helpful?
Thank you for voting!
  • 1
Model Cross Reference
This part works with the following models:
PartSelect Number: PS11744015
Manufacturer Part Number: WP74003020
Brand
Model Number
Description
Magic Chef
9875VRV
Wall Oven - Built-in, Electric
Magic Chef
9875VVV
Wall Oven - Built-in, Electric
Magic Chef
9875VYV
Wall Oven - Built-in, Electric
Magic Chef
9875XRB
Wall Oven - Built-in, Electric
Magic Chef
9875XVB
Wall Oven - Built-in, Electric
Magic Chef
9875XYB
Wall Oven - Built-in, Electric
Magic Chef
9876VVV
Wall Oven - Electric
Magic Chef
9876XVB
Wall Oven - Electric
Magic Chef
9895VRV
Wall Oven - Built-in, Electric
Magic Chef
9895XRB
Wall Oven - Built-in, Electric
Admiral
A9875VRV
Wall Oven - Built-in, Electric
Admiral
A9875XRB
Wall Oven - Built-in, Electric
Admiral
A9895VRV
Microwave Oven Combo - Built-in, Electric
Admiral
A9895XRB
Microwave Oven Combo - Built-in, Electric
Magic Chef
C9875VRV
Wall Oven - Built-in, Electric
Magic Chef
C9875VVV
Wall Oven - Built-in, Electric
Magic Chef
C9875XRB
Wall Oven - Built-in, Electric
Magic Chef
C9875XVB
Wall Oven - Built-in, Electric
Maytag
CWE9000BCB
Wall Oven - Freestanding, Electric
Maytag
CWE9000BCE
Wall Oven - Wall, Electric
Maytag
CWE9000BCM
Wall Oven - Freestanding, Electric
Maytag
CWE9000BDB
Wall Oven - Freestanding, Electric
Maytag
CWE9000BDE
Wall Oven - Wall, Electric
Maytag
CWE9000CDB
Wall Oven - Freestanding, Electric
Maytag
CWE9000CDE
Wall Oven - Wall, Electric
Maytag
CWE9000DDB
Wall Oven - Freestanding, Electric
Maytag
CWE9000DDE
Wall Oven - Wall, Electric
Maytag
CWE9030BCB
Wall Oven - Built-in, Electric
Maytag
CWE9030BCE
Wall Oven - Built-in, Electric
Maytag
CWE9030BDB
Wall Oven - Built-in, Electric
Customer Service Representative

Get in touch, we're here to help!

Daily 8am - 9pm EST

Contact Customer Service