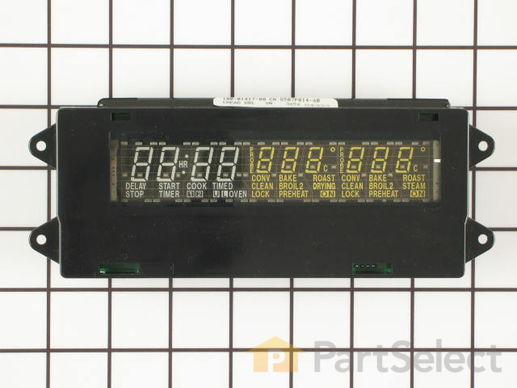
Part Location Diagram of WP71001872 Whirlpool Electronic Clock Assembly
See part 2 in the diagram
( Grid squares measure 1x1 inch )
Customer Service Representative

Get in touch, we're here to help!

Daily 8am - 9pm EST

customerservice@partselect.com

Electronic Clock Assembly WP71001872

Rated by 37 customers 

Really Easy 

15 - 30 mins 

Ratings submitted by customers like you who bought this part.

$ 679.05
  In Stock
Get FREE EconoShip on orders over $100! T&C apply

Get this part fast! Average delivery time for in-stock parts via standard shipping: 1.8 days.

PartSelect Number PS11743864
Manufacturer Part Number WP71001872
Manufactured by Whirlpool
Product Description

Electronic Clock Assembly Specifications

This part controls the functions of your oven such as bake, broil, timed bake and the clock.
How Buying OEM Parts Can Save You Time and Money

How Buying OEM Parts Can Save You Time and Money

Troubleshooting
This part fixes the following symptoms:
Will not program
This part works with the following products:
Wall Oven.
This part works with the following products:
Jenn-Air, Maytag, Amana.
Part# WP71001872 replaces these:
AP6010680, 71001872, 71001872R
Back to Top
Customer Repair Stories
 Average Repair Rating: 4.2 / 5.0, 37 reviews. What's this?
Sort by:
  • 1
  • 2
  • 3
Sorry, we couldn't find any existing installation instruction that matched.
dimming display
Built in so removed 4 screws underneath display and lifted up (was a little tricky because of cabnet doors above)removed 2 plug in connectors and put unit on counter top. to remove ribbon connector push in on tabs on both sides, lightly pull up ribbon (the wider part of connector will come up about a 32nd of an inch and the ribbon will pull away from that, there are two small protusions on the connector that capture two holes in the ribbon) once you figure that out its a simple job.
  • Marc from Emmett, ID
  • Difficulty Level:
    Easy
  • Total Repair Time:
    30 - 60 mins
  • Tools:
    Nutdriver, Screw drivers
0 of 1 people found this instruction helpful.
Was this instruction helpful to you?
Thank you for voting!
Oven display not working
I read installation advise on this web site, so when the part arrived I was more than ready to replace it. Removing a few screws below the faceplate, pulling the faceplate out slightly then up, being careful with the electronic connections, (there are tabs on the sides that need to be pressed to remove the connectors. The largest connecter is tricky, the side tabs need to be pressed then gently pulled up to release the electronic "tape".) It took about ten minutes to complete. Very satisfied.
  • Martin from Salem, MA
  • Difficulty Level:
    Really Easy
  • Total Repair Time:
    Less than 15 mins
  • Tools:
    Nutdriver, Screw drivers
0 of 1 people found this instruction helpful.
Was this instruction helpful to you?
Thank you for voting!
clock display dim.
easy peasy. the only tricky part, if you don't have prior knowledge, is releasing the ribbon from the old part. I recommend going on youtube and searching for any video that shows you how to release a ribbon connector. We did that and it was invaluable. The alternative is practicing on your new part, but I really didn't want to do this. The new part works beautifully and PartSelect had it to us in 2 days.
  • Jeffrey from Grand Rapids, MI
  • Difficulty Level:
    Really Easy
  • Total Repair Time:
    Less than 15 mins
  • Tools:
    Screw drivers, Socket set
0 of 1 people found this instruction helpful.
Was this instruction helpful to you?
Thank you for voting!
Digital display went dim
Turned off power to oven. Unscrewed panel to expose digital board. Disconnected wire plugs. Removed digital board. Replaced new board and reconnected plugs. It really was that easy...
  • Rudy from Ontario, CA
  • Difficulty Level:
    Really Easy
  • Total Repair Time:
    Less than 15 mins
  • Tools:
    Screw drivers, Socket set
2 of 4 people found this instruction helpful.
Was this instruction helpful to you?
Thank you for voting!
Electronic control clock readout failed
Open oven 220V circuit breaker. Take top and bottom Phillips screws holding panel. Turn panel and use an small flat blade screwdriver to pry the two small electrical connectors out freeing the panel from the oven. Place panel on a table. With thumb and index finger push lightly towards the inside the two vertical branches of sank long U type plastic holding flat ribbon and try to gently lift the U. The U doesn't come out all the way, it only needs to come out enough to free the ribbon. I broke the legs of the old one trying to bring it all the way up, fortunately the replacement has a new U. The assembly PS2077427 is removed and replaced after freeing the ribbon. When placing ribbon back, the very small hooks on the plastic U need to engage the two little holes in the ribbon to bring the ribbon down and grab it so it makes contact. The rest is easy.
  • Carlos from Camarillo, CA
  • Difficulty Level:
    Easy
  • Total Repair Time:
    15 - 30 mins
  • Tools:
    Screw drivers, Socket set
1 person found this instruction helpful.
Was this instruction helpful to you?
Thank you for voting!
oven clock and temp display control and door hinge failure
For display replacement: remove top three phillip head screws and four underneath bezel screws. Detach 3 wire harness sockets. With control panel assembly detached from oven face remove two screws holding display control using socket driver and replace with new. Reverse steps for installation.
Hinge replacement: Follow guidelines written by previous comments. Before re-installing door in to oven cavity slots be sure to remove temporary hinge "open" pin (small round-head pin approx. 3/8" long which holds the spring loaded hinge in a position to insert it through the oven door housing assy. slots). Also download the PDF service manual found on the web!
Other Parts Used:
Door Hinge Electronic Clock Assembly
  • David A from Nellysford, VA
  • Difficulty Level:
    A Bit Difficult
  • Total Repair Time:
    1- 2 hours
  • Tools:
    Nutdriver, Pliers, Screw drivers, Socket set, Wrench (Adjustable)
3 of 7 people found this instruction helpful.
Was this instruction helpful to you?
Thank you for voting!
Display was completely blank
Turned off current at breaker box. Removed the panel above the top oven (dual-oven) by removing the seven screws that held it on. Disconnected the wires going to the clock assembly. Laid the entire panel face down on the counter, removed the four screws holding the clock assy in place and removed clock. Installed new clock and reinstalled panel. It was that easy!
  • Michael from Manquin, VA
  • Difficulty Level:
    Really Easy
  • Total Repair Time:
    Less than 15 mins
  • Tools:
    Screw drivers
0 of 1 people found this instruction helpful.
Was this instruction helpful to you?
Thank you for voting!
Clock had gone dim over time
Removed screws holding in control panel. Replaced clock assembly following instructions listed by others. Easy. Wife happy.
  • Mark from North Richland Hills, TX
  • Difficulty Level:
    Really Easy
  • Total Repair Time:
    15 - 30 mins
  • Tools:
    Pliers, Screw drivers, Socket set
0 of 1 people found this instruction helpful.
Was this instruction helpful to you?
Thank you for voting!
control panel lights extremely dim
Removed upper cabinet doors. TURN OFF CIRCUIT BREAKER. Removed 4 screws holding control panel cover. Slid cover up and off. Disconnected 3 sets of wires. Removed old clock assembly, and replaced with new. Hooked up 3 sets of wires. Slid cover back on, attached screws.
Flipped circuit breaker - it worked!
  • Elizabeth from Aitkin, MN
  • Difficulty Level:
    Easy
  • Total Repair Time:
    30 - 60 mins
1 of 3 people found this instruction helpful.
Was this instruction helpful to you?
Thank you for voting!
Digital clock too dim to read
The digital clock was a snape to install but the long oven sensor required installation from the back. This means removing the double oven from the cabinet. I'm saving this repair for the installation of new cabinets.
Other Parts Used:
Electronic Clock Assembly Long Oven Sensor
  • Robert from Placerville, CA
  • Difficulty Level:
    Really Easy
  • Total Repair Time:
    15 - 30 mins
  • Tools:
    Nutdriver, Screw drivers
1 of 3 people found this instruction helpful.
Was this instruction helpful to you?
Thank you for voting!
  • 1
  • 2
  • 3
Questions and Answers

Ask our experts a question about this part and we'll get back to you as soon as possible!

8 questions answered by our experts.
Sort by:
  • 1
Sorry, we couldn't find any existing answers that matched.Try using some different or simpler keywords, or submit your new question by using the "Ask a Question" button above!
Cory
January 3, 2018
Like to know what is wrong with control panel both ovens work broiler does not clock is very dim timer works thanks for any help
For model number WW30430P
PartSelect logo
Hi Cory, Thank you for the question. This sounds like the Electronic Clock Assembly,Part Number: PS11743864 is defective and needs to be replaced. Hope this helps!

3 people found this helpful.

Was this helpful?
Thank you for voting!
John
December 21, 2017
How do you test a clock assembly? Getting F5 error. Oven sensor ok. Bake element ok looks like part # ps 11743864 would work if i can verify the old one is bad. Thanks
For model number WW27430B
PartSelect logo
Hi John, Thank you for your question. Only a trained technician can do the test on your electronic control board. However the F5 error code means: Control Board Failure - Replace control board (clock). Good luck with your repair.

2 people found this helpful.

Was this helpful?
Thank you for voting!
CHARLOTTE
September 12, 2017
My light for the timer is very dim and a couple other lights on the led panel don't work do i have to buy a whole led panel to fix this issue? If so do i need ps11743864 and how hare is it to install myself
For model number ACB6260AB
PartSelect logo
Hi Charlotte, Thank you for your inquiry. It sounds like you will need to replace either the control panel or the electronic control board. You will need a multimeter to check the continuity of each part to see which one is causing the issue. I hope this helps. Thank you and have a great day!

1 person found this helpful.

Was this helpful?
Thank you for voting!
Jeff
September 27, 2017
Was awakened in the middle of the night with a beeping noise coming from the oven. The display reads "f8". The model is a Jenn-Air ww27430p. Does this sound like a bad control board (clock)?
For model number WW27430P
PartSelect logo
Hi Jeff, Thank you for your inquiry. An F8 error code is referring to a Shorted Meat Probe Alarm - This will usually occur if probe is sensing a temperature over 250F. Check probe jack and harness for defects. I hope this helps. Thank you and have a great day!

Was this helpful?
Thank you for voting!
Jeff
September 27, 2017
Clarifying comment to my question below: The oven was not in use when the error occurred. No meat probe was connected or used. I have read this could also be a control board (clock) issue. Does this make sense?
For model number WW27430P
PartSelect logo
Hi Jeff, Thank you for your question. Yes, that would make sense. However the oven does not have to be in use at the time of the error. Good luck with your repair.

Was this helpful?
Thank you for voting!
Rick
February 13, 2020
My light panel showing time/timer/temp is very dim all controls work, but can't see it. What parts do i need and i was told that voltage spikes may have caused the problem. Is there safeguards
For model number AMANA MODEL ACB6280AS
PartSelect logo
Hi Rick, Thank you for your question. The part that you will need to replace is the electronic control board. The part number listed under your model number for the electronic control board is PS11743864. To place an order for the part you may order it either online, by visiting our live chat sessions, Monday to Friday from 8AM to 4PM EST, or by calling our customer service line at 1-888-738-4871 and anyone will be happy to assist you. We hope this helps. Thank you and have a great day.

Was this helpful?
Thank you for voting!
Jon
January 9, 2023
Will the current version of the electronic assembly work with a Jenn Air double oven which is about 20 years old?
For model number ww27430p
PartSelect logo
Hello Jon, thank you for your question. The part number of the Electronic Control is PS11743864. We hope this helps.

Was this helpful?
Thank you for voting!
Bill
4 days ago
oven works but no display like the panel is dead. Will the part PS11743864 fix this. The clock also does not work.
For model number WW27430P
PartSelect logo
Hello Bill, thank you for reaching out. Yes, the issue is most probably with the oven control board, part number PS11743864. You may need to replace it to fix the issue. We hope this helps!

Was this helpful?
Thank you for voting!
  • 1
Model Cross Reference
This part works with the following models:
PartSelect Number: PS11743864
Manufacturer Part Number: WP71001872
Brand
Model Number
Description
Amana
ACB6260AB
Wall Oven - Built-in, Electric
Amana
ACB6260AS
Wall Oven - Built-in, Electric
Amana
ACB6260AW
Wall Oven - Built-in, Electric
Amana
ACB6280AS
Wall Oven - Built-in, Electric
Maytag
MEW6627BAB
Wall Oven - Built-in, Electric
Maytag
MEW6627BAC
Wall Oven - Built-in, Electric
Maytag
MEW6627BAQ
Wall Oven - Built-in, Electric
Maytag
MEW6627BAS
Wall Oven - Built-in, Electric
Maytag
MEW6627BAW
Wall Oven - Built-in, Electric
Maytag
MEW6627CAS
Wall Oven - Built-in, Electric
Maytag
MEW6630BAB
Wall Oven - Built-in, Electric
Maytag
MEW6630BAC
Wall Oven - Built-in, Electric
Maytag
MEW6630BAQ
Wall Oven - Built-in, Electric
Maytag
MEW6630BAS
Wall Oven - Built-in, Electric
Maytag
MEW6630BAW
Wall Oven - Built-in, Electric
Maytag
MEW6630CAS
Wall Oven - Built-in, Electric
Jenn-Air
WW27430B
Wall Oven - Built-in, Electric, Wall
Jenn-Air
WW27430BC
Wall Oven - Built-in, Electric, Wall
Jenn-Air
WW27430P
Wall Oven - Built-in, Electric, Wall
Jenn-Air
WW27430PF
Wall Oven - Built-in, Electric, Wall
Jenn-Air
WW27430PG
Wall Oven - Built-in, Electric, Wall
Jenn-Air
WW27430PK
Wall Oven - Built-in, Electric, Wall
Jenn-Air
WW27430PR
Wall Oven - Built-in, Electric, Wall
Jenn-Air
WW27430PU
Wall Oven - Built-in, Electric, Wall
Jenn-Air
WW27430W
Wall Oven - Built-in, Electric, Wall
Jenn-Air
WW27430WC
Wall Oven - Built-in, Electric, Wall
Jenn-Air
WW30430B
Wall Oven - Built-in, Electric, Wall
Jenn-Air
WW30430P
Wall Oven - Built-in, Electric, Wall
Jenn-Air
WW30430PC
Wall Oven - Built-in, Electric, Wall
Jenn-Air
WW30430PF
Wall Oven - Built-in, Electric, Wall
Customer Service Representative

Get in touch, we're here to help!

Daily 8am - 9pm EST

Contact Customer Service