This is a drum felt seal for your dryer. It creates an airtight seal between the dryer rear panel and the back of the drum. It is important that this seal be flexible so it does not interfere with the function of the appliance. This model may be used for the front or the rear of your appliance. Take note that the adhesive is not included. The most common reason for needing to repair this part is if your dryer will not tumble, or there is not enough heat to properly dry your clothing.
How Buying OEM Parts Can Save You Time and Money
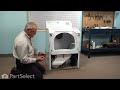
Part Videos
Replacing your Maytag Dryer Dryer Drum Felt Seal
Troubleshooting
This part fixes the following symptoms:
Noisy | Marks left on clothes
This part works with the following products:
Dryer, Washer Dryer Combo.
This part works with the following products:
Maytag, International, Crosley.
Part# WP33001807 replaces these:
AP6007947, 33001807, WP33001807VP
Customer Reviews
Average Rating:
★★★★★
★★★★★
4 Reviews
4.8
Filter By Rating:
5 Stars
3
4 Stars
1
3 Stars
0
2 Stars
0
1 Star
0
Sort by:
< Prev
1
Next >
Search filter:
Clear Filter
Your search term must have 3 or more characters.
Keep searches simple. Use keywords, e.g. "leaking", "pump", "broken" or "fit".
Sorry, we couldn't find any existing reviews that matched. Try using some different or simpler keywords.
★★★★★
★★★★★
Gerald M - November 4, 2021
Verified Purchase
Good try
Parts were good, but it didn’t solve the problem of Squeaking. The padding was almost the same as original. Only gave 4 star because it wasn’t a cure. But I would buy from them again fair fast & concerned
★★★★★
★★★★★
Roger B - June 3, 2019
Verified Purchase
Exactly What I Needed
This part is a perfect fit to replace the felt seals around my dryer drum. Easy to install and a quality part.
★★★★★
★★★★★
JOHN P - April 8, 2019
Verified Purchase
Replace front dryer drum felt seal
The old seal came out without any real problem. However, some of the tabs that hold the seal in place on the front structure had worn and some had broken in place. I now see why the fast drying mastic / glue was required. It did a fine job replacing the mechanical tabs. I found it easier to lay the dryer assembly on its back on the floor, since it was difficult to maneuver the front panel onto the drum and into the front screw holes simultaneously. By being on the back on the floor this allowed me to use gravity to position the front panel onto the drum and in place to the screws and I did not have to bear the weight of the whole assembly. I merely set it in position and ran my finger around the drum to tuck the felt seal in place without the drum falling out of position. The assembly stayed in place and allowed me to position the front plate to the screw holes.
★★★★★
★★★★★
James C - February 8, 2018
Verified Purchase
Part arrived early, perfect fit
Installation went well and took less than one hour. Parts fit perfectly.
< Prev
1
Next >
Customer Repair Stories
Average Repair Rating: 3.1 / 5.0, 20 reviews.
What's this?
Sort by:
< Prev
1
2
Next >
Search filter:
Clear Filter
Your search term must have 3 or more characters.
Keep searches simple. Use keywords, e.g. "leaking", "pump", "broken" or "fit".
Sorry, we couldn't find any existing installation instruction that matched.
Very Loud Squeaking / Clothing having rips
The support rollers were fried, literally. I'm honestly surprised they held on. Let's just say that the "roller" part wasn't even attached to the support wheel... That bad. Because there wasn't much support there is a small tear in the metal on the back drum. The felt seal for the drum had basically been worn down to pieces. So I order tw
... Read moreo drum support rollers, two roller shafts, a new drum felt seal, and a new rib belt.
After the repair, no more squeaking, literally a huge difference, and because of there's plenty of support now for the drum, there isn't any clothes being torn. If it weren't for the videos and the parts, we would of spent hundreds of dollars on a new dryer. Instead we spent just over $100 and now our dryer is quiet and operating better than when we got it.
Felt gaskets were worn and protruding into the drum. Cork and nylon bearing surfaces worn were
Removed and replaced felt gaskets as per the instructional video, simple task. Removed and replaced cork and nylon bearing surfaces, simple task. I did NOT need the high temp adhesive as recommended by a rep according to the model # provided. I did use a small amount to reattach the loose rubber gasket on the front drum panel. The adhesiv
... Read moree was an unnecessary added expense, and the cost of the cork and nylon bearing surfaces was excessive.
There are several parts that will cause the dryer to squeak, drum roller, idler pully and the drum slides. To start, remove the door and the two opposite screws. Pull the front cover down and remove, no screws to remove, this is a snaped on piece. Next, remove the two screws holding the dryer top bracket and lift the top. Take drum su
... Read morepport by removing the screws and then remove the belt from the motor and remove the drum. The hardest part was removing the C clips from the roller axle even with the snap ring pliers. Replace the drum rollers and reverse the process to re-assemble. Of course, the rollers weren't the problem even though they were worn out from 20 years of service. I ended up replacing the idler pully and and the idler pully support arm. If I had all of the parts prior to starting, the total time would have been about an hour. I did watch several YouTube videos before attempting the repair. That helped me understand the "how" and made it easy once I started the repair.
Did an internet search for parts for my older Maytag dryer. Landed on PartSelect and man I am glad I did! Entered my model number and boom! Complete schematics on the dryer, with part numbers. Also have diagnostic questions to point you in the right direction. Figured out what parts I needed, ordered via phone. Fantastic customer service.
... Read more PartSelect also has excellent installation videos you can watch to assist. Took me a little over an hour to open up the dryer, replace the drum rollers, drum belt, idler roller and both front and rear felt seals. Buttoned dryer back up, hit the run switch and it purs like brand new. I cannot recommend PartSelect to highly. Great company, great customer service, quick shipping.
Dryer emitted a squeaky noise every time it started
We inherited this dryer three years ago upon purchasing our current house. At that time I found this website to purchase and install a couple of the baffles that were missing. This time, I checked the troubleshooting for my current problem and ordered all of the parts I felt I needed to resolve the problem. Once I received the parts, I
... Read more followed the great how-to videos by Steve to disassemble the front of the dryer and remove the drum. I could not get to the repairs right away since the interior of the dryer was quite dirty and I took a lot of time to clean it out. Once I got to removing and replacing the drum rollers, idler pulley, rear drum felt shaft, and drum belt, everything went smoothly and was just as easy as Steve described in the videos. If I didn't have such a dirty machine interior, removing the old parts and installing the new parts would have taken less than an hour. I had to hold off on installing the front glide kit and front drum felt seal since I forgot to order two of each (I'll install these at a later date. I proceeded to putting everything back together and testing the dryer. The dryer now runs quietly and works great.
Dryer making grinding noise, and spotting clothes with black dust.
Followed your video; replaced felt seal on front of drum, (torn in two or three places), and replaced both front guide kits,which were ground to the metal, causing the black dust, ( metal shavings). Thanks for the help, Buck. The drum support rollers were OK.
Replaced damaged parts and recommended parts normally causing the problem. Dryer is working again like new. I expended $112 rather than $600 for a new equipment. Good deal!
Nutdriver, Pliers, Screw drivers, Socket set, Wrench set
5 of 10 peoplefound this instruction helpful.
Was this instruction helpful to you?
Thank you for voting!
Noisy dryer drum
I made the mistake of repairing my old maytag neptune dryer with cheap eBay rollers and they crumbled apart and made a ton of noise within a month. I replaced them with quality OEM parts from partselect.com and my dryer is running like new. It's easy to do with common household tools and there are even easy to follow instructions availabl
... Read moree online.
Follow instructions on this website and be sure to pull the felt seal fairly tight as you work your way around or you'll be a little short at the end...
Kirt from TWIN FALLS, ID
Difficulty Level:
Really Easy
Total Repair Time:
30 - 60 mins
Tools:
Nutdriver, Screw drivers
1 of 2 peoplefound this instruction helpful.
Was this instruction helpful to you?
Thank you for voting!
Tensioner Pulley Seized
Replaced tensioner pulley along with felts, rollers, shafts, belt, and bearing pads. This dryer is 21 years old and has been serviced by myself at 15 years old. I replaced everything mentioned above except the tensioner pulley. This is a great running dryer but always remember to change the tensioner pulley when the unit is apart. Also
... Read more have a third hand when mounting the belt and drum. Very easy other wise.
Ask our experts a question about this part and we'll get back to you as soon as possible!
5 questions answered by our experts.
Sort by:
< Prev
1
Next >
Search filter:
Clear Filter
Your search term must have 3 or more characters.
Keep searches simple. Use keywords, e.g. "leaking", "pump", "broken" or "fit".
Sorry, we couldn't find any existing answers that matched.Try using some different or simpler keywords, or submit your new question by using the "Ask a Question" button above!
John
March 10, 2018
Our front felt pad on the drum wore out. If I buy the replacement felt, what kind of adhesive should I use?
Hello John,
Thanks for your question. The adhesive to use with this part is part number PS11757492.
I hope this helps.
Hello Ronnie, thank you for your question. This is only one felt seal. To replace both, please order a quantity of 2. I hope this helps.
3 people found this helpful.
Was this helpful?
Thank you for voting!
Beryl
February 11, 2018
What part is drum felt seal for the front of the dryer.
For model number MDE9606AYW
Hi Beryl,
Thank you for your question. This would be the part for your front seal. Here is a video that should help you with installation: https://youtu.be/rv1Z0yNJIMY . It works for the front and the back. I hope that helps. Good luck with your repair.
2 people found this helpful.
Was this helpful?
Thank you for voting!
Zinnia
October 24, 2019
Hi i need to buy the felt seal for my dryer. Do i need to buy adhesive?
For model number Mdg7657bwq
Hi Zinnia, yes the felt seal does not come with adhesive. Thank you for your question and good luck with your repair!
1 person found this helpful.
Was this helpful?
Thank you for voting!
Zinnia
October 25, 2019
What felt product do I need to buy for this model Maytag dryer
For model number Mdg7657bwq
Hello Zinnia, Thank you for contacting us. I have researched the model you have provided and have found the part you are looking for is PartSelect Number PS11741074. Hope this helps!
1 person found this helpful.
Was this helpful?
Thank you for voting!
< Prev
1
Next >
✖
Ask a Question
Ask our experts a question on this part and we'll respond as soon as we can.