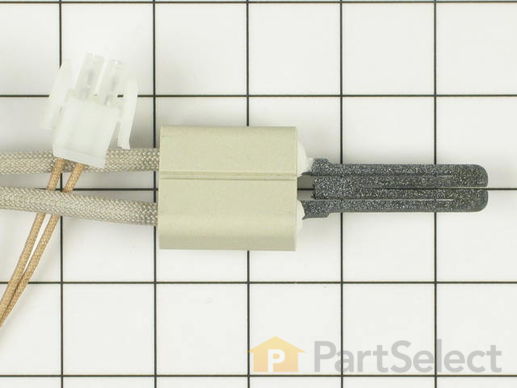
Part Location Diagram of WP31940001 Whirlpool Oven Igniter
See part 14 in the diagram
( Grid squares measure 1x1 inch )
Customer Service Representative

Get in touch, we're here to help!

Daily 8am - 9pm EST

customerservice@partselect.com

Oven Igniter WP31940001

 Fits your ARGS7650E!
★★★★★
★★★★★
24 Reviews

Rated by 81 customers 

Easy 

15 - 30 mins 

Ratings submitted by customers like you who bought this part.

$ 112.63
  In Stock
Get FREE EconoShip on orders over $100! T&C apply

Get this part fast! Average delivery time for in-stock parts via standard shipping: 1.8 days.

 Fits your ARGS7650E!
PartSelect Number PS11740951
Manufacturer Part Number WP31940001
Manufactured by Whirlpool
Product Description

Oven Igniter Specifications

This flat style gas oven igniter has ceramic housing and comes with a connector. The igniter body is just over three inches in length. Be very careful to not touch the black element part of this igniter as it is very fragile.
How Buying OEM Parts Can Save You Time and Money

How Buying OEM Parts Can Save You Time and Money

Troubleshooting
This part fixes the following symptoms:
Gas igniter glows | but will not light | Little to no heat when baking | Will Not Start
This part works with the following products:
Range.
This part works with the following products:
Amana, Caloric.
Part# WP31940001 replaces these:
AP6007826, 0316223, 31940001, Y0316223
Back to Top
Customer Reviews
Average Rating:
★★★★★
★★★★★
24 Reviews
4.8
Filter By Rating:
  • 5 Stars
    19
  • 4 Stars
    4
  • 3 Stars
    1
  • 2 Stars
    0
  • 1 Star
    0
Sort by:
  • 1
  • 2
  • 3
Sorry, we couldn't find any existing reviews that matched. Try using some different or simpler keywords.
  • 1
  • 2
  • 3
Customer Repair Stories
 Average Repair Rating: 3.8 / 5.0, 81 reviews. What's this?
Sort by:
  • 1
  • 2
  • 3
Sorry, we couldn't find any existing installation instruction that matched.
Gas oven would not heat up.
Researched through this site to find part numbers and names. Youtubed it to see how to install the part. Ordered the exact part via this site and received it in only a day or two. Installed it in less than 15 minutes and the oven works amazing. It gets up to temp quickly and holds temp better than it has in years. Very satisfied!
  • Gary from OSWEGO, NY
  • Difficulty Level:
    Really Easy
  • Total Repair Time:
    Less than 15 mins
  • Tools:
    Nutdriver, Screw drivers
1 person found this instruction helpful.
Was this instruction helpful to you?
Thank you for voting!
Oven doesn't start
Installed new igniter - easy job. Remove burner deflector, remove screws holding igniter bracket, remove panels below oven (accessible via removal of drawer), disconnect igniter and remove. Remove igniter from bracket, slide new one into bracket and reverse the steps to install it. Unfortunately, it didn't work. Igniter not glowing. I checked continuity on the igniter and it showed 90ohms resistance, so seems to be OK. Put multimeter on range plug end, turned on oven and multimeter did show cycling voltage at the plug (although I'm not certain what it should read). Relay in the control board does 'click' when oven turned on, so it also seems to work. Think I may be down to the gas control safety valve for the oven, but it is no longer available. Anyone have any other ideas? Hate to buy another igniter and have it still not work. Thanks!!
  • Dennis from STEWARTVILLE, MN
  • Difficulty Level:
    Really Easy
  • Total Repair Time:
    30 - 60 mins
  • Tools:
    Nutdriver, Screw drivers
1 person found this instruction helpful.
Was this instruction helpful to you?
Thank you for voting!
Oven would not light
I had done this before, but a while back, so it took a little longer to disassemble and find the igniter. Once there, easy to troubleshoot with a meter. Reassembly was only a few minutes and part of that was finding a new nut, since I lost one. I had to remove the storage drawer, then remove a metal cover to get at the connections. I tested the power to the igniter and found it to be OK. I tested continuity and had some but very low. Pulled the diffuser and cover off burner to locate igniter. Ordered part,put it on and reassembled everything. Working fine.
  • Verno from PRINCETON, WI
  • Difficulty Level:
    Really Easy
  • Total Repair Time:
    15 - 30 mins
  • Tools:
    Nutdriver, Screw drivers
1 person found this instruction helpful.
Was this instruction helpful to you?
Thank you for voting!
The Electric Igniter did not heat
Thanks to this website I was able to quickly identify the needed part. A few days later I had it. To install the new part I had to open up the bottom inside of the oven to access the igniter assembly and remove the drawer to get to the connecting plug underneath. Four screws needed to be removed, unplugged the old part and plugged in the new part. Replaced the four screws to hold the igniter in place. Replaced the drawer and fired it up. Worked great!
  • Daniel from Lake Elmo, MN
  • Difficulty Level:
    Easy
  • Total Repair Time:
    15 - 30 mins
  • Tools:
    Pliers, Screw drivers
0 of 1 people found this instruction helpful.
Was this instruction helpful to you?
Thank you for voting!
oven igniter failure
Removed the three screws holding the igniter, pulled the old one out and plugged in the new one. Very simple.
  • Donald from lake village, IN
  • Difficulty Level:
    Really Easy
  • Total Repair Time:
    15 - 30 mins
  • Tools:
    Nutdriver
1 of 2 people found this instruction helpful.
Was this instruction helpful to you?
Thank you for voting!
Oven on gas range would not light.Smelled gas.
Removed oven grills and top of burner pan. This exposed the igniter. Removed 3 phillips head screws from igniter bracket. Slid old igniter out the back end. Removed utility drawer. Removed two screws from back pan covering igniter plug-in. Unplugged igniter, removed from range. Handling of igniter is tricky..do not touch black end. Slide new igniter into the bracket, feed wire with connector through hole in back (where igniter was removed from), install the three screws for the bracket (your new igniter is now secure), from the bottom, plug in the new connector it only goes on one way. Re-install pan with two screws. Put utility drawer back in..job is complete!!
  • Ted from Howell, MI
  • Difficulty Level:
    Easy
  • Total Repair Time:
    Less than 15 mins
  • Tools:
    Screw drivers
1 of 2 people found this instruction helpful.
Was this instruction helpful to you?
Thank you for voting!
Qven would not heat.
I listened to see if the stove was igniting. It was not so we went with the igniter. It arrived in three days. I thin watched a u-tube repair. It was very helpful but looked as if a few steps were unnecessary. After reading the responses decided what steps could be eliminated and carefully replaced the part. It worked the first time. Besides handling the ceramic part very carefully the hardest part was remembering what screws went where! Extremely glad I took this on as a first time stove repair.
  • Mary from Austintown, OH
  • Difficulty Level:
    Easy
  • Total Repair Time:
    30 - 60 mins
  • Tools:
    Screw drivers
0 of 1 people found this instruction helpful.
Was this instruction helpful to you?
Thank you for voting!
oven wouldn,t light
remove oven flare pan in bottom of stove, about 25 screws, lift out and remove igniter. tip stove back and remove splash pan from underneath, 2 screws, unplug ignitor and reinstall using reverse procedure. igniter is very fragile so be extremely careful with it. reuse old hardware to hold in place,reassemble and good to go.
  • gerald from sturtevant, WI
  • Difficulty Level:
    A Bit Difficult
  • Total Repair Time:
    30 - 60 mins
  • Tools:
    Screw drivers
0 of 1 people found this instruction helpful.
Was this instruction helpful to you?
Thank you for voting!
ignitor would not work
Ordered new ignitor and recieved it in two days. Took out broiler drawer, took out 6 screws ,replaced ignitor reinstalled screws and broiler drawer in less then 15 minutes. New ignitor works perfectly. Couldn't of been any easier.
  • Lonnie from Knoxville, IA
  • Difficulty Level:
    Really Easy
  • Total Repair Time:
    Less than 15 mins
  • Tools:
    Screw drivers
0 of 1 people found this instruction helpful.
Was this instruction helpful to you?
Thank you for voting!
Baking doesn't ignite
Baking ignitor glows but gas valve not opening. Replacing the bake ignitor solves the problem.

Here is how to do:
1) open the oven door, unload the racks, bottom plate, and flame deflector. unscrew three screws (phillips screw driver needed) to loosen the bake ignitor (along with the metal rack).
2) take out the bottom drawer. you should see two screw all the way at the back. unscrew them to take off a metal cover. you should see the connector. unplug to take off the defective ignitor.
3) plug in the ignitor and put everything back in reverse order.

It took me a while to figure out how to access the connector at the bottom back of the stove. The next time it should take less than 15 minutes.
  • Ping from Winchester, MA
  • Difficulty Level:
    A Bit Difficult
  • Total Repair Time:
    30 - 60 mins
  • Tools:
    Nutdriver, Screw drivers
0 of 1 people found this instruction helpful.
Was this instruction helpful to you?
Thank you for voting!
  • 1
  • 2
  • 3
Questions and Answers

Be the first to ask our experts a question about this part!

Model Cross Reference
This part works with the following models:
PartSelect Number: PS11740951
Manufacturer Part Number: WP31940001
Brand
Model Number
Description
Amana
ACS3350AB
Range - Gas
Amana
ACS3350AB0
Range - AMANA RANGE- S/C S/I GAS
Amana
ACS3350AC
Range - Gas
Amana
ACS3350AC0
Range - AMANA RANGE- S/C S/I GAS
Amana
ACS3350AS
Range - Gas
Amana
ACS3350AS0
Range - AMANA RANGE- S/C S/I GAS
Amana
ACS3350AW
Range - Gas
Amana
ACS3350AW0
Range - AMANA RANGE- S/C S/I GAS
Amana
ARG7102C
Range - Downdraft, Gas
Amana
ARG7102C-P1143389NC
Range - GAS RANGE
Amana
ARG7102L
Range
Amana
ARG7102L-P1143338NL
Range - Amana Range/Stove/Oven Model ARG7102L-P1143338NL (ARG7102LP1143338NL, ARG7102L P1143338NL) Parts
Amana
ARG7102L-P1143341NL
Range - Amana Range/Stove/Oven Model ARG7102L-P1143341NL (ARG7102LP1143341NL, ARG7102L P1143341NL) Parts
Amana
ARG7102L-P1143344NL
Range - Amana Range/Stove/Oven Model ARG7102L-P1143344NL (ARG7102LP1143344NL, ARG7102L P1143344NL) Parts
Amana
ARG7102L-P1143347NL
Range - Amana Range/Stove/Oven Model ARG7102L-P1143347NL (ARG7102LP1143347NL, ARG7102L P1143347NL) Parts
Amana
ARG7102L-P1143370NL
Range - GAS RANGE
Amana
ARG7102L-P1143389NL
Range - GAS RANGE
Amana
ARG7102W
Range
Amana
ARG7102W-P1143338NW
Range - Amana Range/Stove/Oven Model ARG7102W-P1143338NW (ARG7102WP1143338NW, ARG7102W P1143338NW) Parts
Amana
ARG7102W-P1143341NW
Range - Amana Range/Stove/Oven Model ARG7102W-P1143341NW (ARG7102WP1143341NW, ARG7102W P1143341NW) Parts
Amana
ARG7102W-P1143344NW
Range - Amana Range/Stove/Oven Model ARG7102W-P1143344NW (ARG7102WP1143344NW, ARG7102W P1143344NW) Parts
Amana
ARG7102W-P1143347NW
Range - Amana Range/Stove/Oven Model ARG7102W-P1143347NW (ARG7102WP1143347NW, ARG7102W P1143347NW) Parts
Amana
ARG7102W-P1143370NW
Range - GAS RANGE
Amana
ARG7102W-P1143389NW
Range - GAS RANGE
Amana
ARG7102W-P1143399NW
Range - GAS RANGE
Amana
ARG7200L
Range
Amana
ARG7200L-P1143316NL
Range - GAS RANGE
Amana
ARG7200L-P1143323NL
Range - GAS RANGE
Amana
ARG7200L-P1143329NL
Range - GAS RANGE
Amana
ARG7200L-P1143331NL
Range - GAS RANGE
Customer Service Representative

Get in touch, we're here to help!

Daily 8am - 9pm EST

Contact Customer Service