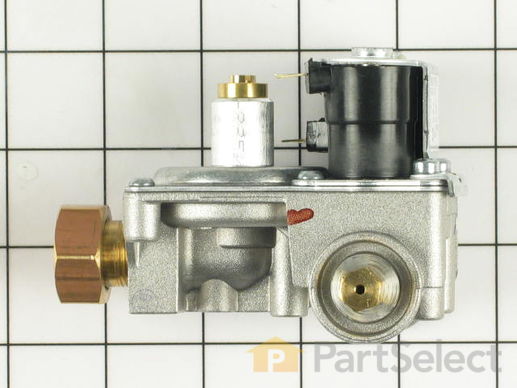
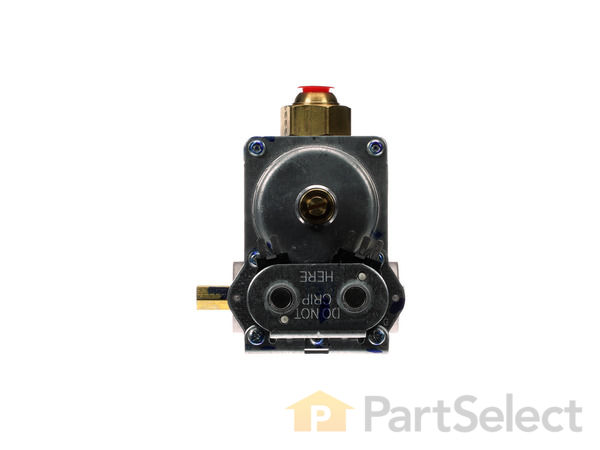
Part Location Diagram of WP306176 Whirlpool Gas Valve with Coils
See part 46 in the diagram
( Grid squares measure 1x1 inch )
Customer Service Representative

Get in touch, we're here to help!

Daily 8am - 9pm EST

customerservice@partselect.com

Gas Valve with Coils WP306176

★★★★★
★★★★★
1 Review

Rated by 10 customers 

Easy 

30 - 60 mins 

Ratings submitted by customers like you who bought this part.

$ 330.33
  In Stock
Get FREE EconoShip on orders over $100! T&C apply

Get this part fast! Average delivery time for in-stock parts via standard shipping: 1.8 days.

PartSelect Number PS11740673
Manufacturer Part Number WP306176
Manufactured by Whirlpool
Product Description

Gas Valve with Coils Specifications

This valve comes with electrical solenoids/coils.
How Buying OEM Parts Can Save You Time and Money

How Buying OEM Parts Can Save You Time and Money

Troubleshooting
This part works with the following products:
Dryer, Washer Dryer Combo.
This part works with the following products:
Maytag, Crosley.
Part# WP306176 replaces these:
AP6007556, 3-6176, 306176, 35001094
Back to Top
Customer Reviews
Average Rating:
★★★★★
★★★★★
1 Review
3.0
Filter By Rating:
  • 5 Stars
    0
  • 4 Stars
    0
  • 3 Stars
    1
  • 2 Stars
    0
  • 1 Star
    0
Sort by:
  • 1
Sorry, we couldn't find any existing reviews that matched. Try using some different or simpler keywords.
  • 1
Customer Repair Stories
 Average Repair Rating: 3.6 / 5.0, 10 reviews. What's this?
Sort by:
  • 1
Sorry, we couldn't find any existing installation instruction that matched.
Noticed a slight gas odor at startup. Did not light on first try and flame seemed weak after lighting.
A new gas valve solved the problem. The valve was an exact match but the gas fitting nut has a slightly larger diameter and required a minor modification to the 30 year old Maytag mounting bracket to provide clearance.
  • James from BEACON, NY
  • Difficulty Level:
    Easy
  • Total Repair Time:
    1- 2 hours
  • Tools:
    Screw drivers, Socket set, Wrench (Adjustable)
2 of 2 people found this instruction helpful.
Was this instruction helpful to you?
Thank you for voting!
No Heat In the Dryer.
Let me give a little background first for those trying to diagnose their dryer issue. My dryer was turning on and running but the clothes were not drying. From everything i read I thought it was going to just be the IGNITER (part# 304970 [Partselect# PS373025]), but when I opened the dryer and watched it worked I saw that the igniter was working fine and the gas was coming on. This made me think that it is was the HIGH LIMIT THERMOSTAT (# 3033950 [Partselect# PS2029366]). I replaced this and got no real change other than the gas would stay on a bit longer at the start. So I replaced the other TEMPERATURE CONTROL THERMISTOR (# 3072080 [Partselect# PS2030068]) but this had no effect. I then went back to my original thought of the igniter and replaced it with no improvement. My dryer was still running and only occasionally lighting the gas to heat up the drum, the clothes would eventually dry after a much longer than normal time. After reading some other stories I decided to try the GAS VALVE WITH COILS. I ordered the part and was surprised when it arrived at my house the next day. I took out the four screws in the front panel which are accessed by opening the door to the dryer. I shut off the gas and removed the igniter to avoid any accidents with it. Unscrew the gas line from the old valve, remove two screws in bottom of unit to remove it from the dryer. Turn it over and remove two small screws to remove old valve from housing. Now take your new valve and do the opposite. Set in the housing, screw in the two small screws, place in dryer and replace two screws to hold in place. Screw gas line onto new valve and replace igniter. Turn on the gas and give it a test run. My dryer fired right and for the first time in a long time the whole dryer actually got warm.
  • Craig from San Miguel, CA
  • Difficulty Level:
    Easy
  • Total Repair Time:
    15 - 30 mins
  • Tools:
    Screw drivers, Socket set
26 of 29 people found this instruction helpful.
Was this instruction helpful to you?
Thank you for voting!
After initial ignition & first heat cycle, gas valve would fail to re-ignite
The good: No need to pull out dryer beyond point where (wall) gas valve could be shut off.
The gotcha: Be sure to wear thick leather gloves to protect your hands. I discovered sharp edges the hard way!
The tip: To loosen gas valve inlet nut and to remove gas pipe from valve, use a bottom-to-top wrench motion. Despite threads being right-handed, this counter-intuitive operation (the thinking is that you are tightening the nut instead of loosening it) is necessary due to nut being located on the valve rather than the gas pipe which reverses the context.
The ending: Wife is happy to be back in the drying business and I'm happy just to have her happy not to mention saving a little $ in the process! Thanks PartSelect.com!!!
Other Parts Used:
Moisture Sensor Gas Valve with Coils
  • Lawrence S from Rancho Santa Margarita, CA
  • Difficulty Level:
    Easy
  • Total Repair Time:
    30 - 60 mins
  • Tools:
    Nutdriver, Wrench (Adjustable)
10 of 15 people found this instruction helpful.
Was this instruction helpful to you?
Thank you for voting!
Dryer runs, but no heat
Removed screws in hinges and on opposite side inside the door to remove the front panel.

You can put the door back on at this point to run the dryer with the burner exposed. At this point I could tell that the igniter was working and the gas valve would occasionally work so that burner would fire. The valve only seemed to work when everything was completely cooled down. I first replaced only the solenoid coils on top of the valve, this did not fix the problem. When I replaced the entire valve the problem was fixed.

Replacing the valve is easy.

1) Unplug dryer from wall outlet
2) Turn off gas supply cutoff valve
3) Remove door and front panel
4) Unplug wires from solenoid coil terminals. There are two coils on top of the valve body.
5) Remove gas line from valve body.
6) Remove two screws which secure the bracket holding the valve body and burner nozzle to the bottom of the dryer cabinet.
7) Remove two screws which secure the valve to the bracket.
8) Reverse the procedure for installation of new valve.
  • doug from dallas, TX
  • Difficulty Level:
    Really Easy
  • Total Repair Time:
    30 - 60 mins
  • Tools:
    Nutdriver, Screw drivers, Wrench (Adjustable)
13 of 16 people found this instruction helpful.
Was this instruction helpful to you?
Thank you for voting!
gas valve making chatter noise
shut off gas to dryer took apart the old and installed the new gas valve and glow coil.
Other Parts Used:
Gas Valve with Coils Flat Style Igniter
  • denise from winthrop, MA
  • Difficulty Level:
    Easy
  • Total Repair Time:
    15 - 30 mins
  • Tools:
    Nutdriver, Screw drivers, Wrench (Adjustable), Wrench set
4 of 9 people found this instruction helpful.
Was this instruction helpful to you?
Thank you for voting!
Dryer would not light
Easy yo replace the gas valve.

TURN OFF THE GAS. Remove dryer door and the 2 screws holding the bumpers on the left side of the door opening, then pull the dryer front forward at the top. Unplug the 2 electrical coils. Unplug the igniter. Disconnect the gas connection union. Remove 2 hold down screws from the bottom. Pull the burner assembly out of the dryer (BE VERY CAREFUL OF THE IGNITER - DON"T TOUCH). Remove 2 small screws holding gas valve to burner.

Reverse process to re-assemble.
  • Dave from Milford, MI
  • Difficulty Level:
    Easy
  • Total Repair Time:
    30 - 60 mins
  • Tools:
    Nutdriver, Screw drivers, Wrench (Adjustable)
4 of 6 people found this instruction helpful.
Was this instruction helpful to you?
Thank you for voting!
no gas circulation in the appliance
removed the screws and disconnected the wires and replaced the old unite with the new one
  • diana from valencia, CA
  • Difficulty Level:
    Easy
  • Total Repair Time:
    15 - 30 mins
  • Tools:
    Screw drivers, Wrench (Adjustable)
3 of 4 people found this instruction helpful.
Was this instruction helpful to you?
Thank you for voting!
Dryer was failing to dry clothes (heat going off intermittently)
To be more precise, the clothes weren't getting dry and there was some sort of vibration sound coming out of the dryer. I removed the front panel (by removing the 4 front screws (2 in the door and 2 on the opposite side). I then ran the dryer while inspecting the innards. I notice that the igniter was lighting but was failing to start the gas flame. I could smell a little gas during this period so I know that gas was available but was not getting released in the correct amount. This told me that the gas valve we malfunctioning. I remove the gas valve and broke the igniter (it's fragile so be careful). Some other contributer did the same thing :(
I replace both the igniter and gas valve and presto... it was fixed. My wife was impressed and I looked good. I guess that's all that matters :)
Other Parts Used:
Gas Valve with Coils Flat Style Igniter
  • Patricia from Oakland, CA
  • Difficulty Level:
    Really Easy
  • Total Repair Time:
    15 - 30 mins
  • Tools:
    Nutdriver, Screw drivers
28 of 29 people found this instruction helpful.
Was this instruction helpful to you?
Thank you for voting!
Flame would go out during cycle and not fire back up
Removed front of dryer, removed 3 screws from bracket mounted on bottom holding gas valve assembly, removed nozzle from assembly. Removed 2 screws that held gas valve assembly to bracket. Replaced with new gas valve assembly and dryer works fine
  • Ralph from Phildelphia, PA
  • Difficulty Level:
    Easy
  • Total Repair Time:
    15 - 30 mins
  • Tools:
    Screw drivers, Socket set, Wrench (Adjustable)
4 of 6 people found this instruction helpful.
Was this instruction helpful to you?
Thank you for voting!
Gas dryer would only occasionally heat up.
I noticed that the igniter would glow white hot for about 5 to 10 seconds, but would only ignite every once in a while. I decided that it was probably the gas valve that was bad. I removed the wires to the igniter and valve, and removed the two screws that secured the valve to the frame. I accidentally bumped the igniter as I removed the valve from the dryer - it broke! The igniter is extremely delicate, be careful not to touch it. When the new valve and igniter came in, I swapped some of the mounting hardware and installed the valve and igniter. I reattached the wires. The dryer fired up immediately - it was an easy fix.
Other Parts Used:
Gas Valve with Coils Flat Style Igniter
  • Daniel from East China, MI
  • Difficulty Level:
    Easy
  • Total Repair Time:
    15 - 30 mins
  • Tools:
    Screw drivers, Wrench (Adjustable)
71 of 79 people found this instruction helpful.
Was this instruction helpful to you?
Thank you for voting!
  • 1
Questions and Answers

Ask our experts a question about this part and we'll get back to you as soon as possible!

3 questions answered by our experts.
Sort by:
  • 1
Sorry, we couldn't find any existing answers that matched.Try using some different or simpler keywords, or submit your new question by using the "Ask a Question" button above!
Sam
June 27, 2019
What coil can I use for these valve
PartSelect logo
Hello Sam, Thank you for the question. The coils are only sold as part of the valve assembly. Hope this helps!

1 person found this helpful.

Was this helpful?
Thank you for voting!
Thomas
November 27, 2019
Igniter goes on but dryer only fires up on occasion
For model number MDG2600BWW
PartSelect logo
Hello Thomas, Thank you for the question. I suggest testing the M Series New Style Coil Kit, PartSelect Number PS334310. The coils should be reading a resistance of 1000 - 2000 ohms. If it is zero, then your coils are bad. Good luck with your repair.

1 person found this helpful.

Was this helpful?
Thank you for voting!
Glen
May 26, 2022
Burner is shutting off after about 30 second to a minute
For model number mdg7600aww
PartSelect logo
Hello Glen, Thank you for your inquiry. We have researched the model you have provided and we would recommend checking the following parts to fix your issue: the high limit thermostats, the cycling thermostat, the gas coils, and the flame sensor. You can test the parts with a multimeter. If you are unfamiliar with how a multimeter functions, we have videos available to assist you. We hope this helps and if you need help placing an order, customer service is open 7 days a week. Please feel free to give us a call. We look forward to hearing from you!

Was this helpful?
Thank you for voting!
Related Parts:
  • 1
You May Also Need ?
Model Cross Reference
This part works with the following models:
PartSelect Number: PS11740673
Manufacturer Part Number: WP306176
Brand
Model Number
Description
Crosley
CDG4205AWJ
Dryer - Residential
Crosley
CDG4205AWW
Dryer - Residential
Maytag
DG212
Dryer - Residential
Maytag
DG22CA
Dryer - Gas
Maytag
DG303
Dryer - Residential
Maytag
DG312
Dryer - Residential
Maytag
DG313
Dryer - Residential
Maytag
DG382
Dryer - Residential
Maytag
DG4000
Dryer - Residential
Maytag
DG412
Dryer - Residential
Maytag
DG482
Dryer - Residential
Maytag
DG490
Dryer - Residential
Maytag
DG4910
Dryer - Residential
Maytag
DG512
Dryer - Residential
Maytag
DG590
Dryer - Residential
Maytag
DG5910
Dryer - Residential
Maytag
DG612
Dryer - Residential
Maytag
DG712
Dryer - Residential
Maytag
DG713
Dryer - Residential
Maytag
DG7400
Dryer - Residential
Maytag
DG7500
Dryer - Residential
Maytag
DG7600
Dryer - Residential
Maytag
DG7800
Dryer - Residential
Maytag
DG8000
Dryer - Residential
Maytag
DG8200
Dryer - Residential
Maytag
DG8300
Dryer - Residential
Maytag
DG8410
Dryer - Residential
Maytag
DG8420
Dryer - Residential
Maytag
DG8500
Dryer - Residential
Maytag
DG8600
Dryer - Residential
Customer Service Representative

Get in touch, we're here to help!

Daily 8am - 9pm EST

Contact Customer Service