Keep searches simple. Use keywords, e.g. "leaking", "pump", "broken" or "fit".
Sorry, we couldn't find any existing reviews that matched. Try using some different or simpler keywords.
★★★★★
★★★★★
Toula A - June 26, 2021
Verified Purchase
Did the trick!
Received the part the next day and installed it. That was the problem, so problem solved!
★★★★★
★★★★★
Brent K - January 3, 2019
Verified Purchase
Defrost timer good
The part was in good condition, arrived quickly and it matched the old part perfectly. The defrost timer is working good no more problems.
★★★★★
★★★★★
Steven W - August 25, 2018
Verified Purchase
Easy install. Works great!!
The part is what was ordered and works great.
< Prev
1
Next >
Customer Repair Stories
Average Repair Rating: 4.0 / 5.0, 2 reviews.
What's this?
Sort by:
< Prev
1
Next >
Search filter:
Clear Filter
Your search term must have 3 or more characters.
Keep searches simple. Use keywords, e.g. "leaking", "pump", "broken" or "fit".
Sorry, we couldn't find any existing installation instruction that matched.
Coil inside freezer kept "icing" over, causing little to no air flow. This was causing the food to thaw while in the freezer.
After viewing a video by Parts Select, I pulled freezer from the wall to gain access to the back where the timer is located. I unplugged the freezer from the wall outlet. I then located the timer and used a screwdriver to turn the plastic screw on timer until it clicked once. I then waited a few minutes to see if heating elements would
... Read morestart working. When I heard water sizzling of the elements, I concluded the timer was bad. I then purchased a new timer from Parts Select and replaced it by removing the 2 screws holding it in place. I unplugged old timer and plugged in the new timer, reinstalling it onto the freezer. My 17 year old freezer is working like new again. Thank you Parts Select for everything.
Read less
Arthur from LAKE VILLAGE, AR
Difficulty Level:
Really Easy
Total Repair Time:
15 - 30 mins
Tools:
Nutdriver, Pliers
1 personfound this instruction helpful.
Was this instruction helpful to you?
Thank you for voting!
Deep Freezer leaked, warmed up to about 60 degrees, door no longer pulled shut when closing
You should know that the freezer leaked for months before it warmed up. It's not connected to water (no ice maker in it) so I figured it was ice build-up that was melting and causing the leak.
When it warmed up I called a repairman who said the start relay was bad and estimated $500 to replace it. I disputed this because the c
... Read moreompressor was running. I asked him if perhaps the freon was low, he said if it was, we should dispose of the freezer.
I even asked him to take $300 to replace that relay, but he refused so I paid him his service fee and sent him on his way. Turns out even $300 would've been a ripoff.
I watched several videos on diagnosing warm freezers. I tried contacting many online parts stores but PartsSelect.com was the only one that answered and had kind and patient techs willing to explain things to me.
I tested the evaporator fan motor, which turned out to be bad. The tech recommended other parts that might also be bad so I put them all into the shopping cart, including the overload (by accident, not sure how I got that one as I did not need the overload for this repair). I did buy the relay in case the unethical repair guy was right about the relay being bad.
The parts arrived quickly and the diagrams/video supplied by this site were very helpful. I used my cell phone to take photos of everything before I started so I could put all wires back in their proper places, etc.
EVAPORATOR FAN MOTOR:
Very easy to replace. I removed the cover panel as instructed, and removed the screws holding the motor with my nutdriver. The blades slid off the motor nice and easy--I did not have to fiddle with the clip at all, just slid them off and on.
There is a third hole in the white bracket that worried me because I didn't see a corresponding third hole in the photo online of that part. But when it arrived, it did have the hole so I was able to plug it in just fine.
I removed the middle wire from the old part's white bracket NOT by pulling on it. I removed it by gently pushing an allen wrench into the hole and then the wire came out easily so it could be plugged into the new part.
Very easy overall to replace the Evaporator Fan Motor.
BI-METAL DEFROST THERMOSTAT:
Another very easy to replace part! Find the old part, unplug it and plug in the new part! Once the panel is removed to access the fan, you can hold up the new part and use it to find the old one. In this model it was easy to find.
DEFROST TIMER:
This was on the back of my freezer, in the cavity that holds the compressor. Once I located it, it was a simple thing to replace it. I used the nut driver to unscrew the screws and unplugged it, plugged in the new one, put the screws back... super simple.
START RELAY:
This was the scariest for me but turned out to be simple. I had to lie on the ground to get close enough and position a bright light so I could see everything clearly. (I'm a 60-year-old gal with poor eyesight and creaky bones!) The cell phone came in handy here to take up close photos of the assembly.
Another difficult step: grabbing the relay to pull it out. It was difficult to gain purchase on it but I finally figured it out.
A third difficulty (only for me) was pulling off the terminals without damaging the wire. I followed the video closely here, grabbed the terminals and not the wire and worked at them to pull them off. They were on very tight, difficult but I did get them off.
Installing the new relay was easy. Attach the terminals (cell phone photo of original part helped me ensure I got the right wires to the right place) and plug it in (cell phone helped again so I could line up the pins before pushing).
The old part rattled just barely -- so perhaps it WAS on its way out, but certainly not worth a $500 repair the repairman wanted! And as you will see, it was not the only thing not working in our this freezer.
The freezer started right up -- compressor humming nicely -- but after 24 hours it was only 60 degrees. At that point I called PartsSelect.com and they spent a long time with me on the phone. We decided it might be leaking freon but they don't have parts or info on adding freon.
I researched "how to add freon to your freezer" and found a great video by Vegas Romaniac on youtube.
Turns out you need to make sure your gauge has a DVA-1 adapter; the link in the youtube video sends you to an old-style gauge, so if you buy that one you'll need to go to Walmart for a DVA-1 adapter ($3).
Another issue: the green gasket in that gauge prevented it from seating properly, it took me a very long time before it finally seated and pierced the can...
Ask our experts a question about this part and we'll get back to you as soon as possible!
12 questions answered by our experts.
Sort by:
< Prev
1
2
Next >
Search filter:
Clear Filter
Your search term must have 3 or more characters.
Keep searches simple. Use keywords, e.g. "leaking", "pump", "broken" or "fit".
Sorry, we couldn't find any existing answers that matched.Try using some different or simpler keywords, or submit your new question by using the "Ask a Question" button above!
Robert
April 1, 2019
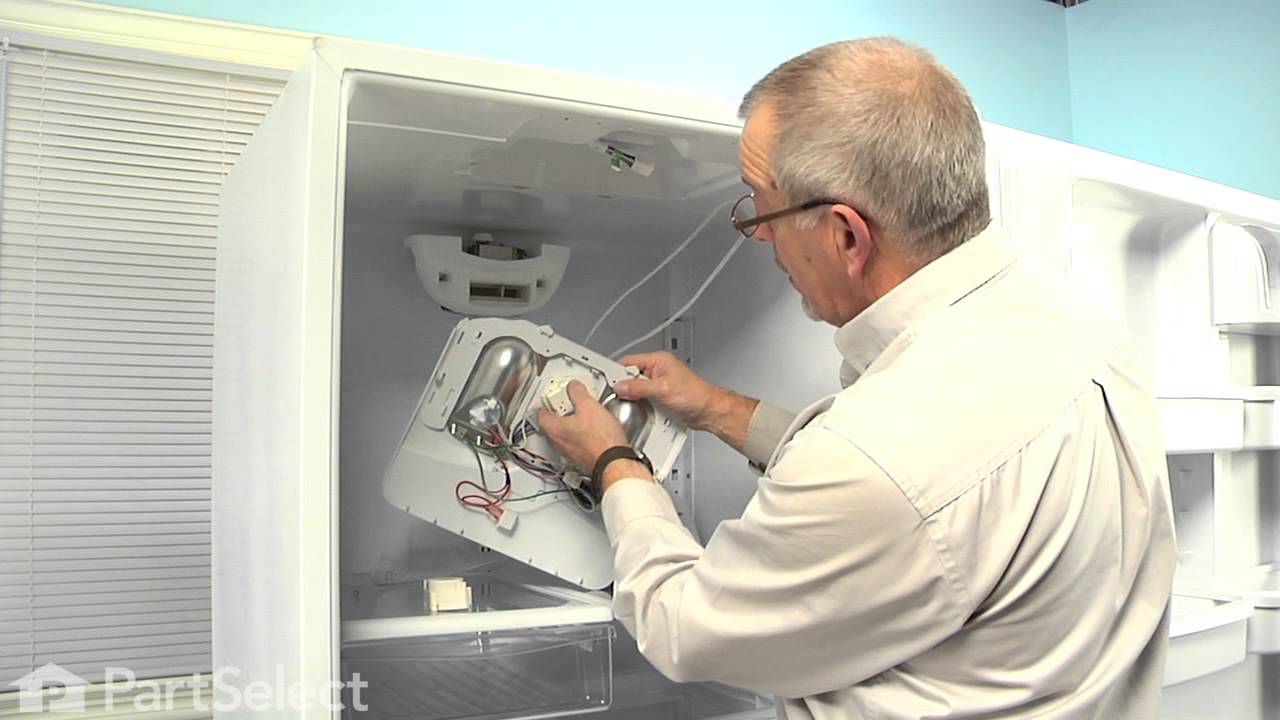
Hello, is there a video for replacing the defrost timer on the Whirlpool refrigerator Model el88trrws03. I'm having trouble finding the location. The diagram shows is Along with parts on the inside of the cabinet. Thanks
For model number EL88TRRWS03
Hello Robert, Thank you for the question. Here is a link to a video on how to replace the timer. Hope this helps! https://www.youtube.com/watch?v=-Cw8iYNsNmg
5 people found this helpful.
Was this helpful?
Thank you for voting!
Gary
April 17, 2019
Where is the defrost timer located?
For model number EV170NYLS00
Hello Gary, Thank you for the question. The Defrost Timer is located in the right side wall of the Freezer next to the controls. Hope this helps!
3 people found this helpful.
Was this helpful?
Thank you for voting!
Linda
August 12, 2017
Even after a complete defrost and cleaning and i make sure the drain hole is clear the freezer will build up ice at the very bottom. The hole is clear because i use a pipe cleaner as well as compressed air and strong vacuum. Everything seems fine but ice builds up again and this has gone on for 2 years. I can buy a new one for what having a service person come and order parts. Thank you, linda
For model number EV200NXGW00
Hi Linda,
Thank you for your inquiry. It sounds like there are three parts that could be causing your problem. The gasket seems to be the main problem for your type of refrigerator however that is an easy check. Just by looking at the seal you would be able to tell if it is not sealing properly. The other two parts that cause a build up in your type of appliance is the Defrost Timer and the Defrost Heater. You can test both of those parts with a multi-meter. I hope this helps.
The freezer is building up ice on top of the grill, even after I defrosted completely. It is not freezing but is slightly colder in the middle shelf. Need help to fix it. What part do I need?
For model number MQF1656TEW02
Hi Neomi, Thank you for the question. I suggest testing the Defrost Timer, the Heater and the Bimetl Defrost Thermostat.The best way to do this is to remove the thermostat from the refrigerator so you can control the temperature of the sensor. You can let the sensor warm up to room temperature. With the sensor warmed up to room temperature the sensor should read approximately 6.2K Ohms at 68°F. With the thermistor submerged is a glass full of ice water, the sensor should be very close to 32°F which should read approximately 16.3K Ohms. If the values that you are getting are far off from these readings, then the sensor is bad and should be replaced. Hope this helps!
3 people found this helpful.
Was this helpful?
Thank you for voting!
Neomi
November 30, 2017
Please show me on the picture of the parts page what i need to replace heater/cooler sensor on my freezer. I don't know anything about fixing freezers so please be thorough with pictures and so on. Ty. Please see my previous request.
For model number MQF1656TEW02
Hi Neomi,
Thank you for contacting us back. In diagram 6, the Unit Parts diagram, listed under your model number, the parts are listed as followed:
1. The Defrost Heater, part number 5,
2. The Defrost Timer, part number 8, and
3. The Bi-Metal Defrost Thermostat, part number 9.
We do not have photographs that we can provide you, but there are videos on our website that you can reference on how to install them. The refrigerator in the video may not show exactly like the one you have, but they will give you a general idea on how to install the parts. You will find the videos listed under the following part numbers on our website:
1. The Defrost Heater, part number PS1993872,
2. The Defrost Timer, part number PS11743439, and
3. The Bi-Metal Defrost Thermostat, part number PS11750673.
I hope this helps with your repair. Thank you and have a great day!
1 person found this helpful.
Was this helpful?
Thank you for voting!
Dennis
November 27, 2018
Where is the defrost timer located and is there a trick to changing it?
For model number EV209NBTN00
Hello Dennis, Thank you for the question. The defrost timer is located in the controls with the thermostat and the light switch. Here is a link to a video on how to replace the timer. Hope this helps!
https://www.youtube.com/watch?v=-Cw8iYNsNmg
1 person found this helpful.
Was this helpful?
Thank you for voting!
PAUL
April 23, 2023
How long (minutes) will the Whirlpool 3-81329 Defrost Timer stay in the defrost mode?
For model number Whirlpool 3-81329 Timer
Hi Paul,
Thank you for your question. The defrost cycle can last between 25 and 35 minutes. We hope this helps!
1 person found this helpful.
Was this helpful?
Thank you for voting!
Ronnie
April 17, 2018
Need location of defrost timer on this unit.
For model number MQF1656TEW02
Hi Ronnie, Thank you for the question. The defrost timer is located in the controls with the thermostat and the light switch. Hope this helps!
Was this helpful?
Thank you for voting!
Casey
June 6, 2019
Where is defrost timer located?
For model number EV170NYLQ00
Hi Casey, Thank you for the question. The defrost timer is located in the controls with the thermostat. Hope this helps!
Was this helpful?
Thank you for voting!
Edward
July 16, 2019
The side became extremely hot, and would not cool
Could the timer have stopped working on the defrost position?
For model number Wcf25f1
Hello Edward, thank you for writing. If your refrigerator will not cool, you may want to consider replacing the Evaporator Fan Motor part PS11740628 or this Defrost Timer part PS11740630 for your model. We hope this helps.
Was this helpful?
Thank you for voting!
< Prev
1
2
Next >
✖
Ask a Question
Ask our experts a question on this part and we'll respond as soon as we can.