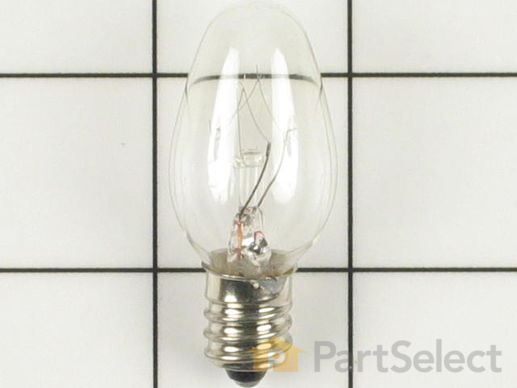
Part Location Diagram of W10857122 Whirlpool Light Bulb - 7W
See part 22 in the diagram
Replacing your Amana Refrigerator Light Bulb - 7W
( Grid squares measure 1x1 inch )
Customer Service Representative

Get in touch, we're here to help!

Daily 8am - 9pm EST

customerservice@partselect.com

Light Bulb - 7W W10857122

 Fits your RB184RLDA!
★★★★★
★★★★★
5 Reviews

Rated by 20 customers 

Easy 

30 - 60 mins 

Ratings submitted by customers like you who bought this part.

$ 14.22
  In Stock
Get FREE EconoShip on orders over $100! T&C apply

Get this part fast! Average delivery time for in-stock parts via standard shipping: 1.8 days.

 Fits your RB184RLDA!
PartSelect Number PS11731356
Manufacturer Part Number W10857122
Manufactured by Whirlpool
Product Description

Light Bulb - 7W Specifications

Sold individually. This bulb is a 7-watt appliance incandescent light bulb. This appliance light bulb is two inches long. It is used for many clothes dryers. You will need a Phillips screwdriver and needle-nose pliers. Unplug the power from your dryer. You will find the light bulb by opening your dryer door and locating the casing surrounding the bulb on the top of the inside of the door. You will need to remove the single screw holding it in place to access the bulb. Twist the old bulb out of place. Use your pliers if the base of the bulb is still inside the socket once the glass part of the bulb has been removed. Check to make sure that the socket itself is not damaged. If the socket is damaged it will need to be replaced as well. Screw your new bulb into place.
How Buying OEM Parts Can Save You Time and Money

How Buying OEM Parts Can Save You Time and Money

Part Videos

Replacing your Amana Refrigerator Light Bulb - 7W

Replacing your Amana Refrigerator Light Bulb - 7W
Troubleshooting
This part works with the following products:
Refrigerator, Dryer, Washer Dryer Combo, Microwave.
This part works with the following products:
Amana, Maytag, Admiral, Jenn-Air.
Part# W10857122 replaces these:
AP5999271, 0056324, 14203519, 14218606, 3-7100, 307100, 60954, 63179-1, 63179-1A, 67001316, 67001316A, A0348401, A0365001, M0360001, M0360001Q, M036001, M3600-1, R0605087, W10856862, Y0056324 , Y307100, Y60954 Show less
Back to Top
Customer Reviews
Average Rating:
★★★★★
★★★★★
5 Reviews
4.0
Filter By Rating:
  • 5 Stars
    3
  • 4 Stars
    1
  • 3 Stars
    0
  • 2 Stars
    0
  • 1 Star
    1
Sort by:
  • 1
Sorry, we couldn't find any existing reviews that matched. Try using some different or simpler keywords.
  • 1
Customer Repair Stories
 Average Repair Rating: 3.4 / 5.0, 20 reviews. What's this?
Sort by:
  • 1
  • 2
Sorry, we couldn't find any existing installation instruction that matched.
The motor belt was broken, lint filter torn and light bulb burnt
After watching the short video on belt repair, I put the belt on and ran it through the idle wheel from the small opening on the back of the dryer. I made sure that the felt around the tumbler was not folded and that the tumbler was free to spin.I also thoroughly vacuumed the entire interior of the dryer and the lint filter channel
Other Parts Used:
Tumbler and Motor Belt Lint Filter Light Bulb - 7W
  • Vartan from BURBANK, CA
  • Difficulty Level:
    Easy
  • Total Repair Time:
    1- 2 hours
  • Tools:
    Screw drivers, Socket set
2 of 2 people found this instruction helpful.
Was this instruction helpful to you?
Thank you for voting!
Broken lint screen/ burned out light bulb
Quickly removed lint screen and removed and replaced light bulb.
Other Parts Used:
Lint Filter Light Bulb - 7W
  • Michael from Cheltenham, MD
  • Difficulty Level:
    Really Easy
  • Total Repair Time:
    Less than 15 mins
  • Tools:
    Screw drivers
0 of 2 people found this instruction helpful.
Was this instruction helpful to you?
Thank you for voting!
Refrigerator not cooling, freezer thawing but cold.
I removed the back lower panel within the freezer compartment. The cooling fan which draws cold air from the evaporator unit was functioning fine. I then unplugged the unit.
The evaporator unit was frozen in a block of ice. I removed all food contents from both the freezer and the refrigerator, moving them to a back-up refrigerator. I then allowed the radiator to thaw completely overnight. Upon restarting the unit it became cold within an hour thus I new the compressor was fine. I surmised it must be a defrost issue. I then unconnected the defrost heater and thermostat assembly. The device was easy to remove. I then routed the wire of the new assembly on the side of the evaporator unit and clipped the thermostat back onto the cooper feed, plugged the unit into the connection. Next I turned my attention to replacing the adaptive defrost timer. In the top of the refrigerator compartment, I removed the plastic shroud, by sliding back and pushing the plastic clips in. I took out 4 screws holding the unit to the ceiling of the refrigerator. Slowly lowering this, I could see the adaptive defrost timer in the right rear corner. I simply unplugged the unit and replaced with a new unit. I replaced both items although I am unsure which was not working. Refrigerator is working fine now.
Other Parts Used:
Defrost Heater and Thermostat Assembly Adaptive Defrost Board Water Filter Bypass Plug Door Shelf Bucket Stop Light Bulb - 7W Light Bulb - 40W
  • Thomas from Queensbury, NY
  • Difficulty Level:
    Easy
  • Total Repair Time:
    30 - 60 mins
  • Tools:
    Screw drivers, Socket set
12 of 19 people found this instruction helpful.
Was this instruction helpful to you?
Thank you for voting!
No flame. Igniter cold.
Unplugged the machine. Removed the front cover by removing the 2 Philips screws near the bottom of the front of the machine. Unplugged the igniter. Replaced it. Put this all back together.
Note: Fire will not stay on while front cover is off or door is open.
Other Parts Used:
Light Bulb - 7W Flat Style Igniter
  • Matt from Green Bay, WI
  • Difficulty Level:
    Really Easy
  • Total Repair Time:
    Less than 15 mins
  • Tools:
    Screw drivers, Socket set
1 of 2 people found this instruction helpful.
Was this instruction helpful to you?
Thank you for voting!
Coil would freeze up, then refer would get warm.
I replaced the defrost timer, and then the defrost thermostat. I diagnosed these two items because it would get cold/freeze great for about 12-24 hours and then would start to warm back up. I pulled the cover off that covers the evaporator coil and found it to be frosted up. This told me that the defrost timer probably wasn't working properly. Decided to replace the defrost thermostat while I was in there as a precaution. It was much much cheaper than having to replace a side by side!!
Other Parts Used:
Bimetal Defrost Thermostat Defrost Timer Kit - 120V 60Hz Light Bulb - 7W
  • Michael from Dewitt, MI
  • Difficulty Level:
    Easy
  • Total Repair Time:
    Less than 15 mins
  • Tools:
    Nutdriver
4 of 5 people found this instruction helpful.
Was this instruction helpful to you?
Thank you for voting!
Ice maker not making ice, also needed drumwheel for the front of the ice bucket, wouldn't crush ice , and ice would get stuck
Took the rear bottom panel loose , the ice maker and water dipenser valve is in the right corner. Turn off water line to the refrigerator , and also unplug the electric from the outlet. It is easier to take the ground wire loose from the valve bracket now , before taking valve out of the bracket. take the two water lines that run to the door and the ice maker loose, then remove the main inlet line. Once you have the water lines off, then you can remove both electrical plugs from the electric coils. The water lines that run to the door and the ice maker cant be confused , because they are two different sizes , so they will only fit the correct side. The electrical plugs are pretty simple as well as, the wires are the same color as the coils, so its fairly easy to see which one goes where. The replacement process is pretty self-explanitary , just reverse the order. Just as a hint of advice , have a sponge or mop ready to clean up the water that comes out of the lines when you remove them. I also changed the drum wheel in the front of the ice bin, this process is not easy if you let the blades and spacers fall apart , as they have to pretty much have to be in correct order , or your ice bin will not crush ice , and you could possibly bust the bin into pieces. The process is not really hard , just pay close attention to what is coming off from where!!! There are two bolt on the bottom of the front cover , take them loose and pull the cover forward from the bottom, then lift a little , should come off. Then the metal front cover should be exposed, ther are two bolts in it as well , remove them , and the front should be loose , this is when you hold the auger and keep an eye on the blades. There is also a nut , right in the center of the wheel you have to take loose , hold the auger then take the nut loose with a 1/2 in. wrench. Once you remove the nut the drum pulls right off the auger. When going back together , make sure the ice crusher blades all line up correctly , as the blades wont work at all . They have to slide back into the blade pivot bracket (slot made into the plastic bucket front). As I said before , be sure and pay close attention , and this process will go easily. The drum is marked front side , or this side out, be sure its installed correctly , as the ice will not feed right. The first cycle of the ice maker making ice will probably be only 1 or 2 cubes , but the second time around you will have a full set of 8 , the water lines get air in them while they are unhooked so you wont get a full cycle the first time.
Other Parts Used:
Water Inlet Valve - 120V 60Hz Light Bulb - 120V 25W Crushed Ice Wheel Light Bulb - 7W
  • Andy from Somerset, KY
  • Difficulty Level:
    Easy
  • Total Repair Time:
    Less than 15 mins
  • Tools:
    Nutdriver, Pliers, Screw drivers
6 of 7 people found this instruction helpful.
Was this instruction helpful to you?
Thank you for voting!
No Ice or water dispencing
I first read about others with the same problem on your web sight and figured if they could do it so could I. Anyway the directions are a little hard to read but it was very informative and straight forward. I took the advice of one of the do it your-selfers when it came down to removing the spring. Be careful not to loose it. Everything was there that I needed and went on without a hitch. Now it was time to see if my repairs were done correctly. Pow! Everything worked. This is a great web-sight to buy parts if you are a do it your selfer. Easy to follow instructions.
Other Parts Used:
RACK SLIDE END CAP Limit Switch - 2 Terminal Ice Dispenser Solenoid and Door Kit Light Bulb - 7W
  • Tracey from Cedar Hill, TX
  • Difficulty Level:
    Easy
  • Total Repair Time:
    15 - 30 mins
  • Tools:
    Screw drivers, Socket set
8 of 9 people found this instruction helpful.
Was this instruction helpful to you?
Thank you for voting!
I needed a new grate where the water dispenses.
I just lifed the old grate off and layed the new one in.
  • Vickie from Lincoln, NE
  • Difficulty Level:
    Really Easy
  • Total Repair Time:
    Less than 15 mins
0 of 226 people found this instruction helpful.
Was this instruction helpful to you?
Thank you for voting!
flap on ice door
taking apart and putting new one on is very very easy but the magnet pin that open and shuts had to work with for a while i have big hands and small space but once put it together very easy assembly.
Other Parts Used:
Disposer Care Ice Door Assembly Light Bulb - 7W
  • RALPH from WHEELING, WV
  • Difficulty Level:
    A Bit Difficult
  • Total Repair Time:
    15 - 30 mins
  • Tools:
    Screw drivers
1 of 4 people found this instruction helpful.
Was this instruction helpful to you?
Thank you for voting!
Ice maker door broke allowing open hole to freezer
The ice maker panel on the freezer door detaches by removing two screens at the bottom of the panel behind the drip tray. My son held the panel while I removed three screws holding the ice chute cover. The ice chute door is attached to a spring loaded bracket. I only needed the actual door, but it was just as easy to replace the insulation and the seal. The seal was starting to show wear. I then replaced the ice chute cover and tested the ice maker. With everything working correctly, I reinstalled the panel in the door.
Other Parts Used:
Ice Chute Door Insulation Ice Chute Seal Ice Chute Door Light Bulb - 7W
  • Clifford from Madison, IN
  • Difficulty Level:
    Easy
  • Total Repair Time:
    Less than 15 mins
  • Tools:
    Nutdriver
9 of 12 people found this instruction helpful.
Was this instruction helpful to you?
Thank you for voting!
  • 1
  • 2
Questions and Answers

Ask our experts a question about this part and we'll get back to you as soon as possible!

1 question answered by our experts.
Sort by:
  • 1
Sorry, we couldn't find any existing answers that matched.Try using some different or simpler keywords, or submit your new question by using the "Ask a Question" button above!
WILLIAM
January 28, 2018
I'm trying to determine why my gas dryer won't start. If the door light works, would that eliminate the fuse as the problem? If so, it sounds like the start button switch or door switch.(?)
For model number NDG7800AWW - AMANA
PartSelect logo
Hello William, thank you for your question. The light could stay on even if the fuse is bad. I would check the fuse, door switch, and gas coils first. I hope this helps!

1 person found this helpful.

Was this helpful?
Thank you for voting!
  • 1
Model Cross Reference
This part works with the following models:
PartSelect Number: PS11731356
Manufacturer Part Number: W10857122
Brand
Model Number
Description
Admiral
19902-0A
Refrigerator - REFRIGERATOR
Admiral
19903-0A
Refrigerator - REFRIGERATOR
Admiral
19922-0A
Refrigerator - REFRIGERATOR
Admiral
19922-7A
Refrigerator - REFRIGERATOR
Admiral
19923-0A
Refrigerator - REFRIGERATOR
Admiral
19923-7A
Refrigerator - REFRIGERATOR
Admiral
19972-0A
Refrigerator - REFRIGERATOR
Admiral
19972A
Refrigerator - REFRIGERATOR
Admiral
19972B
Refrigerator - REFRIGERATOR
Admiral
19972C
Refrigerator - REFRIGERATOR
Admiral
19973A
Refrigerator - REFRIGERATOR
Admiral
19973B
Refrigerator - REFRIGERATOR
Admiral
19973C
Refrigerator - REFRIGERATOR
Admiral
19992A
Refrigerator - REFRIGERATOR
Admiral
19993A
Refrigerator - REFRIGERATOR
Amana
1999A
Refrigerator
Amana
1999A-P1193906WL
Refrigerator - SIDE BY SIDE REFRIGERATOR
Amana
1999CIW
Refrigerator
Amana
1999CIWA
Refrigerator
Amana
1999CIWEA
Refrigerator
Amana
1999CIWEL-P1171101WL
Refrigerator - SIDE BY SIDE ICE AND WATER REFRIGERATOR/FREEZER
Amana
1999CIWEW
Refrigerator
Amana
1999CIWEW-P1171101WW
Refrigerator - SIDE BY SIDE ICE AND WATER REFRIGERATOR/FREEZER
Amana
1999CIWL-P1121502WL
Refrigerator - SIDE BY SIDE ICE AND WATER REFRIGERATOR/FREEZER
Amana
1999CIWW
Refrigerator
Amana
1999CIWW-P1121502WW
Refrigerator - SIDE BY SIDE ICE AND WATER REFRIGERATOR/FREEZER
Amana
1999IW
Refrigerator
Amana
1999W
Refrigerator
Amana
1999W-P1193906WW
Refrigerator - SIDE BY SIDE REFRIGERATOR
Admiral
20872A
Refrigerator - REFRIGERATOR
Customer Service Representative

Get in touch, we're here to help!

Daily 8am - 9pm EST

Contact Customer Service