


Models
>
NX58K7850SG
NX58K7850SG (AA-0000) Samsung Range - Overview
Sections of the NX58K7850SG
[Viewing 5 of 5]


Keep searches simple, eg. "belt" or "pump".

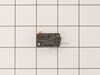
Micro Door Switch
PartSelect #: PS4131192
Manufacturer #: 3405-001034
This door switch, also known as a safety switch, is a genuine OEM replacement part for microwaves. It is a safety mechanism that sends signals to the microwaves control system, telling it when the doo...
$37.08
In Stock

Oven Burner Igniter
PartSelect #: PS4241428
Manufacturer #: DG94-00520A
This is an oven burner igniter made for use with Samsung ovens. This oven burner igniter is designed to ignite the gas that flows into it, to produce heat. However, over time and with further frequent...
$218.00
In Stock


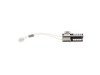
Thermostat
PartSelect #: PS4226434
Manufacturer #: DE47-20037A
This is a high limit thermostat designed for microwaves, ranges and ovens. Made of plastic and metal, this thermostat is designed to open the electrical circuit for your appliance when it reaches a sp...
$28.98
In Stock

Rubber Cushion
PartSelect #: PS4241222
Manufacturer #: DG73-00003A
This rubber cushion is supplied by the original manufacturer and has a shaft approximately 1 inch long. The cushion acts as a layer of protection between the oven door and oven frame/cavity. It preven...
$6.59
In Stock

Right Rear Burner Cap - Black
PartSelect #: PS5576950
Manufacturer #: DG62-00111A
This surface burner cap is specially designed to fit with Samsung ranges. It is a genuine OEM replacement part supplied directly by Samsung to ensure compatibility. The burner cap is a round, black ca...
$63.20
In Stock


Bottom Floor Panel
PartSelect #: PS4240944
Manufacturer #: DG61-00570A
This oven cavity floor coating or bottom floor panel is an authentic OEM part supplied by Samsung to ensure compatibility with various models of Samsung ranges. It is a protective layer that sits on t...
$179.79
On Order
;NX583G0 – Part Number: DG62-00076B")

Range Surface Burner Cap
PartSelect #: PS4240971
Manufacturer #: DG62-00067A
The burner cap protects the burner head from spills and helps spread out the burner flame for even heating.
$86.67
In Stock

Wire Rack
PartSelect #: PS12721757
Manufacturer #: DG75-01001D
This stainless steel wire rack is a sturdy platform for baking or roasting food, making sure heat circulates evenly. It measures approximately 7/16 inches by 24 3/4 inches and is usually found inside ...
$265.94
In Stock

Questions And Answers for NX58K7850SG
We're sorry, but our Q&A experts are temporarily unavailable.
Please check back later if you still haven't found the answer you need.
Common Symptoms of the NX58K7850SG
[Viewing 6 of 6]Doesn’t shut off
Fixed by
these parts
these parts
Show All
No heat
Fixed by
these parts
these parts
Show All
Gas igniter glows, but will not light
Fixed by
these parts
these parts
Show All
Element will not heat
Fixed by
these parts
these parts
Show All
Won’t turn on
Fixed by
these parts
these parts
Show All
Door won’t open after self cleaning cycle
Fixed by
these parts
these parts

Show All

Keep searches simple. Use keywords, e.g. "leaking", "pump", "broken" or "fit".
Oven not heating and holding temp
The Samsung stove I have has had the igniter replaced several times. It seems to wear out over a couple years time. I did the repair with a Philips #2 screw driver. Open the oven door, remove the grates. unscrew the bottom cover and expose the heat shield. Unscrew the heat shield. This exposes the burner. Unscrew the burner from the c
... Read more
enter of the plate/lower heat shield. Unscrew the burner from the front and back of the oven. Carefully lift up the burner to expose the igniter and clip. Unscrew the igniter from the burner and set the burner aside. Unclip the igniter from the power cable. If it falls below, it won't go far just reach in a lift it back up to fasten the new igniter to the power clip. Refasten to the burner with new clips and screws provided. Re-insert the burner to the gas jet that is below the bottom plate which will not be visible to you unless you place your head towards the rear of the stove and look down. Once the Jet is back into the hole of the burner, re fasten it to the middle back and front of the stove. Replace the covers and grates. Close the oven and test it. A new igniter does wonders. You can remove the stove door for a less intrusive install, but I found it unnecessary to do so and saved a step and time. I was done well under 30 minutes.
Read less
Parts Used:
-
John from EAST QUOGUE, NY
-
Difficulty Level:Easy
-
Total Repair Time:15 - 30 mins
-
Tools:Screw drivers
12 of 17 people
found this instruction helpful.
Was this instruction helpful to you?
Thank you for voting!
Oven shut off during self clean cycle and door stayed locked.
I took off the back cover after I looked at youtube similar problems. Then removed the little thermostat and un hooked the 2 wires. I looked up the part and after is was delivered couple days later I connected the 2 wies and after putting the back cover on the oven was back to normal. Was such an easy repair and the part was only $11.
Parts Used:
-
Uwe from FORT COLLINS, CO
-
Difficulty Level:Very Easy
-
Total Repair Time:15 - 30 mins
-
Tools:Screw drivers
11 of 20 people
found this instruction helpful.
Was this instruction helpful to you?
Thank you for voting!
REPLACED THE FLOOR CAVITY
REMOVED THE TWO SCREWS AND THEN THE FLOOR PIECE. THEN REPLACED THE NEW FLOOR CAVITY AND SCREWED THE NEW ONE IN PLACE.
Parts Used:
-
Madeleine from CHICAGO, IL
-
Difficulty Level:Really Easy
-
Total Repair Time:Less than 15 mins
-
Tools:Screw drivers
4 of 6 people
found this instruction helpful.
Was this instruction helpful to you?
Thank you for voting!