


Models
>
MW880RDA
MW880RDA Amana Microwave - Overview
Sections of the MW880RDA
[Viewing 4 of 4]


.gif "SUPPLEMENTAL INFORMATION Diagram and Parts List for Amana Microwave")
Keep searches simple, eg. "belt" or "pump".

Micro Switch
PartSelect #: PS11741686
Manufacturer #: WP3405-001034
This is a micro switch, which is also known as a door switch for your microwave. The main reason for needing to replace this part is if you are not getting heat to your appliance. The door switch is l...
$51.43
In Stock


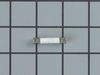
Rectifier
PartSelect #: PS11738693
Manufacturer #: WP13091701
The rectifier (also known as a diode) provides the microwave with energy to cook food. If your appliance is not producing heat or not turning on it could be due to the breakdown of the rectifier. This...
$25.99
In Stock


Questions And Answers for MW880RDA
We're sorry, but our Q&A experts are temporarily unavailable.
Please check back later if you still haven't found the answer you need.
Common Symptoms of the MW880RDA
[Viewing 2 of 2]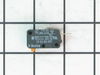
Keep searches simple. Use keywords, e.g. "leaking", "pump", "broken" or "fit".
Blown Fuse - Ps1750182
Unscrewed the cover of the microwave replaced the blown fuse with the new fuse, plugged in the microwave and tested all functions and everything worked fine. Thx for quick delivery.
Parts Used:

-
John from Inverness, FL
-
Difficulty Level:Really Easy
-
Total Repair Time:Less than 15 mins
-
Tools:Screw drivers
10 of 12 people
found this instruction helpful.
Was this instruction helpful to you?
Thank you for voting!
Light bulb burned out.
Found instruction on internet,
1. Remove anit-tampering screws with punch and hammer
2. Remove the rest of the screws
3. Removed cover
4. Remove burned out bulb and installed new one
5. INstalled cover
6. Installed screws including the anti tampering onces
7. Op tested unit.
Wife is happy.
1. Remove anit-tampering screws with punch and hammer
2. Remove the rest of the screws
3. Removed cover
4. Remove burned out bulb and installed new one
5. INstalled cover
6. Installed screws including the anti tampering onces
7. Op tested unit.
Wife is happy.
Parts Used:

-
Stephen from Cottonwood, AZ
-
Difficulty Level:Easy
-
Total Repair Time:Less than 15 mins
-
Tools:Screw drivers
16 of 33 people
found this instruction helpful.
Was this instruction helpful to you?
Thank you for voting!
replacing light bulb in microwave
We have a Jenn-Air microwave and oven combination that is installed as a "stack" in a cabinet. The light bulb had burned out, and I read some of the posts on the partselect.com site about how others performed this replacement; ours was a bit different.
To replace the microwave light bulb, we had to remove the entire microwave and ... Read more oven stack from the cabinet. There were four anchor screws on the sides (two on each side) of the microwave that were driven in perpendicular to the face of the microwave. There were four more screws that were on the sides of the oven that could be accessed once the oven door was open.
With those anchor screws removed, we had to carefully pull the entire microwave / oven stack from the cabinet to reach the top cover of the microwave. We used an old wooden crate to hold the front of the oven and left the back of the oven resting in the cabinet enclosure. This gave enough room to access the screws on the top cover of the microwave, without having to lift the entire stack down to the floor.
At this point, I could unplug the microwave power cord, which was plugged in to a socket built into the top of the conventional oven part of the stack.
The top cover of the microwave was attached with regular Phillips head screws, so those were easy to remove. Several other instructions indicated I would need a torx or star drive screwdriver, but I did not.
Once the screws were removed from the top cover of the microwave, the cover can slide rearward to be removed. However, there are two metal strips that run vertically along the sides of the microwave and at the top of the microwave, these bends over at a right angle over the top of the microwave. The top cover has tabs that sticks up vertically from the cover, so that the bent strips prevents the cover tabs from passing as the cover is slid backwards. The vertical strips have several screws connecting it to the body of the microwave. On one of the vertical strips, I removed the two of these screws closest to the top of the microwave. Then, I gently pushed a wood chisel, because of the bevel angle, between the vertical metal strip and the microwave body. This moved the bent-over portion of the vertical strip far enough away from the microwave that the tab on the top cover cleared the strip, and I could then remove the top cover.
With the top cover removed, I could see the old light bulb. It is attached with a push-in electrical connection that was easily pulled off. One Phillips head screwdriver held the old bulb in place towards the rear of the microwave. Towards the front of the microwave, a small plastic post holds the front of the bulb. I removed the screw and pulled out the old bulb.
The new bulb fits easily into the same plastic post and screw connection. However, the new bulbs connector prongs are bent at a 90 degree angle to the original bulb. Instead of sticking straight out from the microwave, which was how the old bulb was configured, the new bulb prongs pointed to the right side of the microwave (as viewed from the front). Fortunately, the wiring harness in the microwave that connects to the light bulb had a zip tie that was loose enough to get enough slack for the push-in connector to reach the new bulb's prongs.
After the bulb was in, I reversed the steps described above, making sure to leave the chisel in place until the top cover had been secured back in place. Once the chisel was removed from the vertical metal strip, the bent portion again would prevent easy removal of the top cover. I made sure to plug the microwave power cord back into the outlet on the conventional oven, then we slid the entire unit back into the cabinet enclosure, and I put the anchor screws back to hold the stack into the cabinet.
Three of us worked on this - mostly to help pull the stack out of the cabinet and to help steady it while the front was resting on the wood crate. This is not a single-person job. It was not terribly difficult, but the number of steps is very tedious. I found a helpful YouTube video "How to uninstall/install a Jenn-Air JMC8127DD/JMC8130DD Microwave Oven" posted by Ali The Handy Man. Being able to see that the microwave and oven stack was connected by a "bridge" (as Ali calls it) was a major help in tackling this.
After this, we suspect that Jenn-Air must have not wanted any repairs to their appliances. As I said above, this repair to replace a light bulb seemed unnecessarily tedious.
Read less
Parts Used:
-
William from W LAFAYETTE, IN
-
Difficulty Level:A Bit Difficult
-
Total Repair Time:30 - 60 mins
-
Tools:Screw drivers
6 of 6 people
found this instruction helpful.
Was this instruction helpful to you?
Thank you for voting!