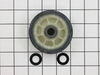
The drum support roller (Dryer Drum Support Roller, Drum Roller and Washer Assembly) holds the drum in the proper position while it spins on the support wheels. This part rotates on the roller shaft w...
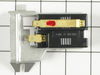
When the igniter reaches a high enough temperature, these coils (Coil Valve, Dryer Gas Valve Coil Kit, Dryer Valve Coil Kit, Gas Valve Solenoid) work together to open the gas valve and allow the gas t...
The front glide is located at the front of the dryer, the drum rides along it. If you hear a metal-on-metal noise when your dryer is running, your front glide may be worn out and require replacing. Th...
This roller shaft is also known as a support roller shaft or a drum roller axle, and is a part for your dryer. The function of this piece is to act as the axle for the drum roller; it provides a place...
This multi rib belt spins the dryer drum during the drying cycle. This belt is 91-5/8 inches in length, 3/8th of an inch wide and has five ridges. It is black in color and made of rubber. You may need...
This part is a retaining ring, sometimes called a retaining clip, that holds the drum support roller onto the shaft of a dryer. It is made entirely of metal and measures less than an inch in diameter....
The idler pulley tightens the drive belt to properly spin the dryer drum. It is attached to an idler bracket. This part comes with the idler pulley and center bearing. To replace this part, you will n...
If your gas dryer is not heating up or igniting, then replacing the flame sensor, located in the burner assembly, could solve it. This part senses heat from the igniter to monitor if it is hot enough ...
If you notice that your dryer is noisy or will not tumble, then you may need to replace the drum roller shaft washer. This drum roller shaft washer is just under an inch in diameter and is sold indivi...
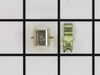
This door catch kit is designed for use in dryers. This is an authentic OEM replacement part. This catch assembly ensures the door of your appliance will close, and remain closed. It allows your appli...
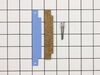
This is a drum felt seal for your dryer. It creates an airtight seal between the dryer rear panel and the back of the drum. It is important that this seal be flexible so it does not interfere with the...
$15.93
In Stock
Questions And Answers for MHG15MNAWW
Be the first to ask our experts a question about this model!
✖
Ask a Question
Ask our experts a question on this model and we'll respond as soon as we can.
first, I unplug the power supply of the dryer then I removed the two screws at the bottom of the dryer then pulled out the front part of the dryer,unplugged the blue & yellow wire for the on/off switch for the door,at the back of the dryer I unscrew the pannel for the belt,disconect the belt,and I unscrew the four screws on both side of t
... Read morehe front pannel to remove the front cover of the drum. Once I removed the front cover of the drum I can now remove the drum itself to access the drum support roller. I unscrew the rollers then replace it with the new once. It was an easy job. Thank you.
PartSelect showed seven different possibilities why the dryer wouldn't heat. I removed the two screws to remove the bottom panel and turned the dryer on and noticed that the heating element that ignites the gas was working fine. This meant that it was not getting gas so it could be the gas valve or one of the two gas valve coils which are
... Read more located on top of the gas valve. I borrowed my neighbor"s ohm meter and touched the two probes on the coils terminals to check for continuity and found that one of the coils read zero. I then took both of the coils out by removing two screws and tested each coil again. One coil read 500-850 and the other read zero. This meant that it was no good so I called for the part and received it in three days. I reassembled the parts and turned the dryer on and it fired up after a few seconds. It works as good as new. The part plus shipping was less than $30. My repairman would have charged me $150-$200. While the dryer was apart I gave it a good cleaning with a vacuum and a toothbrush in delicate areas. I also removed and cleaned the lint trap housing by removing two nuts. I didn't know much about gas dryers, but thanks to PartSelect I easily fixed it myself.
If everything else is working ( tumbler and timer ) except for the heating. Your first bet would be checking your flat style igniter. Mine was cracked, something that I wouldnt have seen unless I had taken it off. Because of the crack no current was being passing through, therefore the igniter wasnt heating to its amber color. Since
... Read morethere wasnt any current the gas valve was doing its job by not allowing any gas to blow out. Dont worry about turning the gas off just disconnect your elecrical outlet. Remove whole front dryer panel by taking 2 front bottom screws out (philip screw driver). Dont pull to hard because there are two wires connected to the panel and dryer that you will have to disconnect. When you get to the igniter disconnect wire plug and use your socket set to loosen the single srew on the igniter, gently wiggle it out by just handling the white ceramic part of the piece, and replace new one in. Just remember to be careful since the dark part of the igniter that heats up is real brittle.


 Diagram and Parts List for Maytag Dryer")

 Diagram and Parts List for Maytag Dryer")