


Models
>
MGR6751BDW
MGR6751BDW Maytag Range - Overview
Models starting with MGR6751BDW
Click on the best match to narrow your results.
Keep searches simple, eg. "belt" or "pump".

LEVELER-FOOT,SCREW,F/S,NYLON
PartSelect #: PS16875974
Manufacturer #: W11665456
This is a leveling leg for your oven, range, or stove. The leveling legs on your oven allow your appliance to sit perfectly flat. The new one may be longer in length than your original, but will work...
$21.18
In Stock

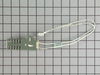
Short Oven Sensor Kit
PartSelect #: PS2003225
Manufacturer #: 12001655
The temperature sensor on your oven detects the temperature within the oven cavity. If you notice your oven is too hot, not hot enough, or does not heat evenly, the short oven sensor kit may need repl...
$46.33
In Stock


BUMPER
PartSelect #: PS11770098
Manufacturer #: W10919249
Sold individually. Must be held in with adhesive.
$14.08
In Stock

Screw, 8/18 x 3/8
PartSelect #: PS11746840
Manufacturer #: WP90767
This screw is sold individually.
$5.42
In Stock

Oven Rack
PartSelect #: PS11744745
Manufacturer #: WP7801P173-60
This is a replacement oven rack and it is designed for use with ranges and ovens. This is a genuine OEM replacement part. The rack provides a level and stable surface for cookware inside of your appli...
$90.62
In Stock

Screw with Washer
PartSelect #: PS11744138
Manufacturer #: WP74006515
This is a replacement screw and washer for your oven/range. It is a Phillips-head screw approximately half an inch long, and the washer is approximately 1 inch in diameter. The screw attaches the oven...
$7.95
In Stock

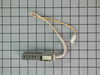
IGNTR-OVEN
PartSelect #: PS16744717
Manufacturer #: W11596211
This bake or broil igniter ignites the gas for the oven burner by glowing white. If any of the following symptoms occur, it is best to replace this part: little to no heat when baking, oven will not t...
$58.78
In Stock

Screw
PartSelect #: PS12349731
Manufacturer #: W11233072
This is a multi-use and multi-appliance screw. It can be used on a microwave, refrigerator, range/oven, air conditioner, dehumidifier, washer, or dryer. The measurements of this screw are 8 x 1/2 inch...
$20.79
In Stock

Surface Burner Spark Igniter
PartSelect #: PS11746068
Manufacturer #: WP8523793
This part helps your burner ignite and produce flame.
$25.35
In Stock

Screw - 10-16 x 1
PartSelect #: PS11741409
Manufacturer #: WP3387230
This screw is sold individually.
$7.95
In Stock

Door Gasket
PartSelect #: PS11749287
Manufacturer #: WPW10162384
The oven door gasket on your range functions as a seal between the warm interior of your oven, and the outside. It prevents heat from fleeing your oven when the door is closed. Before making any repai...
$87.22
In Stock
Common Symptoms of models starting with MGR6751BDW
[Viewing 9 of 9]Little to no heat when baking
Fixed by
these parts
these parts


Show All
Will Not Start
Fixed by
these parts
these parts

Show All
Gas igniter glows, but will not light
Fixed by
these parts
these parts
Show All
Oven not heating evenly
Fixed by
these parts
these parts

Show All
Element will not heat
Fixed by
these parts
these parts
Show All
Door won’t close
Fixed by
these parts
these parts


Show All
Oven is too hot
Fixed by
these parts
these parts
Show All
Touchpad does not respond
Fixed by
these parts
these parts
Show All
Little to no heat when broiling
Fixed by
these parts
these parts
Show All


Keep searches simple. Use keywords, e.g. "leaking", "pump", "broken" or "fit".
F1 code - gas over would not heat.
Repair tech checked oven and said the control panel was bad and needed to be replaced. The new control panel would cost over $450.00! I found that the oven sensor was bad and replaced it for $30.00. The old oven sensor had failed following a self cleaning cycle. I found that the wires coming out of it were burnt.
Replacing ... Read more the oven sensor was very easy. I removed the back panels 6 screws to gain access to the sensor's connection. I then removed the 2 screw that hold the sensor in place inside the oven and pulled the old sensor out through the oven. I reversed this process to place the new sensor in the oven.
Replacing ... Read more the oven sensor was very easy. I removed the back panels 6 screws to gain access to the sensor's connection. I then removed the 2 screw that hold the sensor in place inside the oven and pulled the old sensor out through the oven. I reversed this process to place the new sensor in the oven.
Read less
Parts Used:

-
george from birmingham, AL
-
Difficulty Level:Easy
-
Total Repair Time:15 - 30 mins
-
Tools:Screw drivers
169 of 181 people
found this instruction helpful.
Was this instruction helpful to you?
Thank you for voting!
mice had made nests in the insulation wrap in the range
I numbered every part. ex: 1 L., for first part removed left side. I used a magic marker to circle the holes and wrote the number of screws used on the part, set the srews in a separete place, so that I new where these screws went to. The cleanup was pretty time consuming, but I was able to keep my stove, when every repairman I called to
... Read more
fix my stove told me I was better off buying a new stove. ($600.00 stove 2 years old)Please Note: The insulation blanket needed for the entire stove is two pieces, the sides and top are one part # and the bottom and back, are another part #. I did not know this. I just purchased the top and sides. I got lucky, the back and bottom were still in good shape. So I guess I should have read the description of the part more carefully to see what it covers, before I ordered it. It took two people two hours to do the work, it was really nice to have an extra set of eyes, to remember what direction pieces of metal from the stove went. I would do it all over in a heart beat instead of buying a new stove.
Read less
Parts Used:

-
Wendy from Red Hook, NY
-
Difficulty Level:Easy
-
Total Repair Time:More than 2 hours
-
Tools:Screw drivers
98 of 132 people
found this instruction helpful.
Was this instruction helpful to you?
Thank you for voting!
Ignitor was bad on upper oven
First I removed the lower tray and all parts covering the ignitor on the upper oven. 2. Then I removed the screws holding down the ignitor and flame distributor. 3. I then had to pull out the oven from the wall and remove the back panel to expose the wires connecting the ignitor. This required the removal of about six screws but they
... Read more
were fairly easy to get to. 4. I disconnected the ignitor from the back panel then went around to the front of the oven and pulled out the ignitor and all of the attached parts. 5. Here's the tricky part. The screws holding the ignitor in place had fused from the heat and then the threads stripped when I tried to remove them. I had to use a dremel tool and cutting wheel to carefully cut the screws off and then went to buy some replacement screws from the hardware store. 6. I replaced them with a nut and a bolt, to hopefully avoid the same problem for later replacement if necessary. 7. I then replaced everything the same way it came out and all is working like new!
Read less
Parts Used:

-
David from Temple Terrace, FL
-
Difficulty Level:A Bit Difficult
-
Total Repair Time:1- 2 hours
-
Tools:Nutdriver, Pliers, Screw drivers
70 of 80 people
found this instruction helpful.
Was this instruction helpful to you?
Thank you for voting!