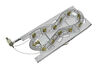
When connected to electricity the dryer heating element glows red hot and generates heat. When air is blown over it, it heats the air which is used to dry the clothes. The heating element fits inside ...
$94.64
In Stock
Order within the next 3 hrs and your part ships today!
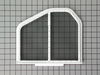
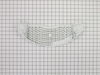
The filter collects lint during the drying cycle. This filter is 12 1/2 inches wide and 10 1/2 inches deep. Replacing the lint filter is an easy repair which requires no tools. When replacing the lint...
$61.46
In Stock
Order within the next 3 hrs and your part ships today!
This Idler Pulley includes the tri-ring and gasket and everything included here is manufacturer-certified. This part maintains correct tension on the drive belt in order to spin the drum properly. If ...
$26.95
In Stock
Order within the next 3 hrs and your part ships today!
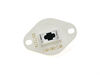
The internal-bias thermistor (Thermistor, Dryer Thermister, Dryer Thermistor) prevents the dryer from overheating by monitoring and controlling the temperature of the inside of the dryer drum. It is l...
$47.74
In Stock
Order within the next 3 hrs and your part ships today!
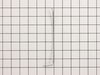
The Drive Belt is a 93 1/2" belt which wraps around the dryer drum to allow tension and movement. If broken the dryer will not turn properly, or there may be loud noises. The part is rated as "medium"...
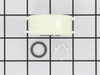
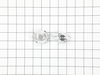
If you notice that your dryer is noisy or will not tumble, you may need to replace the tri ring. This part is triangular, and is less than an inch in size. Tri rings can be found both on the idler pul...
$13.42
In Stock
Order within the next 3 hrs and your part ships today!
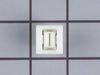
If your washer shakes or vibrates loudly when it reaches its max speed, check that the leveling legs are even. To ensure that the washer is firmly on the ground using all four legs, adjust the legs so...
$11.40
In Stock
Order within the next 3 hrs and your part ships today!
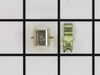
This door catch kit is designed for use in dryers. This is an authentic OEM replacement part. This catch assembly ensures the door of your appliance will close, and remain closed. It allows your appli...
$32.34
In Stock
Order within the next 3 hrs and your part ships today!
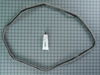
Also known as Thermal Cut-Off kit. The thermostat acts as a safety mechanism that keeps the dryer from overheating and the fuse is like a backup system - it's set to trip at a higher temperature than...
$53.28
In Stock
Order within the next 3 hrs and your part ships today!
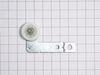
The idler pulley wheel is now sold with this arm. This idler pulley is for dryers.
Idler pulley maintains correct tension on the drive belt to spin the drum.
$26.79
In Stock
Order within the next 3 hrs and your part ships today!
This is the moisture sensor for your dryer. It helps detect the amount of moisture in your clothes during the dryer cycle. If you notice your clothes are still wet after an automatic dryer cycle is do...
$10.72
In Stock
Order within the next 3 hrs and your part ships today!
Questions And Answers for MED9700SQ0
Ask our experts a question about this model and we'll get back to you as soon as possible!
6 questions answered by our experts.
Sort by:
< Prev
1
2
Next >
Search filter:
Clear Filter
Your search term must have 3 or more characters.
Keep searches simple. Use keywords, e.g. "leaking", "pump", "broken" or "fit".
Sorry, we couldn't find any existing answers that matched.Try using some different or simpler keywords, or submit your new question by using the "Ask a Question" button above!
Craig
14 days ago
You answered for Fred re door switch and actuator kit, part number PS334284
Everything begins as expected - setting heat, time etc. Push and hold Start, system clicks, "Sensing" light comes on, motor/drum doesnt turn. Manually depressed door switch, light turns off - still wont run. Checked belt, reset breaker.
Can actuator be checked for electrical power w/multimeter?
How can we tell if door switch, actuator is faulty?
For model number MED9700SQ0
Hello Craig, thank you for contacting us. According to our research, the issue is most probably with the door switch, part number PS334284. You can test the door switch by checking the continuity between the terminals using the multimeter. We hope this information helps!
Not getting heat. Reset breaker. No heat. Tested for 240v ac at element leads while on and running. No voltage. Ohm test element 10.0ohms. Thermostat test 0.1 ohm. Thermal fuse there's just a 1 on the left. I'm thinking that's the problem but not 100% sure. You think it's the thermal fuse?
For model number MED9700SQ0
Hello Dan, Thank you for the question. You should receive a reading of 0. Resistance that is low, or near 0, means that the electrical flow is good and the part does not need to be replaced. There are a few thermostats to tests, so we are not sure what Thermostat you have tested but we suggest testing them all. We hope this helps.
The control lock light is on. I unplugged it thinking that might reset the controls. Plugged it back in and the control locked light is still on.
For model number MED9700SQ0
Hi Charlene, thank you for the question! Based on our research, you may need to press and hold for 3 seconds the "Cycle End Signal" button on the control panel to unlock the controls. We hope this solves your problem!
Was this helpful?
Thank you for voting!
Ken
August 8, 2023
Clothes too hot, even on "air only" setting.
* Dryer duct and venting cleared out
* Thermistor registers 9.8K ohms, ambient temp
* High-limit thermostat registers 0 ohms, ambient temp
Thoughts?
For model number MED9700SQ0
Hello Ken, thank you for reaching out. Based on our understanding of the issue, we would suggest checking the moisture sensor, part number PS11741408. If it is good, we would recommend replacing the heating element, part number PS11741416. We hope this solves your problem!
Lights come on when you press start, you hear a click . Doesn’t start
For model number MED9700SQ0
Hi Fred, thank you for contacting us. Based on our understanding of the issue, we would suggest you check the door switch and actuator kit, part number PS334284, as it is the most likely cause of this issue and may need to be replaced. We hope this sorts out your problem!
Remove the kick plate from the bottom of the dryer by sliding a putty knife along the top edge to release the plastic clamps, one on each side about 4" in from the edges. The kick plate folds out and down. You will see the heat shield on the right, held in by one hex head screw. Remove screw and heat shield. The element is positioned in a
... Read moren open-front housing and is fastened to the left side of the housing by two hex head screws, located on the "rail" of the element and right near the two wires. Remove the hex-head screws that hold the element in place and disconnected the two wires by pulling them out by hand or with needle nose pliers. The only difficulty here is the cramped working area...I recommend a stubby socket driver for these two screws. Most of this I had to do by feel because I could not see the screw heads. Once the screws are out and the wires have been disconnected, slide the old element straight out toward you. You may need to disconnect a small plastic hose located to the left front of the element, but this hose just pulls right off. Vacume the dust & lint build-up out of the whole area, wipe out the element housing and clean up the whole underside of the dryer prior to installing the new element. Installation is reverse of removal. It also might be a good opportunity to clean out your exhaust duct and the vent to the outside. (Never use the aluminum foil-accordian-type duct.) If the exterior dryer vent has any kind of screen over it, remove it and get rid of it. Screens collect lint, lint builds up and burns out elements.
The door had always opened with the wrong swing and it wasn't til I needed to repair this that I noticed you could change the swing. I changed the swing of the door and then noticed that the clip was included on both sides so i did not need to repair the catch. I still have the part so when it breaks again, I can just pop it in.


 Diagram and Parts List for Maytag Dryer")