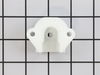
This hi-limit thermostat acts as a safety mechanism that keeps the dryer from overheating. With this thermostat, a dryer's heating element will cut out if the internal temperature reaches 260 degrees...
This part is found in the same location as the Terminal Block at the back of the Dryer. It acts as a safety device which prevents your appliance from overheating.
We're sorry, but our Q&A experts are temporarily unavailable.
Please check back later if you still haven't found the answer you need.
1 question answered by our experts.
Sort by:
< Prev
1
Next >
Search filter:
Clear Filter
Your search term must have 3 or more characters.
Keep searches simple. Use keywords, e.g. "leaking", "pump", "broken" or "fit".
Sorry, we couldn't find any existing answers that matched.Try using some different or simpler keywords, or submit your new question by using the "Ask a Question" button above!
Laurie
February 8, 2020
Why is my dryer beeping incessantly
For model number DSXH47EG1WW
Hello and thank you for writing.
Unfortunately, the beeping is a result of a bad control panel PS1482224. Unplugging or resetting the dryer will not solve the problem. The board PS12726610 will need to be replaced. If you are handy with tools and electronics, you can avoid a service call if you do the work yourself to solve the beeping. We hope this helps. Please contact us anytime if you require further assistance.
Unplug power. Take the top off. Take front off, unplug the two wire connections. Undo belt from back access. Pull up on drum and remove. Unscrew 4 screws that hold on the element housing, remove. Reverse steps to put back together.
About a year ago I had to replace the front sliders. I had thought at the time that I should replace the belt and check the rear bearing, but I was in a hurry, and the wash was backing up, so I didn't do it. Oops. Within 6 months dryer started squeaking. Did I get around to pulling it out, and greasing rear bearing. Nope. Dbl oops.
... Read morer /> Luckily on this model, everything is pretty basic, strong, and well made. The rear bearing after 9 years of constant use (5 person family)had simply run out of grease, and then worn into the plastic housing that holds the rear bearing. NOTE TO ALL -- probably too late if you're reading this -- but just grease your rear bearing by using a grease gun with high temp grease (car bearing grease works fine)through the small hole at back of dryer dead center of drum. It will take 5 min, and probably prevent the need for this repair, or delay it substantially.
Unplug dryer, turn off gas, and disconnect gas hose and duct hose. Inspect the latter two and consider repacing while you're at it. Move dryer to where you can get at front and back without cursing too much.
So...take a putty knife, and put a little masking tape around the blade if you're worried about scratching the finish on your dryer. If you're doing this repair, your dryer is probably at least as old as mine, and you can skip the tape and just bear with some small scratches.
Slide the putty knife into the groove between lid and front of dryer and pop up. (held by spring clips)
Now tip up lid and slide back, you may have to wrestle it a bit, or it may come off like a charm. Put it out of the way.
Take a sec to look at the interior wiring (you unplugged the dryer, right?) If you see any worn or raw spots, take some electrical tape and fix. Should be fine though. Take a vacuum and suck up any extraneous lint, dirt etc.
Tip dryer up slightly and block with wood or a brick. There are two screws at bottom -- undo these. IF they're missing, no worries, they're not critical. Put dryer back down.
Get a trouble light or a good lamp and shine ti wher you can see interior of dryer. There are two screws, one on each side on the INSIDE of the dryer, connecting the side panels to the front. Undo those. Put them in a little baggie and mark them "interior fr screws." I know, you're thinking "I can just remember them." But trust me, this way, you can't lose them or screw up. Now use the putty knife to pop the front panel off the sides. Do this gently, and don't yank the front way back, as the drum will drop. Oh, on mine there was a yellow plastic doohicky in the middle at top. Take that off too (one tiny screw) put the screw back in part way and stick the doohicky in the baggie.
OK, so the front panel should now be loose. It is still on a couple of little tabs at the bottom, which you prefer not to bend. So lift the front slightly and then back it out, while you (or preferably a helper) holds the drum so you can let it down gently. The front is attached to all sorts of wiring. You don't need to disconnect ANYTHING. THe front should be able to be moved away to the right like a door. Rest this up against something so as to not strain the wiring. On the front of the door are the felt and plastic sliders. If they look beat up or worn, replace them now -- or like me, you can do the job twice... That part is super simple...
Now, got back of dryer, there is a vent at back bottom. Remove three (or less) screws) and remove little door. Probably substantial lint here. Vacuum like crazy. The belt comes down around the drive pulley, and then up and over the idler pulley (to keep tension on belt. IF this feels loose/easy to move, replace the belt. In fact, if the belt is over 5 years old, replace the belt. (or when it breaks, you get to open everything again). Just unhook the spring and the idler will be loose and you can remove the belt off the pulleys -- it's now just around the drum. Slide the idler pulley off the stem
We unlatched the top of the dryer by pushing a screwdriver under the two areas where there were metal clips holding it down. We then removed the yellow clip screwed onto the top frame. We removed the front frame of the dryer by unscrewing the two screws holding the front frame on--one on either side. We didn't undo the wiring to the con
... Read moretrols, we just kind of pivoted the front aside. We pulled the drum out from the plastic holder attached to the back of the dryer frame also unwinding the belt encircling the drum. Then we unscrewed the 3 screws holding the bearing to the back of the drum. We removed the plastic that had held the bearing by undoing the screws to the back of the frame. We installed the new bearing by screwing it to the back of the drum with 3 screws. We installed the plastic holder to the back of the frame by 2 screws and put the little ball bearing in. We used the grease that came with the kit to grease up the plastic where it held the big bearing attached to the back of the drum and inserted the drum back into the body of the dryer frame, pushing the bearing into the plastic holder. The hard part was getting the belt back around the drum and through the pulley on the motor that holds the belt. When that was accomplished, we put the yellow plastic holder back on the front frame with the screws and put the front back on after thoroughly cleaning the inside bottom area where there was a lot of lint. Then we snapped the top back into place.