


Models
>
ALW880QAW
ALW880QAW Amana Washer - Overview
Models starting with ALW880QAW
Click on the best match to narrow your results.
Keep searches simple, eg. "belt" or "pump".

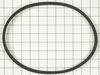
Thrust Washer
PartSelect #: PS11740482
Manufacturer #: WP233520
This genuine OEM washer has a 3/4 inch outside diameter. This thrust washer can be used on most makes and models of dryers. A complete list of compatible dryers is available below. The washer is found...
$7.95
In Stock

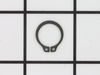
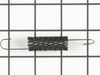
Retaining Ring
PartSelect #: PS11740487
Manufacturer #: WP23748
The metal retaining ring, which is under an inch long, holds the rear wheels on the axels of the dryer. The main reason why it would need to replaced is if the retaining ring has sprung out of place o...
$13.58
In Stock

Screw, 8/18 x 3/8
PartSelect #: PS11746840
Manufacturer #: WP90767
This screw is sold individually.
$5.42
In Stock

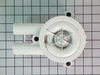
Drain Pump
PartSelect #: PS1594294
Manufacturer #: 27001233
This pump is attached to the motor and helps expel water from the washing machine. It is activated after the spin speed is maintained for a specific period of time.
No Longer Available

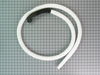
Hose Clamp
PartSelect #: PS11743008
Manufacturer #: WP596669
This hose clamp is used in a wide variety of household appliances. Most often it is found in washers, dishwashers, refrigerators, freezers, dehumidifiers, garbage disposals, or air conditioners. This ...
$7.76
In Stock

Adjustable Leveling Leg
PartSelect #: PS2021026
Manufacturer #: 22003428
If your washer shakes or vibrates loudly when it reaches its max speed, make sure the 4 levelling legs are even. Adjust the legs so that the machine is level, and tighten the locking nuts on the legs ...
$18.47
In Stock

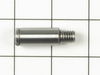
Idler Pulley Shaft
PartSelect #: PS11742857
Manufacturer #: WP56461
This shaft is made to fit the center of the idler pulley wheel of many clothes dryers. It is less than two inches long, and is made of metal.
$65.61
In Stock

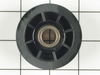
Idler Pulley Wheel
PartSelect #: PS11742250
Manufacturer #: WP40045001
This wheel has a center metallic bearing. A dryer's idler pulley wheel serves to help the belt to rotate the drum.
$63.73
In Stock

Spring Retaining Clip
PartSelect #: PS11739294
Manufacturer #: WP22001650
This spring retaining clip is just under 1 inch long. The clip is made entirely of metal and is attached to the back wall of the washer, under the console. If your washer is vibrating and louder than ...
$11.10
In Stock

V-Style Spin and Agitate Belt - 28-3/4 inches long
PartSelect #: PS11740577
Manufacturer #: WP27001006
This v-style spin and agitate belt is 28-3/4 inches long and half of an inch wide. It is all black in color and made entirely of rubber.
$67.36
In Stock

Hose Clamp
PartSelect #: PS11740613
Manufacturer #: WP285655
The hose clamp is used to hold the water hose in place which will prevent the hose from leaking water. Sometimes the clamp may lose its ability to latch on, causing a leaking washer. For the installat...
$11.10
In Stock

Lid Hinge Mounting Screw
PartSelect #: PS11748588
Manufacturer #: WPW10119828
Sold individually. NOTE: The color on the screw may not be the same as the image, but will still function the same.
$11.80
In Stock
Common Symptoms of models starting with ALW880QAW
[Viewing 7 of 7]Leaking
Fixed by
these parts
these parts

Show All
Noisy
Fixed by
these parts
these parts

Show All
Burning smell
Fixed by
these parts
these parts
Show All
Will not agitate
Fixed by
these parts
these parts
Show All
Will not drain
Fixed by
these parts
these parts
Show All
No hot or cold water
Fixed by
these parts
these parts

Show All
Spins slowly
Fixed by
these parts
these parts
Show All


Keep searches simple. Use keywords, e.g. "leaking", "pump", "broken" or "fit".
Spin cycle sounded like freight train
Spin cycle sounded like freight train, bad bearing, apparently they all fail the same way, this revised parts kit should prevent premature failure in future.
The following is easy for an experienced mechanic of any type, fully doable by an accomplished DYI'er, between this writeup and the kit instructions (which I do not fully ... Read more follow) you should be fine. Probably avoid this task if you aren't either of the aforementioned.
Remove lower pannel, top pannel, lift top back. Remove fill hose to outer tub, clear tube to outer tub. Remove entire outer cabinet from base, exposing base and tub. Remove augur assy by popping off cap removing inner bolt, lifting augur out. Remove top of outer tub cap assy by pressing down where each latch is and gently prying latch open with screwdriver. Remove bolts holding in inner tub and remove inner tub. Unscrew the pastic nut on transmission shaft using channel locks (counterclockwise from top), don't worry about destroying this part since a new one is in the kit. Remove (pry off with your hands, don't worry about breaking it) the 'lint filter' (looks like a frisbee) and trash it. Remove the large (about 8")aluminum hub (that the inner tub bolts to) by unscrewing counterclockwise. No special tool needed, just use air hammer if available against one of the T shaped castings to get it loose, otherwise use a drift and hammer same way. Don't worry about messing up the part since a new one is in the kit. Remove the outer tub drain hose, remove six screws holding outer tub, lift outer tub out. Turn outer tub upside down and use a wide crowbar/nail puller to CAREFULLY pry out the bearing/seal assy from the bottom of the tub. Take your time working your way completely around the bearing/seal several times so it doesn't get too crooked while removing it. Clean everything thoroughly. Inspect the area of the bottom of outer tub where you removed the bearing/seal. If all is well and there are no gouges, get it wet with clean water and then carefully press the new bearing/seal assy in with the heal of the palm of your hand, working your way around it so it doesn't get crooked while pressing in. Do not use sealer (unless there are gouges) and do not hammer this. Make sure it is fully seated in the outer tub. Do reverse to put everything back together. I tightened the aluminum hub the same way I loosened it, no problem. There are some rubber plugs in the kit to install in some holes in the tub, scrape or clean any gunk off the inner tub around these holes so the rubber plugs will seat properly. Carefully snug the plastic nut with channelocks by gripping it from the top as opposed to the side (so the fins don't break). Note there is a small o-ring on the transmission shaft to change before replacing the augur. Nice and quiet after the repair, hopefully the new kit (and trashing the 'lint filter') makes it last longer... LOL, it's a bit disturbing seeing the gunk under the augur knowing that has been there all this time while 'cleaning' the laundry! I'll probably start removing the augur every so often to clean under there.
Read less
Parts Used:

-
Mike from Houston, TX
-
Difficulty Level:Easy
-
Total Repair Time:More than 2 hours
-
Tools:Socket set
98 of 106 people
found this instruction helpful.
Was this instruction helpful to you?
Thank you for voting!
Water leaking on floor from "mysterious place underneath washer"
Water was leaking on the floor during the wash cycle and especially during draining of the washer. I removed the front panel at ground level and watched while draining after a rinse.
I t was obvious that water was spraying from a hole in the rubber end of the hose (the hose is a fused assembly of a plastic section and a rubber ... Read more section).
So, I finished draining, removed the hose (required pliers to squeeze off a hose clamp).
Upon inspecting the hose, it was also apparent that the hole was caused by rubbing against a support bracket for the motor. This should not happen, but it did because the plastic standoff supposed to keep the hose away from the bracket was installed 180 degrees backwards.
So, I simply replaced the hose and turned the bracket around to the correct orientation.
Everything worked as planned and my repair cost was much less than if I had called someone out.
Read less
Parts Used:

-
Bryan from Chicago, IL
-
Difficulty Level:Easy
-
Total Repair Time:Less than 15 mins
-
Tools:Pliers, Socket set
50 of 55 people
found this instruction helpful.
Was this instruction helpful to you?
Thank you for voting!
tub seal/bearing failed due to dirt
First removed the front panels and tilted the top back.Disconnected the electrical connector to the motor,removed the cabinet base screws and slid the entire cabinet away from the interior after disconnecting the clear tube and the water feed to the panel.removed bolt inside agitator and remove agitator.removed the plastic hold down cente
... Read more
r nut with channel lock pliers.remove top cover from outer tub(pry out over tabs with screw driver).remove 4 bolts holding inner tub and remove tub.remove inner bottom tub support with pliers(screws off).remove 6 machine screws from frame to bottom of plastic outer tub and remove tub.Carefully pry seal/bearing out of tub from the bottom(remember its just plastic).install is just the reverse of the dissassembly.Note: This is the second seal/bearing for this washing machine in less than 2 yrs..I work in the Site developement/construction field and my clothes get extremely dirty.The dirt is being held under the inner tub support and driven down thru the seals and into the bearing(great design).This go around the intsructions called for the removal of the plastic lint filter under the tub support which I believe was a large part of the problem.I hope so.I'm not going to spend $90 every 2 yrs. on this machine.Good luck.
Read less
Parts Used:

-
John from Salford, PA
-
Difficulty Level:Easy
-
Total Repair Time:1- 2 hours
-
Tools:Nutdriver, Pliers, Screw drivers, Socket set, Wrench set
49 of 59 people
found this instruction helpful.
Was this instruction helpful to you?
Thank you for voting!